
As an introduction, it is important for you to have an idea about the technology behind the topics just mentioned and our reasons for writing this book, as well as to know about the different devices and middleware libraries that can be used with OpenNI.
Motion detectors are part of our everyday life, from a simple alarm system to complicated military radars or an earthquake warning system, all using different methods and different sensors but for the same purpose—detecting motion in the environment.
But they were rarely used to control computers or devices until recent years. This was usually because of the high price of capable devices and the lack of powerful software and hardware for consumers, and maybe because end users did not need this technology. Fortunately, this situation changed after some of the powerful players in computer technology tried to use this idea and supported other small innovation companies in this task.
We believe that the idea of controlling computers and other devices with environment-aware input devices is going to grow in computer industries even more in the coming years. Computers can't rely any more on a keyboard and a mouse to learn about real environments. Computers are going to control more and more parts of our everyday life; each time they need to understand better our living environment. So if you are interested in being part of this change, work through this book.
In this book, we are going to show you how to start using current devices and software to write your own applications or games to interact with the real world.
In this chapter, we will introduce you to some usable technologies and devices, and then introduce some of the frameworks and middleware before speaking a little about how you can make applications or games with Natural Interactive User Interfaces (NIUI).
Tip
This way of interacting with a computer is known as 3DUI (3D User Interaction or 3D User Interfaces), RBI (Reality based interaction), or NI (Natural Interaction). To know more, visit http://en.wikipedia.org/wiki/3D_user_interaction and http://en.wikipedia.org/wiki/Natural_user_interface.
The keyboard and mouse are two of the most used input devices for computers; they're the way they learn from outside of the box. But the usage of these two devices is very limited and there is a real gap between the physical world and the computer's understanding of the surrounding environment.
To fill this gap, different projects were raised to reconstruct 3D environments for computers using different methods. Read more about these techniques at http://en.wikipedia.org/wiki/Range_imaging.
For example, vSlam is one such famous project designed for robotic researchers who try to do this using one or two RGB cameras. This project is an open source one and is available at http://www.ros.org/wiki/vslam.
However, since most of these solutions depend on the camera's movement or detection of similar patterns from two cameras, and then use Stereo triangulation algorithms for creating a 3D map of the environment, they perform a high number of calculations along with using complex algorithms. This makes them slow and their output unreliable and/or inaccurate.
There are more expensive methods to solve these problems when high accuracy is needed. Methods such as Laser Imaging Detection and Ranging (LIDaR) use one or more laser beams to scan the environment. These methods are expensive and actually not a good option for targeting end users. They are usually big in size and the mid-level models are slow at scanning a 3D environment completely. Yet, because they use ToF (Time of Flight) for calculating distances, they have very good accuracy and a very good range too. The devices that use laser beams are used mainly for scanning huge objects, buildings, surfaces, landforms (in Geology), and so on, from the ground, an airplane, or from a satellite. Read more on http://en.wikipedia.org/wiki/Lidar.
To know more about the other types of 3D scanners, visit http://en.wikipedia.org/wiki/3D_scanner.
In 2010, Microsoft released the Kinect device for Xbox 360 users to control their console and games without a controller. Kinect originally uses PrimeSense's technology and its SoC (System on Chip) to capture and analyze the depth of the environment. PrimeSense's method of scanning the environment is based on projecting a pattern of a hundred beams of infrared lasers to the environment and capturing these beams using a simple image CMOS sensor (a.k.a. Active Pixel Sensor or APS) with an infrared-passing filter in front of it. PrimeSense's SoC is then responsible for comparing the results of the captured pattern with the projected one and creates a displacement map of the captured pattern compared to the projected pattern. This displacement map is actually the same depth map that the device provides to the developers later with some minor changes. This technology is called Structured-light 3D scanning. Its accuracy, size, and error rate (below 70 millimeters in the worst possible case) when compared to its cost makes it a reasonable choice for a consumer-targeted device.
To know more about Kinect, visit http://en.wikipedia.org/wiki/Kinect.
PrimeSense decided to release similar devices after Kinect was released. Carmine 1.08, Carmine 1.09 (a short range version of Carmine 1.08), and Capri 1.25 (an embeddable version) are the three devices from PrimeSense. In this book, we will call them all PrimeSense sensors. A list of the available devices from PrimeSense can be viewed at http://www.primesense.com/solutions/sensor/.
Before the release of PrimeSense sensors, Asus released two sensors in 2011 named Asus Xtion (with only depth and IR output) and Asus Xtion Pro Live (with depth, color, IR, and audio output) with PrimeSense's technology and chipset, just as with Kinect, but without some features such as tilting, custom design, higher resolution, and frame rate compared to Kinect. From what PrimeSense told us, the Asus Xtion series and PrimeSense's sensors both share the same design and are almost identical.
Both of PrimeSense's sensors and the Asus Xtion series are almost twice as expensive compared to Microsoft Kinect, yet they have a more acceptable price than the other competitors (in the U.K., Microsoft Kinect is priced at $110).
Here is an illustration to help you understand how Kinect, Asus Xtion, and PrimeSense sensors work:
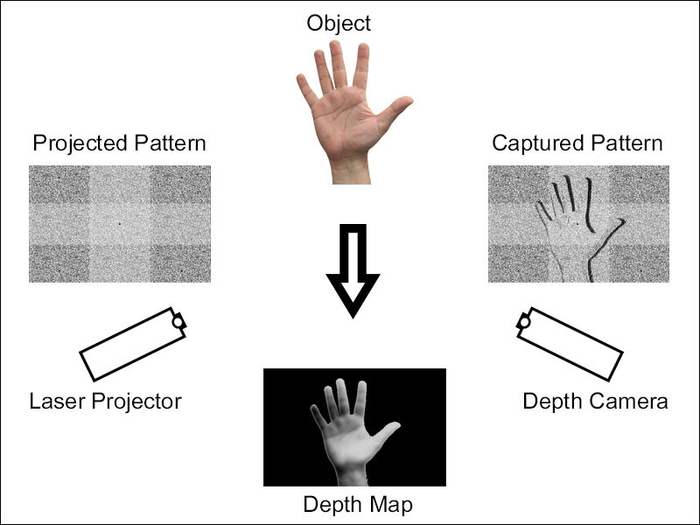
More information about this method is available on Wikipedia at http://en.wikipedia.org/wiki/Structured-light_3D_scanner.
After the release of Kinect, other devices aimed to give better and faster outputs to users and yet keep the price in an acceptable range. These devices usually use ToF to scan environments and must have better accuracy, at least in theory. SoftKinetic devices (the DepthSense series of devices) and pmd[vision]® CamBoard nano are two of the notable designs. Currently, there is no support for them in OpenNI and they are not very popular compared to Kinect, Asus Xtion, and PrimeSense's sensors. Their resolution is less than what PrimeSense-based devices can offer, but their frame rate is usually better because of a simple calculation they use to produce a depth frame. Current devices can offer from 60 to 120 frames per second ranging from 160 x 120 to 320 x 240 resolutions, whereas Kinect, Asus Xtion, and PrimeSense's sensor can give you up to 640 x 480 resolutions at 30 to 60 frames per second. Also, these devices usually cost more than PrimeSense-based devices (from $250$ to $690 at the time of writing this book).
Microsoft introduced Xbox One in 2013 with a new version of Kinect, known as Kinect for Xbox One (a.k.a. Kinect 2), which uses ToF technology and custom-made CMOS for capturing both RGB and depth data along with projecting beams of laser. From what Microsoft told the media, it is completely made by Microsoft and, unlike the first version of Kinect, this time there is no third-party company involved. It is unknown if this new version of Kinect is compatible with OpenNI, but Microsoft promised a Windows SDK, which means we can expect a custom module for OpenNI from the community at least.
You can read more about ToF-based cameras and their technologies on Wikipedia at http://en.wikipedia.org/wiki/Time-of-flight_camera.
Fotonic is another manufacturing company for 3D imaginary cameras. Fotonic E series products are OpenNI-compatible TOF devices. You can check their website (http://www.fotonic.com/) for more information.
In this book, we use Asus Xtion Pro Live and Kinect, but you can use any of PrimeSense's sensors and it will give you the same result as Asus Xtion Pro without any headache. We even expect the same result with any other OpenNI-compatible device (for example, Fotonic E70 or E40).
After having good hardware for capturing the 3D environment, it is very important to have a good interface to communicate and read data from a device. Apart from the fact that each device may have its own SDK, it is important for developers to use one interface for all of the different devices.
Unfortunately, there is no unique interface for such devices now. But OpenNI, as the default framework, and SDK, for PrimeSense-based devices (such as Kinect, PrimeSense sensors, and Asus Xtion), have the capacity to become one.
OpenNI is an organization that is responsible for its framework with the same name. Their framework (that we will call OpenNI in this book) is an open source project and is available for change by any developer. The funder of this project is PrimeSense itself. This project became very famous because of being the first framework with unofficial Kinect support when there wasn't any reliable framework. In the current version of OpenNI, Kinect is officially supported via the Microsoft SDK.
OpenNI, on one hand, gives device producers the ability to connect their devices to the framework, and on the other hand gives developers the ability to work with the same API for different devices. At the same time, other companies and individuals can develop their own middleware and expand the API of OpenNI. Having these features gives this framework the value that other competitions don't have.
As mentioned in the title of the book, we will use OpenNI as a way to know this field better and to develop our applications.
NiTE is a middleware based on the OpenNI framework and was developed by PrimeSense as an enterprise project.
NiTE gives us more information about a scene based on the information from the depth stream of a device.
We will use NiTE in this book for accessing a user's data and body tracking as well as hand tracking and gesture recognition.
NiTE is not the only middleware; there are other middleware that you can use along with OpenNI, such as the following:
Hand Grab Detector from PrimeSense for recognizing hands in the closed mode: http://www.openni.org/files/grab-detector
3D Hand Tracking Library and TipTep Skeletonizer for recognizing fingers: http://www.openni.org/files/3d-hand-tracking-library and http://www.openni.org/files/tiptep-skeletonizer
3D Face Identification from the University of Southern California for face recognition: http://www.openni.org/files/3d-face-identification
And a whole lot more. A list of SDKs and middleware libraries is available at OpenNI.org (http://www.openni.org/software/?cat_slug=file-cat1).
With the seventh generation of video game consoles, interacting with users via motion detection became popular, with the focus on improving gaming experience, starting with the Nintendo Wii controller and followed by Microsoft Kinect and Sony PlayStation Move.
But gaming isn't the only subject capable of using these new ways. There are different cases where interacting with users via natural ways is a better option than traditional ways, or at least can be used as an improvement. Just think of how you can use it in advertising panels, or how you can give product information to users. Or you can design an intelligent house that is able to identify and understand a user's orders. Just look at what some of the companies such as Samsung did with their Smart TV line of productions.
With improving the device's accuracy and usable field of view, you can expect the creation of applications for personal computers to become reasonable too, for example, moving and rotating a 3D model in 3D modeling apps, or helping in drawing apps, as well as the possibility of interacting with the Windows 8 Modern interface or other similar interfaces.
As a developer, you can think of it as a 3D touch screen, and one can do lots of work with a 3D touch screen. What it needs is a little creativity and innovation to find and create ways and ideas to use these methods to interact with users.
Yet, developing games and applications is not the only area that you can use this technology for. There are projects already underway for creating more environment-aware indoor robots and different indoor security systems as well as constructing and scanning an environment completely (such as the KinectFusion project or other similar projects). It's hard to ignore and not mention the available Motion Capture applications (for example, iPi Motion Capture™).
As you can see, there are lots of possibilities in which you can use OpenNI, NiTE, and other middleware libraries.
But in this book, we are not going to show you how to do anything specific to one of the preceding categories. Instead, we are going to cover how to use OpenNI and NiTE, and it all depends on you and how you want to use the information provided in this book.
In this chapter, we are going to introduce OpenNI and cover the process of initializing OpenNI as well as the process of accessing different devices. The next step for you in this book is reading RAW data from devices and using OpenNI to customize this data from a device. NiTE can help you to convert this data to understandable information about the current scene. This information can be used to interact with users. We are going to cover NiTE and its features in this book too.
By using this information, you will be able to create your own body-controlled game, an application with an NI interface, or even custom systems and projects with better understanding of the world and with the possibility of interacting more easily and in natural ways with users.
The main programming language with OpenNI is C, but there is a C++ wrapper with each release. This book makes conservative use of C++ for simplicity. We used a little bit of OpenGL using the GLUT library to visually show some of the information. So you may need to know C++ and have a little understanding about what OpenGL and 2D drawing are.
Currently, there are two official wrappers for OpenNI and NiTE: C++ and Java wrappers. Yet there is no official wrapper for .NET, Unity, or other languages/software.
Community-maintained wrappers, at the time of writing this book, are NiWrapper.Net which is an open source project supporting OpenNI and NiTE functionalities for .NET developers and ZDK for Unity3D, which is a commercial project for adding OpenNI 2 and NiTE 2 support to Unity. Of course, there are other frameworks that use OpenNI as the backend, but none of these can be fitted in the subject of this book.
OpenNI is a multiplatform framework supporting Windows (32 bit and 64 bit; the ARM edition is not yet available at the time of writing this book), Mac OS X, and Linux (32 bit, 64 bit, and ARM editions). In this book, we are going to use Windows (mainly 64 bit) for projects. But porting codes to other platforms is easily possible and it is unlikely to create serious problems for you if you decided to do this.