
One thing we all struggle with when creating presentations is finding the right image to deliver our message. You know exactly what you want to say, and if you could just find the right image to accompany your words, then your whole presentation will have a much bigger impact on its audience.
The problem is, of course, that we all have tight (and usually unrealistic) deadlines to meet, and we are probably trying to work on several different projects at once. There isn't enough time in the day to spend it looking at images, but you do want your Prezi to look great.
Following are a few ways of finding the right images, starting with the least time-consuming methods. If you live on some strange planet other than earth, and have the luxury of time to seek out the perfect images, then you'll definitely want to take a look at the latter half of this section. For the rest of us earthlings to whom time is precious, I'm sure you'll find some useful tips at the start.
The most time-efficient method for finding imagery is, without a doubt, by starting in Prezi itself and using the "insert image from web" function.
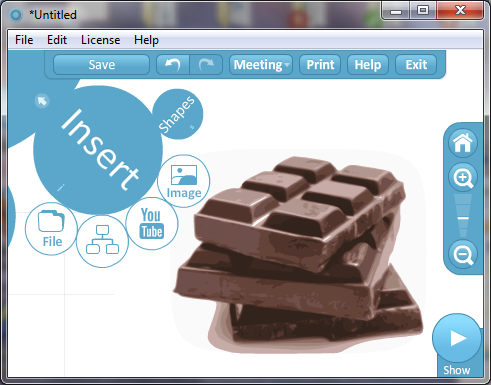
To access this, click on INSERT from the Prezi menu, then click on IMAGE to open the Insert image dialogue box, as shown in the following screenshot:
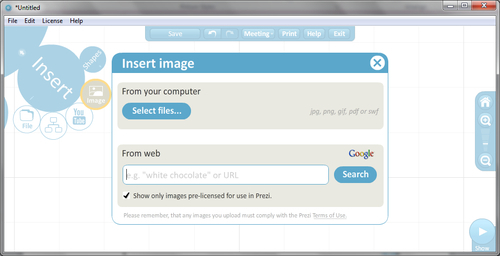
There are two parts to the Insert image dialogue box, but as we're focusing on the least time-consuming method for finding and inserting new imagery, let's look at the bottom part titled From web.
The From web feature allows you to run a Google image search by entering a keyword or phrase into the search panel.
Tip
Pre-licensed images tick box
The tick box marked Show only images pre-licensed for use in Prezi should remain ticked. Removing it will allow copyrighted images to appear in your search. These images cannot be used unless you gain permission from the image owner – usually at a cost!
Enter the word Chocolate into the search box and click on the SEARCH button. You'll then see a series of images linked to that keyword which you can scroll through and select as shown in the following screenshot:

Tip
If you see an image that you like, then select it but don't click on the OK button just yet. Before you fully insert it into your Prezi, move over to the left of the Prezi screen and use the zoom button to take a closer look at the image. If you zoom in a little and the image starts to lose quality and is pixilated, then it has probably been saved at a very low resolution.
Always zoom in and check the quality of the image first, especially if you know you're going to zoom into it at some stage in your Prezi.
There's no doubt that using the Insert From web function is the fastest way to find images for your Prezi, but it does have its limitations. Here are some things you won't be able to do:
Check the image dimensions, that is, width and height in pixels
See whether the image is a JPEG, GIF, or PNG file
Your search will only return raster images
If you have a bit more time available when searching for imagery, then you might decide to open a web browser and run a Google image search outside of Prezi. If so, here are some tips that will definitely help.
Most "Non-Masters" will simply go to the Google images home page, type in a keyword and click search. Those of us in the know, however, will normally always click on the Advanced search option to the right of the screen and fine-tune our search before selecting an image.
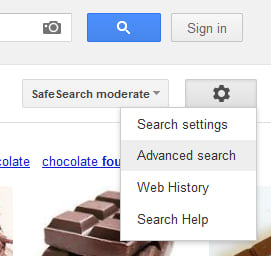
This can actually save your time in the long run because you can be very clear about what you want to see.
Some options I would definitely take advantage of in the advanced image search are:
Set Image size to larger than 800 x 600 pixels. Chances are that these images won't be pixilated as much when zoomed into in Prezi.
Type of image should be set to Photo to save you scrolling through hideous clip art images.
Color in image is extremely useful if you're trying to create a particular style throughout your Prezi and want all imagery to use the same color scheme.
Usage rights should always have the Only images labeled for reuse option selected. This works the same as the Prezi pre-license option and lowers the risk of you inserting copyrighted imagery.
File Type can be set to only look for .png, .jpg, or .gif formats which are useful if, for example, you want to take advantage of transparent backgrounds in PNG files.
If you decide not to use the advanced search option and simply type your keyword, cross your fingers, and hope for the best, then make sure you look at the following before saving and inserting an image into Prezi.
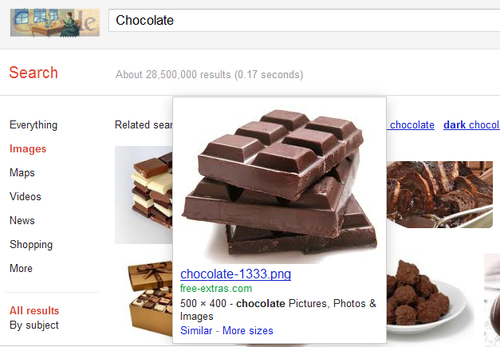
By simply rolling your mouse over one of the images in your Google search, you can reveal some key information about that image file. The key things you should look for are the file type and the dimensions.
The reason I've selected the image shown in the preceding screenshot in my search is because I can see it's a PNG file, which means it will have a transparent background once inserted into Prezi. The file also has a dimension of 500 x 400 pixels. Normally I'd look for something bigger, but I know that I won't be zooming into this image in my Prezi, so for now this will do.
If getting that perfect image in your Prezi is important to you (as it should be), then there are other sources you may want to turn to other than Google images. The web has hundreds of online image libraries just waiting to be tapped into. If you still want your images completely free, then www.sxc.hu and www.morguefile.com are definitely worth checking out. There are also some outstanding premium resources available that give the highest quality images taken by professional photographers. Obviously such resources aren't going to be free, but if you're building your Prezi for business use, I'm hoping you might have some budget for a small spend to get your Prezi looking great.
Here are some things you should know about using online image libraries.
A simple online search for "Image Library" will bring up the most popular resources. These will no doubt include the following:
There are obviously many other that you may wish to look into, but if you are going to invest in the right image, then make sure you get the biggest bang for your buck and compare the following before signing up to any of these sites:
Is there a "Pay Per Download" option? You don't want to be paying a monthly subscription unless you're a designer and need tons of images regularly.
Do you get access to any free images when signing up?
How much are the highest resolution images?
When you read that these online resources needed to be paid for, you might have instantly thought "Oh well, I'll skip this part", and I wouldn't have thought any less of you. However, I'm glad you're still reading this because there are some major benefits that these resources can bring to your Prezi designs:
Time saving: These sites make their money by giving you fast access to the images you want, so the advanced search facilities are usually very detailed and you won't end up scrolling through hundreds of images that aren't related to your original search.
Vector images: All of these libraries will allow you to search for vector images as well as raster. This is obviously a massive advantage, if you're planning to zoom in on images and want to keep everything looking great.
Other media: Although their main focus might be imagery, these resources will no doubt stock video, music, and animations as well. All of which can really bring your Prezi to life, which we'll discuss in later chapters.
To summarize this section, the following chart shows you the three methods mentioned previously and the effects that using either of them will have on your Prezi design.
|
Method for finding imagery |
How this affects your Prezi |
|---|---|
|
Prezi from web function |
Fastest method of finding imagery, but only searches for raster imagery without displaying the file type or size. |
|
Google image search online |
Allows for a more advanced search, but it does mean that you have to save the image outside of Prezi and then insert it, which can take time. |
|
Online image library |
Will have a price attached, but gives the option of searching for vector and raster images that have been produced by professional photographers and/or designers, giving your Prezi a stunning look and feel. |
Hopefully, this far into the chapter, you understand the obvious benefits that both raster and vector imagery bring. But what if you could combine the best of both worlds and have a realistic looking imagery like photographs, at a very small file size, with the ability to zoom into them as far as you like with no pixilation at all? Well guess what, you can!
In the rest of this chapter you'll learn how to become a true master and create imagery that has amazing style, as well as being perfect for use in Prezi. You don't need to buy any expensive software to do this, or have a degree in graphic design.
Two separate methods are explained further for turning raster images into vector so that they look great and load quickly in Prezi. The only difference between these methods is that one is completely free, and the other has a small price attached.
In the steps that follow, you'll learn how to turn a raster image into a stunning looking vector version. You'll be able to do this without spending a penny on expensive software, so it's a great benefit to your Prezis, and your budget!
First of all, you'll need a good raster image to vectorise. If you don't already have something to use, then we'd suggest a quick search on Google images for something interesting.
To continue with the current theme (and to give you another sugar rush), we'll use the raster image of chocolate squares, that you've seen earlier in the chapter. This should look even yummier once it's turned into a vector graphic and inserted into Prezi.

Now you need to do download and install Inkscape which is a great piece of vector editing software mentioned earlier in this chapter. It's completely open source which makes it free for anyone to download and use. Inkscape is available on Windows and Macintosh platforms, and has very similar capabilities to its more expensive cousin Adobe Illustrator!
Note
If you'd like to learn more about Inkscape you can purchase a copy of Bethany Hiitola's book, Inkscape Beginners Guide from Packt Publishing.
Go to http://www.inkscape.org/and click on the Download section to install the correct version of Inkscape for your operating system.
Once the software is installed, you should see the Inkscape icon in your programs list or on your desktop.

Now for the fun bit! Obviously, we won't go into detail on all of Inkscape's many features, but it's time to open the software and vectorise your image.
Double-click the Inkscape icon from your list of programs.
When the software opens, go to the File menu and click on IMPORT.
Select your raster image and click on OK.
Make sure the embed option is selected on the next screen and click on OK.
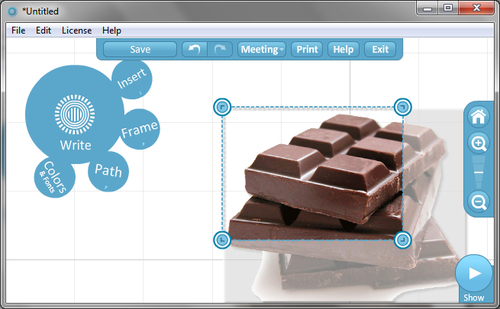
When your image appears on the Inkscape page, make sure it is selected and surrounded by arrows as shown in the following screenshot:

Now go to Path and select TRACEBITMAP. The pop-up box that appears will allow you to create a vector trace of your raster image.
If your image is a simple line drawing without much color, then adjust the settings in the top half of the screen under Single scan. Click on UPDATE to see a preview, and then on OK to create the vector trace.
If your image is a color photo like the one in the previous step, you'll need to concentrate on the lower half of the Trace Bitmap screen. Select Colors, click on UPDATE, and adjust settings further until you are happy with the preview. Click on OK to create your trace.

Back on the main screen, you will see the new vector version of your image. Hold the Ctrl key and use your mouse wheel to zoom in, or click the up arrow in the z box bottom-right corner of the screen.
If you aren't happy with the vector, just delete it and repeat the steps. Adjust the settings in the Trace Bitmap screen until you are happy.
Once you are happy with the trace, click on the new vector and move it to one side. You'll see the original raster below. Delete the raster image leaving only the vector onscreen.
Now go to File and select Save As. Select Portable Document Format (*.pdf) from the Save as type drop-down list, and save your new vector image to your desktop.
Tip
Commit to being a master
On opening Inkscape for the first time, you might be overwhelmed by all of the various buttons and options available. Don't be put off by these, and if you can, we'd really recommend you take some time to explore Inkscape in more detail. There are many other useful tools within the software that will really make you into a master of creating imagery for Prezi. Don't get scared – get curious.
Now it's time to insert your new vector image into Prezi. Our guess is you probably got so excited at the end of step 3 that you've already done it, but just in case you need the instructions to complete this process, keep reading further.
Open Prezi and click on Insert from the bubble menu.
Click on Image and then click on Select files to find your vector image.
Select your vector image and click OPEN.
Once the image is on your Prezi canvas, you can use the zoom tools to go in as close as you like without any loss of image.
If you really don't have the time to go through the preceding steps every time you need to create a vector image, then follow the next set of steps. It's much quicker, but unfortunately it does come at a cost.
Hopefully you enjoyed the last exercise, and learned lots during the process. You might be sitting at your desk now thinking "That's amazing, but will I have time to do this for 20 images?" We appreciate that you are probably working to very tight deadlines forced upon you by your business, and although there might be a small cost involved, the time saving will pay off in the long run.
Just like in the previous steps, you'll need another raster image to vectorise. You can either use the same image as you did before, or carry out another Google Image search for something interesting.
Go to http://www.vectormagic.com and click the Upload Image To Trace button.
Select the raster image you'd like to vectorise and click OK.
Vector Magic will then perform a trace for you and compare the raster and vector image onscreen.

The default settings of Vector Magic are normally very good, so if you are happy with them click Download result.
You'll be asked to enter an e-mail address so that you can set up a free account.
Once you have verified the account, select the PDF option for download, and save it to your desktop.
Open Prezi and click on Insert from the bubble menu.
Click on Image and then click on Select files to find your vector image.
Select your vector image and click on OPEN.
Once the image is on your Prezi canvas, you can use the zoom tools to zoom in as close as you like, without any loss of image.
Note
As you can see from the previous two methods, there are some clear benefits for each, but an obvious difference in the amount of time and effort it will take. Only you will be able to decide which method suits you and the demands of your business.
One thing is for sure though. Vector imagery lends itself much better to building presentations in Prezi and you should try to use it wherever you can.
If you have even the tiniest of creative bones in your body, then you might be able to take your Prezi designs to an even higher level by creating your very own illustrations, and vectorising them for Prezi.
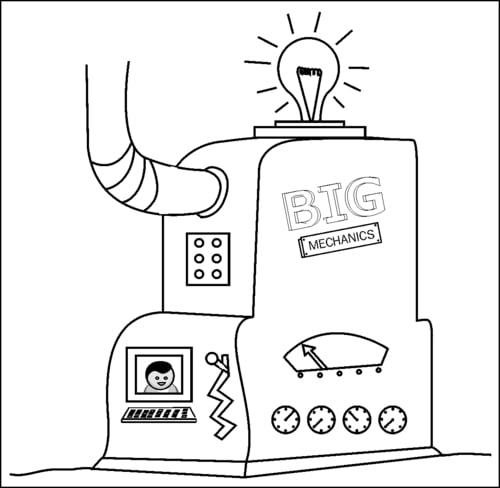
Just like you, we've also been shackled by the time restraints of business at some point in our careers. Let's pretend the boss of your company BIG Mechanics is giving an important presentation in an hour's time, and he's kindly tasked you with pulling together something really eye-catching that explains how the company is like a giant machine with lots of dials and cogs that all work together in unison to get results. You know the same old business talk we've heard a million times before!
So once he's finished telling you what he needs, you now only have 40 minutes left. What would be perfect is an image of a giant machine with the company name on it, but can you find a decent enough raster image in time? You'll then need to vectorise it, add the company name to it somehow and then insert it into Prezi. That's going to be a challenge, so why not use your imagination, and create the exact image you need from scratch?
While we can't teach you how to be a world class illustrator in this chapter, we do hope to give you enough confidence to at least have a go at this. When vectorised and inserted into Prezi illustrations look great, and the fact that they are your own work gives your Prezi a much more human touch. Here's how to vectorise your own illustrations:
Grab a decent pen that isn't going to run out of ink and has a fairly thick nib. Try and use your company's corporate color if you can.
Draw your image on plain white paper.
Get the image onto your PC using a scanner or digital camera.
Use Inkscape or Vector Magic to trace the image and create a vector version.
Save as a PDF file.
Insert into Prezi.
Obviously, we are all going to be of different skill levels when it comes to drawing our own illustrations, but even a badly drawn image seems to look a little nicer once vectorised and inserted into Prezi.
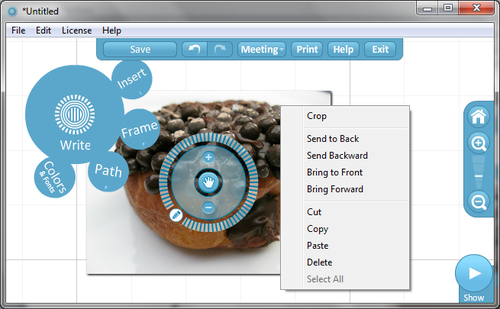
If your Prezi is using lots of images, here are a couple of tips worth knowing:
If there are areas of the image you don't want your audience to see, then simply double-click the image and drag the corners that appear to crop the unwanted area out as shown in the following screenshot:
To place images on top of one another in the correct order, you can simply right-click on your PC, or press Ctrl+click for Mac, on an image and select one of the four available options to change its position.