
By now you've gotten up to speed on the basics of cloud computing and the Google Drive user interface. You've also seen that Google Drive lets you store files online, so you can view and edit them from anywhere. But how do your files get there in the first place?
There are three ways you can get your files into Google Drive. First, you can use the built-in applications to create new files such as documents and spreadsheets. Second, you can upload files and folders from your hard drive directly into Google Drive. As a third option, you can also install the Google Drive sync program on your computer, which will keep files in sync automatically between your hard drive and Google Drive.
Google Drive comes with a built-in set of office productivity applications that work in the cloud, right out of the box. No need to install them; they're automatically there and ready to go.
There are four main programs included in Google Drive: Docs (for documents), Sheets (for spreadsheets), Slides (for presentations), and Drawings.
Google Docs is a word processing program that lets you create and edit text documents. There is full support for text formatting, images, lists, tables, and styles.

Google Sheets is a spreadsheet program that lets you organize information in a tabular format. There is full support for formulas, sorting, charting, multiple worksheets, cell formatting, and pivot tables.

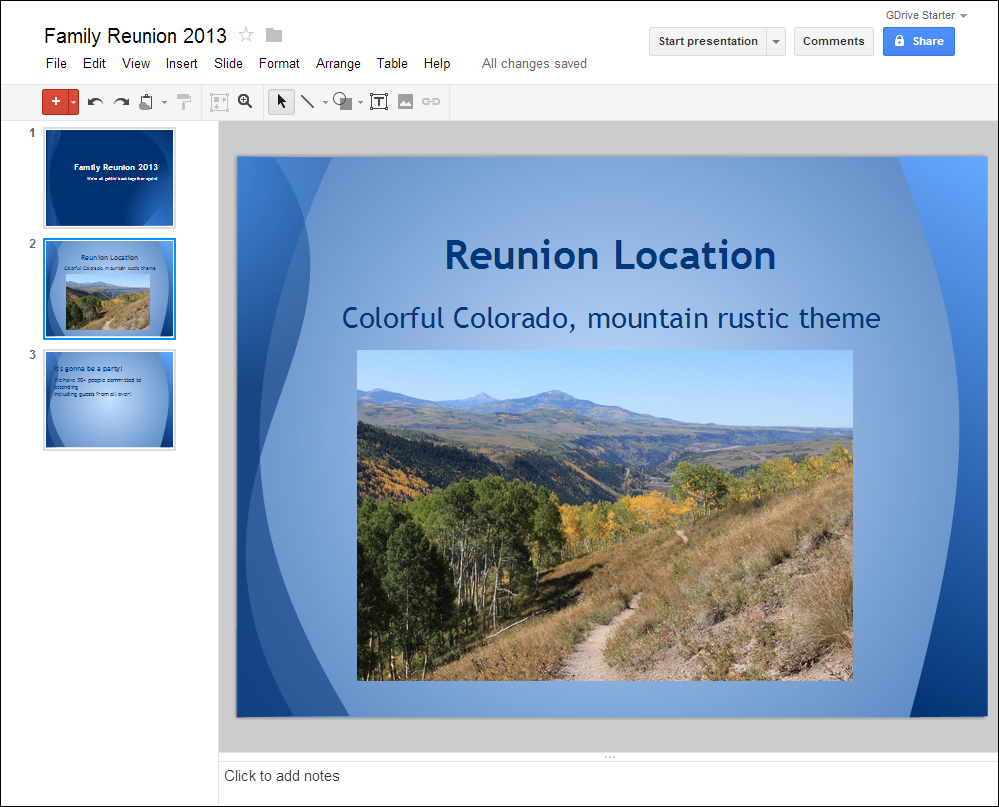
Google Slides is a presentation program that lets you create and present graphical slides. There is full support for images, formatting, tables, themes, animations, and projecting.
Google Drawings is a graphics program that lets you create visually rich graphics including flowcharts and other diagrams. There is full support for shapes, text, images, layout, and ordering.

All of the built-in Google Drive programs support both printing and exporting to PDF and Microsoft Office formats. Each program also has full support for sharing, so you can share any file created with any of these programs with anyone (or keep them private so that only you can see them).
To create a document using one of these programs, first click on the CREATE button, and then choose the document type you wish to create from the menu that appears:

For this example, we will create a document, which represents a text document created with Google Docs (the built-in word processor program).
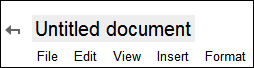
After choosing the new document type to create, a new tab will open up in your web browser, and the selected Google Drive program will load. By default, your document will be named Untitled document as shown in the upper-left corner of the screen.
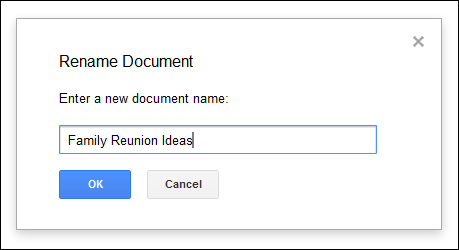
After clicking on the name textbox, you can type in a new name for your document:
From here, you can start typing into your new document. You can insert images and tables, change text formatting, and define and apply styles—all the things you expect to be able to do in a word processing program. The same applies to using the other built-in programs including spreadsheets, presentations, and drawings.

There are many things you usually do in Google Drive (using the toolbar and the Context menu) that, if you prefer, you can do from inside the Google Docs, Sheets, or Slides program. We've just seen how you can rename your document, but you can also share, star, organize, add comments, and print. For example, starring and organizing can be done with the icons to the right-hand side of the filename, and sharing can be accessed under the File menu or by clicking the Share button in the upper-right corner.
When using any of the built-in Google Drive programs, there is no need to manually click on Save. Instead, saving is automatic and happens continuously in the background, while you type.
We've seen that with Google Drive, you can share your documents with other people. One of the biggest benefits of the built-in Google Drive programs is that people with whom you share that document can all edit the document at the same time. There is only one copy of the document, so we don't need to worry about e-mailing revisions back and forth, or overwriting, or having to merge someone else's changes. With the real-time collaboration feature built into Google Drive, multiple people can edit a document simultaneously and their changes are all automatically merged and saved in the background as they type.
When done editing your document, simply close the browser tab and return to Google Drive. You will see the file appear in the Files list. Depending on what Sort you have chosen, the document will appear in alphabetical order (when sorting by Title) or at the top (when sorting by Last modified).

Here are just some of the things you can do with your newly created document (for more information refer to the 3 – Context menu section and the 2 – Toolbars section given in the The Google Drive user interface section):
Open it for viewing or editing by clicking its name in the Files list.
Share it with one or more people by selecting the document and clicking on the Share icon in the toolbar.
E-mail it as an attachment to one or more people by right-clicking on it and choosing Share and then Email as attachment from the Context menu. (Because this may make an unwanted copy of the file, it is often better to share the document directly instead.)
Rename it by right-clicking on the file and selecting Rename from the context menu.
Place it into a different folder by dragging-and-dropping it into the appropriate folder in the Navigation panel, or by selecting the document and clicking on the Organize icon on the toolbar.
Download the file in PDF format by choosing Download… in the Context menu and selecting PDF as the desired format.
View additional details by selecting it and clicking on the Preview icon on the toolbar.
Remove it (put it in Trash) by selecting the document and clicking on the Remove icon from the toolbar.
Another way to get files into Google Drive is by uploading them from your computer's hard drive. This is a great way to quickly move files or folders to the cloud as you need them. Once in the cloud, you can share your files with anyone (or keep them private so that only you can see them), and access them from anywhere.
Tip
Heads up: Windows, Mac, and Linux may look a bit different
In the examples in this section, we have used Microsoft Windows. If using Mac or Linux, the screens for choosing the files or folders to upload will look a little different. In all cases, though, the basic functionality is the same.
Let's run through a quick example for uploading individual files.
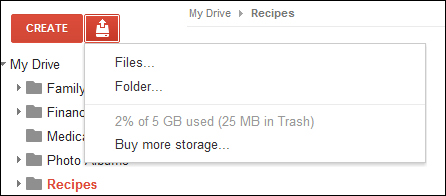
First, open the Upload menu by clicking on the upload button in the upper-left corner, and then select Files…:

Next, you will be presented with a screen that lets you choose which files to upload:
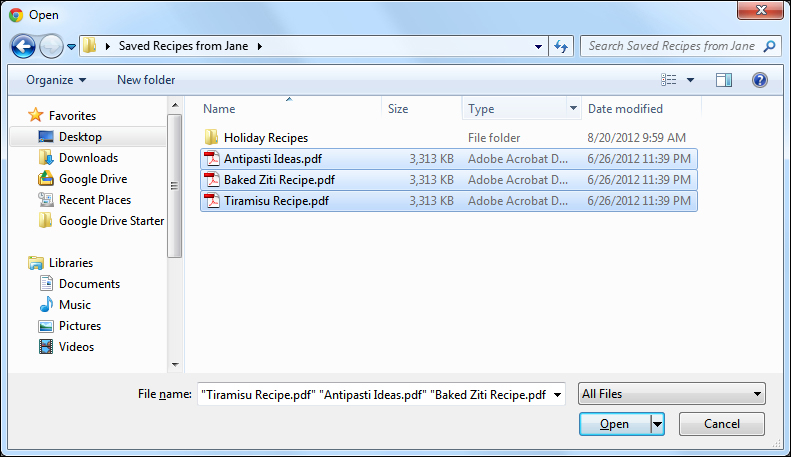
Select the file you wish to upload. You can also select multiple files to upload using the Ctrl or Command key. Then click on Open.
At this point, your upload will begin, and could take anywhere from a few seconds, or minutes, or more to upload depending on how large the file is and how fast your Internet connection is.
Read on to learn how to monitor the progress of your file upload.
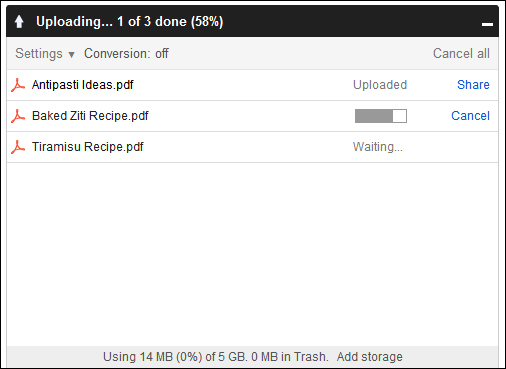
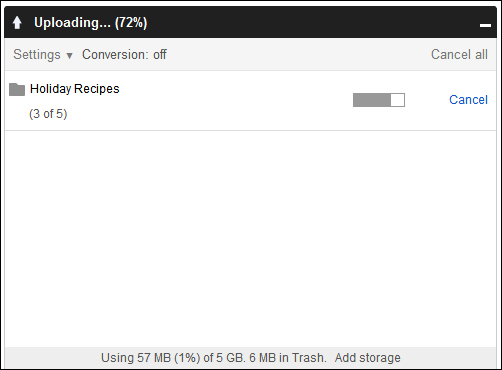
Once your upload has started, a pop-up window will appear in the bottom-right side of the Google Drive user interface, called the upload progress window.
Using this pop-up window, you can:
Watch as each file is uploaded, one at a time. A file's individual progress is shown with a progress bar, and the overall progress is noted at the top of the pop up.
Cancel a file's upload (if it has not yet completed uploading) by clicking on Cancel next to the file in question. You can also cancel the entire upload with the Cancel all button.
Open a file by clicking on its name (available once it has completed uploading).
Share a file with other people by clicking on Share next to the file you want to share (available once it has completed uploading).
Monitor the amount of storage space that you have in Google Drive, and the amount that you are using (this information appears at the bottom). Refer to the Managing your storage in Google Drive section within the Uploading files from your computer section for more information.
You can also upload files using drag-and-drop, which is the easiest way to upload files. To do so, simply select one or more files on your computer, drag them into the Files list area of the Google Drive user interface, and drop (release the mouse button).
This will start your upload just as if you had selected the files using the upload menu, and you'll be able to monitor the upload with the upload progress window described previously.
You can set certain upload-related options using the upload settings menu. This menu is accessed by clicking on Settings in the top-left corner of the upload pop up:
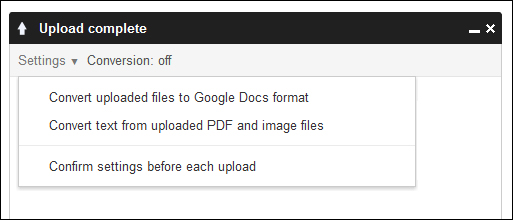
There are three main options in this menu:
Convert uploaded files to Google Docs format: If selected, then certain file formats such as Microsoft Office files will be converted to their corresponding Google type (document, spreadsheet, or presentation). File conversion applies mainly to converting Microsoft Office files into the corresponding Google type. So, Microsoft Word files turn into Google Docs documents, Microsoft Excel files turn into Google Sheets spreadsheets, and Microsoft PowerPoint files turn into Google Slides presentations. Once converted, those files get all the same benefits as if they were created with a Google program in the cloud, including collaborative editing (where multiple people can edit the file at the same time).
Convert text from uploaded PDF and image files: If selected, then Optical Character Recognition (OCR) technology will be applied to any PDF files or images that are uploaded. Any text found in the PDF or image will be extracted and placed in a Google Docs document, along with a snapshot of the original image or PDF.
Confirm settings before each upload: If selected, before each upload you will be shown a screen that lets you choose which of the previously mentioned options to apply to just that one particular upload. For example, you may want to convert certain files to Google format, but not others. In this case, you would leave this feature off, but ask to confirm settings before each upload so you could enable conversion for just that one upload.
In addition to individual files, you can also upload entire folders at once. This is a great way to upload large amounts of files into Google Drive with just a few clicks. When you upload a folder, all "subfolders" within that folder, and all folders within each subfolder, and so on are uploaded.
Note that uploading folders works a little differently when using Google Chrome versus other browsers. This example uses Google Chrome; using the Folder Upload feature in Firefox and Internet Explorer is discussed in the next section.
Tip
Heads up: Uploading large folders can take a long time!
Depending on the size of the folder you select, and the sizes and number of files and folders contained in the selected folder, your upload could take several hours or more. You can monitor the upload progress using the upload pop up to see how the upload is going and how long it will take.
To upload a folder, follow the ensuing steps:
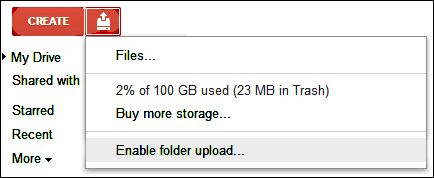
First, open the upload menu by clicking on the upload button in the top-left corner, and then select Folder…:
Next, you will be presented with a screen that will let you choose what folder to upload:

Select the folder to open (you can only choose one folder to upload at a time) and click on OK. At this point the upload progress window will appear in the lower-right corner, and your upload will begin:
From here you can monitor the progress of the upload and perform other upload-related functions. For example, you can cancel the folder upload while it is in progress (cancelling does not remove files in the folder that have already been uploaded).
When complete, you can share the uploaded folder with one or more people using the Share button, or navigate directly to the folder by clicking on its name.
Google's Chrome web browser lets you upload folders without the need to take any extra steps. If you use Firefox or Internet Explorer, however, you will have to enable a special Java applet or plugin in order to upload folders.
To enable folder upload for Firefox or Internet Explorer:
Open the upload menu by clicking on the upload button on the upper-left side, and then select the Enable folder upload… option:
Next, you will be presented with a screen asking you to confirm enabling the folder upload. (Alternatively, you can download the Chrome web browser, which doesn't require the special Java plugin):
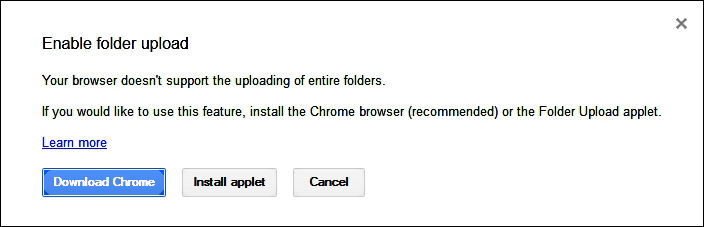
After clicking on Install applet, you may be prompted by your computer with a security warning about the applet, prompting you to confirm the installation of the Java plugin.
Once the applet is installed, you can then return to the upload menu and select the Files and folders… option.
Finally, select the folder you wish to upload, and the upload will proceed as described here.
In Google Drive, just like on your hard drive, you have a certain amount of space that you can use for storing files. You get a fixed amount of storage for free, and you can purchase additional storage at any point in time.
The amount of storage you're using, and the total amount of storage you have available can be seen in the upload menu:

This storage information is also displayed at the bottom of the Navigation panel.
This shows you how much space you have available in Google Drive, and how much of it you're currently using. If you have reached your storage limit, you will not be able to upload files. Purchasing more storage can be done with the Buy more storage… link.
Note
Documents created with built-in Google programs (Docs, Sheets, Slides, and so on) do not take up any storage space, nor do files that other people have shared with you. Files you've uploaded, however, do count towards your storage. Uploaded files also include files automatically synchronized with your computer; refer to the Using the Google Drive sync program section given in the Top features you'll want to know about section.
If you are close to running out of space, you can quickly find files stored in Google Drive that are taking up the most space. This can be done as follows:
Select All Items in the Navigation panel on the left-hand side (you may have to expand the Navigation panel by selecting the More option).
In the toolbar, select the Sort button and select Quota used.
The files taking up the most space will appear at the top.
From here, you could then delete any unnecessary files, freeing up storage space.
A third way to get files into Google Drive is to install the optional Google Drive sync program for PC or Mac. This will automatically keep files in a special Google Drive folder on your hard drive in sync with your files in the cloud in Google Drive. It's a great way to quickly and reliably get large amounts of data on your hard drive into the cloud. For more information, refer to Using the Google Drive sync program, the fifth feature in the following section.