

Animating through code is a great way to start animating generally, as it demonstrates all the core concepts we've seen so far, so let's try it. For this section, and the remaining sections, we'll use C# for scripting wherever applicable. However, since this book focuses on animation, I won't be explaining basic coding concepts here (such as variables, loops, and functions). Instead, I'll assume you already have basic to intermediate coding knowledge. If you want to learn coding, I recommend my 3dmotive video course C# For Unity Developers (available at http://3dmotive.com/) and Learning C# by Developing Games with Unity 3D Beginner's Guide, Packt Publishing.
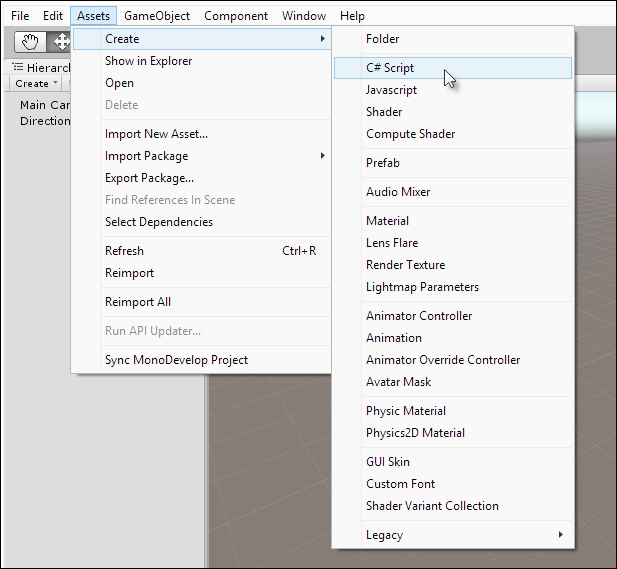
By the end of the next few sections, we'll have created a game object (for example, a spaceship) that can travel at a constant speed in a single direction across the level. To get started, create a new script file by right-clicking inside the Project panel. Go to Create | C# Script from the context menu. Alternatively, go to Assets | Create | C# Script from the application menu, as shown in the following screenshot. Name the file Mover.cs. This script will be attached to any object that will move.
Now open the script file in MonoDevelop by double-clicking on it from the Project panel. By default, all new scripts are created with two functions: Start and Update. The Update function is of special significance for animation because it's related to frames and the frame rate. Specifically, it's called on every frame at runtime. This means that for a game with an FPS of 70, the Update function is called 70 times per second for each object with the script attached, provided the object is active. This makes Update important for animation because it gives us an opportunity to adjust an object's properties continually over time.

The Update function is called once per frame
To start moving an object, let's code the Update function, as shown in the following snippet. It accesses the object's
transform component and increments its current position in the x axis by 1 unit (meter) on each frame.
Code sample 1-1: moving an object:
using UnityEngine;
using System.Collections;

public class Mover : MonoBehaviour
{
  // Use this for initialization
  void Start () {

  }

  // Update is called once per frame
  void Update ()
  {
    //Transform component on this object
    Transform ThisTransform = GetComponent<Transform>();

    //Add 1 to x axis position
    ThisTransform.position += new Vector3(1f,0f,0f);
  }
}
If you haven't already tested the code, drag and drop the script file onto an object in the scene. Then press the Play button. Depending on your view, the object may move too fast to be visible. Be sure to position your camera for a good view, and you should see your object spring to life by moving continually on the x axis.

Adding the Mover script to an object in the scene
The code in sample 1-1 works, but there's an important animation problem, and we should address it directly. As we've seen, the object travels along the x axis by 1 unit on every call to Update, that is, on each frame. This is potentially a problem because frame rates differ across computers, and even over time on the same computer. This means that different users will get different experiences while using our code because the object will move at varying speeds. Specifically, on a system with an FPS of 70, the object will be updated by 70 units every second. But on a different system running at 90 FPS, the object will move 90 units in the same time. This is bad, because we want all users to get a consistent in-game experience, experiencing time at the same speed and in the same way. This issue is especially important for multiplayer games, where it's critical that all users are in sync. To solve this issue, we need to approach the task differently, thinking in terms of speed and time.
To calculate how far an object should travel over time, we can use the speed-distance-time formula, where distance traveled = speed x time. This means that an object traveling at 10 meters per second for 5 seconds will travel a total of 50 meters. This way of thinking about movement doesn't rely on frame rates and frames. Also, it doesn't link motion to the Update function and its frequency specifically. Instead it maps motion to time directly, and time is consistent across all computers; that is, 1 second is the same everywhere. To code this in Unity, we can use the deltaTime variable. Consider code sample 1-2, which updates and improves on code sample 1-1.
Code sample 1-2: setting an object's speed:
using UnityEngine;
using System.Collections;

public class Mover : MonoBehaviour
{
  //Amount to travel (in metres) per second
  public float Speed = 1f;

  // Update is called once per frame
  void Update ()
  {
    //Transform component on this object
    Transform ThisTransform = GetComponent<Transform>();

    //Update X Axis position by 1 metre per second
    ThisTransform.position += new Vector3(Speed * Time.deltaTime,0f,0f);
  }
}
The deltaTime variable is a native Unity variable updated every frame, and is part of the Time class. On each frame, it expresses (in seconds) how much time has elapsed since the previous frame. Therefore, if deltaTime is 0.5, then it means 1/2 of a second has elapsed since the previous frame, that is, since the Update function was last called. This is highly important information because, when multiplied by speed values, we always scale the speed value to be consistent with the frame rate for the current computer, ensuring a consistent speed across computers. By doing this, we make all speed values work the same for everybody. Now try this code in the editor and see the difference. Our objects will now move at the same speed on all computers.

Press Play and test the new code
Based on code sample 1-2, we now have an object that moves in the x axis at a consistent speed. But how can the code be adapted to move in a different direction? If we wanted to move in only the y or z direction, we could've adapted the code easily. But what about movement in any arbitrary direction, including diagonals? For this, we need vectors. A vector is a three-component number in the form of (x, y, z), representing a direction. For example, (0, 1, 0) means up (since the up-down axis is y) and (0, 0, 1) means forward (since the z axis represents the forward-backward axis).
Code sample 1-3: controlling the direction:
using UnityEngine;
using System.Collections;

public class Mover : MonoBehaviour
{
  //Amount to travel (in metres) per second
  public float Speed = 1f;

  //Direction to travel
  public Vector3 Direction = Vector3.zero;

  // Update is called once per frame
  void Update ()
  {
    //Transform component on this object
    Transform ThisTransform = GetComponent<Transform>();

    //Update position in specified direction by speed
    ThisTransform.position += Direction.normalized * Speed * Time.deltaTime;
  }
}
Now return to your object in the scene. The object inspector shows a Direction variable that can be edited to specify the direction in which the object should move. Movement along the x axis is due to (1, 0, 0) or (-1, 0, 0), and the numbers are similar for the other axes. You can also travel in diagonals using (1, 1, 1), which means moving in all three axes simultaneously.
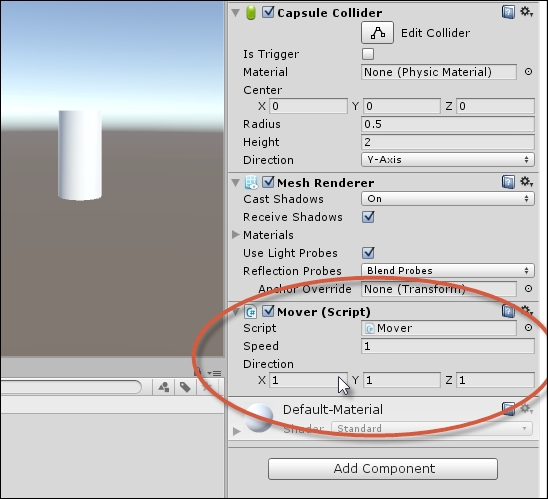
Specifying a direction for the Mover script
For objects that move continually at a constant speed and in a straight line, the code created in sample 1-3 works exactly as expected. But when animating, you'll typically want objects to move along curved paths, not just straight paths. Or you'd want objects to travel at variable speeds as opposed to constant speeds. To solve this, we can use animation curves, which are special objects (available only in Unity Pro) that allow us to build curves that define tweens for the animation, controlling how an object changes across key frames. Consider code sample 1-4, which allows us to vary an object's speed over time with an animation curve.
Note
More information on animation curves can be found online at http://docs.unity3d.com/Manual/animeditor-AnimationCurves.html.
Code sample 1-4: ramping the speed:
using UnityEngine;
using System.Collections;

public class Mover : MonoBehaviour
{
  //Maximum Speed to travel (in metres) per second
  public float Speed = 1f;

  //Direction to travel
  public Vector3 Direction = Vector3.zero;

  //Curve to adjust speed
  public AnimationCurve AnimCurve;

  // Update is called once per frame
  void Update ()
  {
    //Transform component on this object
    Transform ThisTransform = GetComponent<Transform>();

    //Update position in specified direction by speed
ThisTransform.position += Direction.normalized * Speed * AnimCurve.Evaluate(Time.time) * Time.deltaTime;
  }
}
With the code in sample 1-4, select the animated object in the scene and examine the object inspector. The public AnimCurve variable is now visible as a graph.

Accessing the animation curve editor
Click on the graph in the inspector to show the graph editor as a separate dialog. This graph allows you to control the tweens applied to the speed value. The horizontal axis represents time (in seconds), and the vertical axis represents the value (speed).

Building an animation curve
You can click any of the bottom-left curve presets to generate an initial curve, controlling interpolation for object speed. You can also double-click anywhere along the curve to insert new control points, allowing greater control of the curve's shape. Let's go ahead and create a famous type of curve in animation—an ease-in-ease-out curve. It will gradually increase the object's speed at the start of the animation (acceleration), and then eventually reduce the object's speed towards a complete stop (deceleration). To start, use the mouse's scrolling wheel to zoom out from the curve view, to show a horizontal view of 5 seconds in all from 0 seconds at animation start to 5 seconds at animation end. Make sure that the first and last key frame points rest at the start and end times respectively on the horizontal axis. Also make sure that both the points are at 0 for the vertical axis, which means that the object's speed should be 0 at both the start and the end.

Starting an animation curve
To build an ease-in-ease-out curve, insert a new control point at the curve's center (at time equal to 2.5 seconds), and drag it upward on the vertical axis to a value of 1, representing the maximum speed for the object at that time. If the new control point forms a hard-edged angle in the curve, preventing it from being smooth, then right-click on the control point and select the Free Smooth option from the context menu to smooth out the curve.

Creating an ease-in-ease-out curve for speed
Once the curve is constructed, give the code a test run by playing the Unity project, and see the effect it has in the Game tab. Based on code sample 1-4, the speed of the object will necessarily animate according to the curve over time. The AnimationCurve.Evaluate method accepts a time value as the input (on the horizontal axis) and returns an associated value from the y axis as a multiplier for speed. Using this function, we can evaluate any curve for programmatic animation.
Note
More information on the Evaluate method can be found at the official Unity documentation at http://docs.unity3d.com/ScriptReference/AnimationCurve.html.
The Unity project for this assignment can be found in this book's companion files in the Chapter01/animation_curves folder.
Now let's try a different programmatic animation scenario using
coroutines, a special kind of function that are very useful for creating types of behavior that unfold over time. Specifically, we'll create a script that slowly and smoothly rotates an object to always face its target. This is useful for building enemies that always turn to look at you, rotating gun turrets, or other objects that must track a target. It should be emphasized here that the intended behavior isn't simply the LookAt behavior, which causes objects to immediately be oriented towards a target using the Transform.LookAt function. Instead, we're coding a kind of behavior in which an object always rotates at a specified angular speed to face a target, as shown in the following screenshot. The object may or may not be looking at its target at a particular moment, but it'll always be trying to look at it. This involves rotation and turning over time to look at its target, wherever the latter moves. Consider the code file (LookAt.cs) in sample 1-5.

A cubical object rotating to face a sphere
Note
More information on coroutines can be found in the Unity official documentation at http://docs.unity3d.com/Manual/Coroutines.html.
Code sample 1-5: rotating to face a target:
//--------------------------------------------
using UnityEngine;
using System.Collections;
[ExecuteInEditMode]
//--------------------------------------------
public class LookAt : MonoBehaviour
{
  //Cached transform
  private Transform ThisTransform = null;

  //Target to look at
  public Transform Target = null;

  //Rotate speed
  public float RotateSpeed = 100f;

  //--------------------------------------------
  // Use this for initialization
  void Awake () {
    //Get transform for this object
    ThisTransform = GetComponent<Transform>();
  }
  //--------------------------------------------
  void Start()
  {
    //Start tracking target
    StartCoroutine(TrackRotation(Target));
  }
  //--------------------------------------------
  //Coroutine for turning to face target
  IEnumerator TrackRotation(Transform Target)
  {
    //Loop forever and track target
    while(true)
    {
      if(ThisTransform != null && Target != null)
      {
        //Get direction to target
        Vector3 relativePos = Target.position - ThisTransform.position;

        //Calculate rotation to target
        Quaternion NewRotation = Quaternion.LookRotation(relativePos);

        //Rotate to target by speed
        ThisTransform.rotation = Quaternion.RotateTowards(ThisTransform.rotation, NewRotation, RotateSpeed * Time.deltaTime);
      }

      //wait for next frame
      yield return null;
    }
  }
  //--------------------------------------------
  //Function to draw look direction in viewport
  void OnDrawGizmos()
  {
    Gizmos.DrawLine(ThisTransform.position, ThisTransform.forward.normalized * 5f);
  }
  //--------------------------------------------
}
//--------------------------------------------
Coroutines work differently from regular functions. They always feature an IEnumerator return type and contain at least one yield statement. Unlike regular functions, which perform their work line by line and then terminate, after which program execution resumes, coroutines seem to run in parallel with the process that invoked them. They feel and work much like a thread or background process—though without truly being so—multitasking and running alongside other processes. This makes them useful for animation, allowing us to animate and change properties for objects while other processes are running.
Another really useful animation technique is UV or mapping animation, as shown in the following screenshot. This involves programmatically tweaking or changing the UV coordinates across a mesh's vertices over time to slide or move around the texture on its surface. This doesn't change or alter the pixels inside the texture itself, but rather animates where the pixels are mapped on the surface. Using UV animation, various effects can be created, such as animated water, flowing lava, moving clouds, warp tunnel effects, and lots more. Consider code sample 1-6 (MatScroller.cs).

Animating texture mapping for a surface to create moving clouds, water, or lava
Code sample 1-6: material scroller:
//CLASS TO SCROLL TEXTURE ON PLANE. CAN BE USED FOR MOVING SKY
//------------------------------------------------
using UnityEngine;
using System.Collections;
//------------------------------------------------
[RequireComponent (typeof (MeshRenderer))] //Requires Renderer Filter Component
public class MatScroller : MonoBehaviour
{
  //Public variables
  //------------------------------------------------
  //Reference to Horizontal Scroll Speed
  public float HorizSpeed = 1.0f;

  //Reference to Vertical Scroll Speed
  public float VertSpeed = 1.0f;

  //Reference to Min and Max Horiz and Vertical UVs to scroll between
  public float HorizUVMin = 1.0f;
  public float HorizUVMax = 2.0f;

  public float VertUVMin = 1.0f;
  public float VertUVMax = 2.0f;

  //Private variables
  //------------------------------------------------
  //Reference to Mesh Renderer Component
  private MeshRenderer MeshR = null;

  //Methods
  //------------------------------------------------
  // Use this for initialization
  void Awake ()
  {
    //Get Mesh Renderer Component
    MeshR = GetComponent<MeshRenderer>();
  }
  //------------------------------------------------
  // Update is called once per frame
  void Update ()
  {
    //Scrolls texture between min and max
    Vector2 Offset = new Vector2((MeshR.material.mainTextureOffset.x > HorizUVMax) ? HorizUVMin : MeshR.material.mainTextureOffset.x + Time.deltaTime * HorizSpeed,
                   (MeshR.material.mainTextureOffset.y > VertUVMax) ? VertUVMin : MeshR.material.mainTextureOffset.y + Time.deltaTime * VertSpeed);

    //Update UV coordinates
    MeshR.material.mainTextureOffset = Offset;
  }
  //------------------------------------------------
}
//------------------------------------------------
This code can be attached to a mesh object to animate its material. Simply set the HorizSpeed and VertSpeed variables from the object inspector to control the horizontal and vertical scroll speeds of the material.

Controlling a material's scroll speed

The camera shake effect
If you've played hard-hitting action games, such as beat 'em ups or shooters, you'll often see a camera shake effect when the characters get hurt. The shake effect adds a dramatic impact and dynamism to the action. It's also a really easy animation effect to achieve, based only on the principles and ideas we've already seen in this chapter. Consider code sample 1-7, which may be added to any scene camera to create a shake effect:
Code sample 1-7: camera shake:
using UnityEngine;
using System.Collections;
//---------------------
public class CameraShake : MonoBehaviour
{
  private Transform ThisTransform = null;

  //Total time for shaking in seconds
  public float ShakeTime = 2.0f;

  //Shake amount - distance to offset in any direction
  public float ShakeAmount = 3.0f;

  //Speed of camera moving to shake points
  public float ShakeSpeed = 2.0f;

  //---------------------
  // Use this for initialization
  void Start ()
  {
    //Get transform component
    ThisTransform = GetComponent<Transform>();

    //Start shaking
    StartCoroutine(Shake());
  }
  //---------------------
  //Shake camera
  public IEnumerator Shake()
  {
    //Store original camera position
    Vector3 OrigPosition = ThisTransform.localPosition;

    //Count elapsed time (in seconds)
    float ElapsedTime = 0.0f;

    //Repeat for total shake time
    while(ElapsedTime < ShakeTime)
    {
      //Pick random point on unit sphere
      Vector3 RandomPoint = OrigPosition + Random.insideUnitSphere * ShakeAmount;

      //Update Position
      ThisTransform.localPosition = Vector3.Lerp(ThisTransform.localPosition, RandomPoint, Time.deltaTime * ShakeSpeed);

      //Break for next frame
      yield return null;

      //Update time
      ElapsedTime += Time.deltaTime;
    }

    //Restore camera position
    ThisTransform.localPosition = OrigPosition;
  }
  //---------------------
}
//---------------------
This code sample uses coroutines to fluctuate the position of the camera randomly over time within an imaginary spherical volume using the Random.insideUnitSphere variable. To use this code, just drag and drop the script onto a camera, and go!