
The Cloud Flow Designer is a tool that allows you to implement business requirements by constructing Flows (without any code); this is a way to collect, update, edit, and create data in Salesforce. The Cloud Flow Designer user interface has different functional parts as shown in the following screenshot:

These functional parts are as follows:
- The button bar: You can use Save, Save As, Run, Run with Latest, Close, undo, and redo changes to run or view properties of your Flow buttons available in the button bar. The status indicator marked in the red rectangle on the right-hand side of the bar shows the status (Active or Inactive) of your Flow:
- Save: Use this option to save/quick save your Flow.
- Save As: If you want to clone the Flow you are working on or save as a new version, then use this option.
- Run: This runs the most recent version of the Flow you are working in. If the Flow comprises subflow elements, then each subflow refers to the active version of its referenced Flow. If the referenced Flow has no active version, then the subflow element runs the latest version of its referenced Flow.
- Run with Latest: This button will only appear if you are working in a Flow that contains a subflow element.
- Close: If you are working on a Flow and want to close it, then use this button. If Flow is not saved and you clicked on the Close button, then it will return to the Flow list page or else you will be redirected to the Flow detail page.
- Undo or Redo: Use these to undo or redo recent activities on the canvas.
- Flow Properties: Click on the screw driver
 icon to see information related to your Flow, such as Name, Unique Name, Description, its type (Autolaunched Flow or Flow), Interview Label, Version, and created and modified dates. Salesforce allows you to change Name, Description, and Interview Label of your Flow at any time, as shown in the following screenshot:
 The Interview label helps us differentiate between the interviews of the same Flow when an interview is paused.
- The Flow canvas: You can use this area to design your Flow. To edit any element in the main canvas, double-click on it.
- The zoom control: This is a slider that helps you to zoom in and out of the canvas so that you can focus on particular areas. This feature is also combined with the search options on the Explorer tab, so it will highlight results on the canvas tab:

- Palette: This is the area where you can find all the element types available for your Flow. You have to drag and drop elements from the palette onto the canvas to use it. To see the element description/properties in the Description panel (7), click on an element in the palette. Once you have created new elements, they will appear in the Explorer tab. The Palette tab also has a search field to quickly find what you need.
- Resources: The Resources tab allows you to create new resources for your Flow, for example, variables, formulas, and templates. Once you have created new resources, they will appear in the Explorer tab. To create new resources, double-click on it.
- Explorer: The Explorer tab contains all the elements and resources added to the Flow. Double-click on the items from the list to edit them and click to view their details and usage in the Description panel (7).
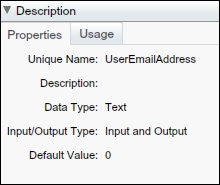
- Description: The Description panel shows the item's description when you view an item in the Palette or Resources tab. It has two subtabs, as follows:
- Properties: This shows the information, such as Unique Name, Description, Data Type, Input/Output Type, and Default Value for the element or resource you have selected:
- Usage: This lists the elements where the selected item is used:

In Chapter 2, Creating Flow through Point and Click, we will start using the elements, variables, and concepts that you learned here.