

Creating VBA code in the code window in three different ways
Our first Sub procedure was as simple as it gets. It wouldn't take much imagination to understand that coding can become more complex than that. If that's the case, it makes you wonder how long it would take to manually type the coding for super-long Sub procedures.
All depending on the situation, there is more than one option to create coding. In this recipe, we will investigate the different methods to create code.
Getting ready
With Excel open, activate a worksheet in the workbook.
How to do it…
We will now go through the steps of working with each method to create code.
Recording a macro and then opening the VBA Editor to view the code
When using this method, you'll need to perform the following steps:
- Fill the range A1:A10 with any numerical value. In this case, I filled the range with the value 100. Once done, click on cell A1:

Figure 2.18 – Fill the range A1:A10
- Navigate to Developer | Code and click on Record Macro. The Record Macro dialog box appears. Give the macro a name and shortcut key, and type a short description, as shown:

Figure 2.19 – The Macro dialog box
- Click on OK to start recording the macro. The first step is to highlight the range A1:A10. Then, format the range as Accounting by using the drop-down list from Home | Number, as shown:

Figure 2.20 – Formatting the range
- Once the formatting is done, stop the recording from Developer | Code by clicking on Stop Recording.
- Now, view the code. Press Alt + F11 to display the VBA Editor. Double-click on Module1 to open the code window:

Figure 2.21 – Code for the recorded macro
- To test the macro, press Alt + F11 to switch back to Excel. First, clear the formatting on range A1:A10. To clear the formatting, select the range. Then, go to Home | Editing | Clear | Clear formats. Click any cell on the sheet, then run the macro. The range A1:A10 will be formatted as Accounting.
Entering the code manually by typing
In this method, we will be typing the code manually using the following steps:
- While still in the VBA Editor, click on Insert, then select Module.
- A new module will appear in the Project window. Double-click on the Module icon to open the corresponding code window.
- Type the following code:
Sub MsgBoxOKCancel()
    MsgBox "Do you want to continue?", vbOKCancel
End Sub
- To run the code, press F5. The Excel spreadsheet will appear, with a message box on the screen. When you click on OK, you will switch back to the VBA Editor.
Copying and pasting
When you work in MS Word and want to copy text from one document to the other, you need both pages to be open. The same applies for code in VBA.
Open the module with the code you want to copy, as well as the one where you want to paste it. Select the code in the first module – use Ctrl + C, or right-click and Copy – then switch to the new module. Ctrl + V will paste it, or you can right-click and select Paste.
How it works…
Now let's see how each method works.
Recording a macro, and then opening the VBA Editor to view the code
Many Excel users are introduced to the world of VBA coding after recording a macro or two. Looking at the recorded steps and starting to understand how VBA works is quite exciting.
If you have to record a series of steps in Excel, there is no better or faster way to create the code than with a macro.
Entering the code manually by typing
It normally comes as a shock when you realize that not all coding can be done with the macro recorder.
Take, for instance, the message box we created with the sample code. There is no way to create that message box other than manually typing the code.
If you are new to VBA, typing code manually might sound like a challenge. However, with a little bit of experience, you will soon be able to type lines of code like a professional.
Like with any other typing, you can cut, copy, paste, and delete text in the Editor. To make the code easier to read, indent some of the lines with the Tab key. Don't forget that undo and redo can also be used!
If a single line becomes too long to read on one screen, use a space and an underscore (_) to break to a new line.
Copying and pasting
This sounds like the lazy man's escape, but there are many good reasons for copying code. Firstly, if you created a Sub procedure for another project that can be used in your current project, it would be a waste of time to retype it.
You will also find many examples of VBA code on the internet. This is a very good way of learning from people with experience.
There's more…
To make the macro we recorded a bit more useful, do the following:
- In the VBA Editor, copy the
Currency_FormatSub procedure and paste it directly below the last line. - Still in the Editor, rename it to
Range_Format. - Now, delete all the notes in the
Range_Formatprocedure. - Finally, delete the line that selects the range A1:A10.
Your code should now look like this:
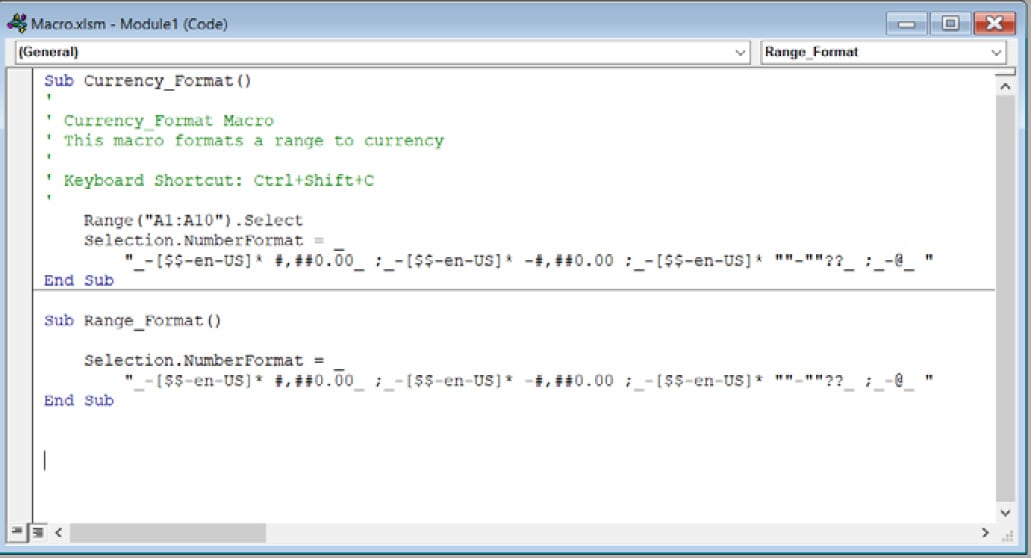
Figure 2.22 – Altered code
If you switch back to Excel, you can now use the second macro to highlight any range and format it to accounting.