
Organizing your work
Some of you might be familiar with the Windows OS's star ratings. This is a feature that allows you to award a file anything from one to five stars, depending on its merit. You can then search for files (in this context, images) that are displaying X number of stars. You might give your best images five stars, and those that need editing three stars – that kind of thing. Ratings appear in a wide range of photo-editing applications, including Adobe Bridge, Lightroom, and Camera Bits' Photo Mechanic, for good reason—it's a system that's easy to implement and effective in its organizational potential.
Star-rating your photos
If photo organization and image management are new concepts for you, I recommend you start out using Elements' Ratings feature because it's simple and works well. Here's how to get this happening:
- Right-click an image in the Organizer.
- From Ratings in the contextual menu, slide over the number of stars you'd like to award the selected image (that is, from 1-5). Or, faster still, select one or more images in the main window, and hit any number key between 1 and 5 (use the top of the keyboard, not the number keypad) to add a rating.
- To search for an already-rated image, click the appropriate star symbol in the Ratings search field (at the top of the screen, just under the Create tab), and everything in the main screen with that star rating will remain. Everything else is hidden until you click the same star rating again to zero the search.
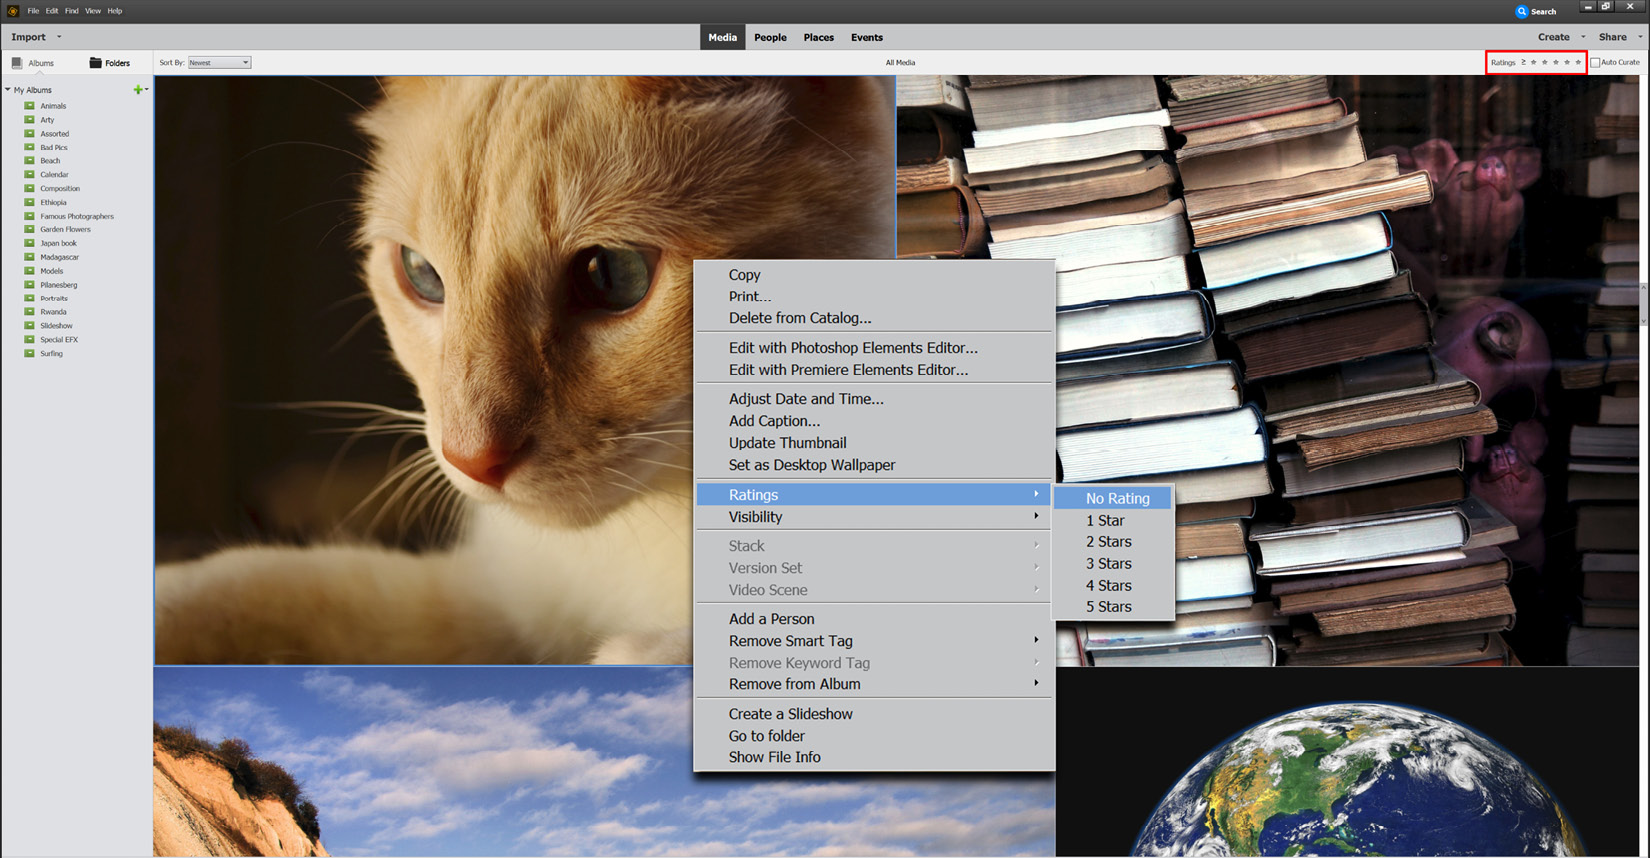
Note that this search can be refined by clicking the tiny symbol to the right of the word Ratings to set Greater than, or equal to; Less than, or equal to; or Rating is equal to. It can make a big difference to your search results.
This is an exceptionally intuitive system that's easy to set up, easy to modify, and very efficient in its search results – just use that pop-out menu to lower, raise, or delete the rating if required.
Using metadata
Metadata is little more than a small text file that records all your camera details at the time the photo is taken. We rarely see what's in the metadata unless we specifically need to look it up or, in this context, use it to search for images. Metadata records camera and lens details, the date and time, and, if your camera has it, a set of GPS coordinates.
So, without having to enter any data first (like we have to when using keywords and tags), we can use Organizer to search our image database using any of those pre-recorded metadata details:
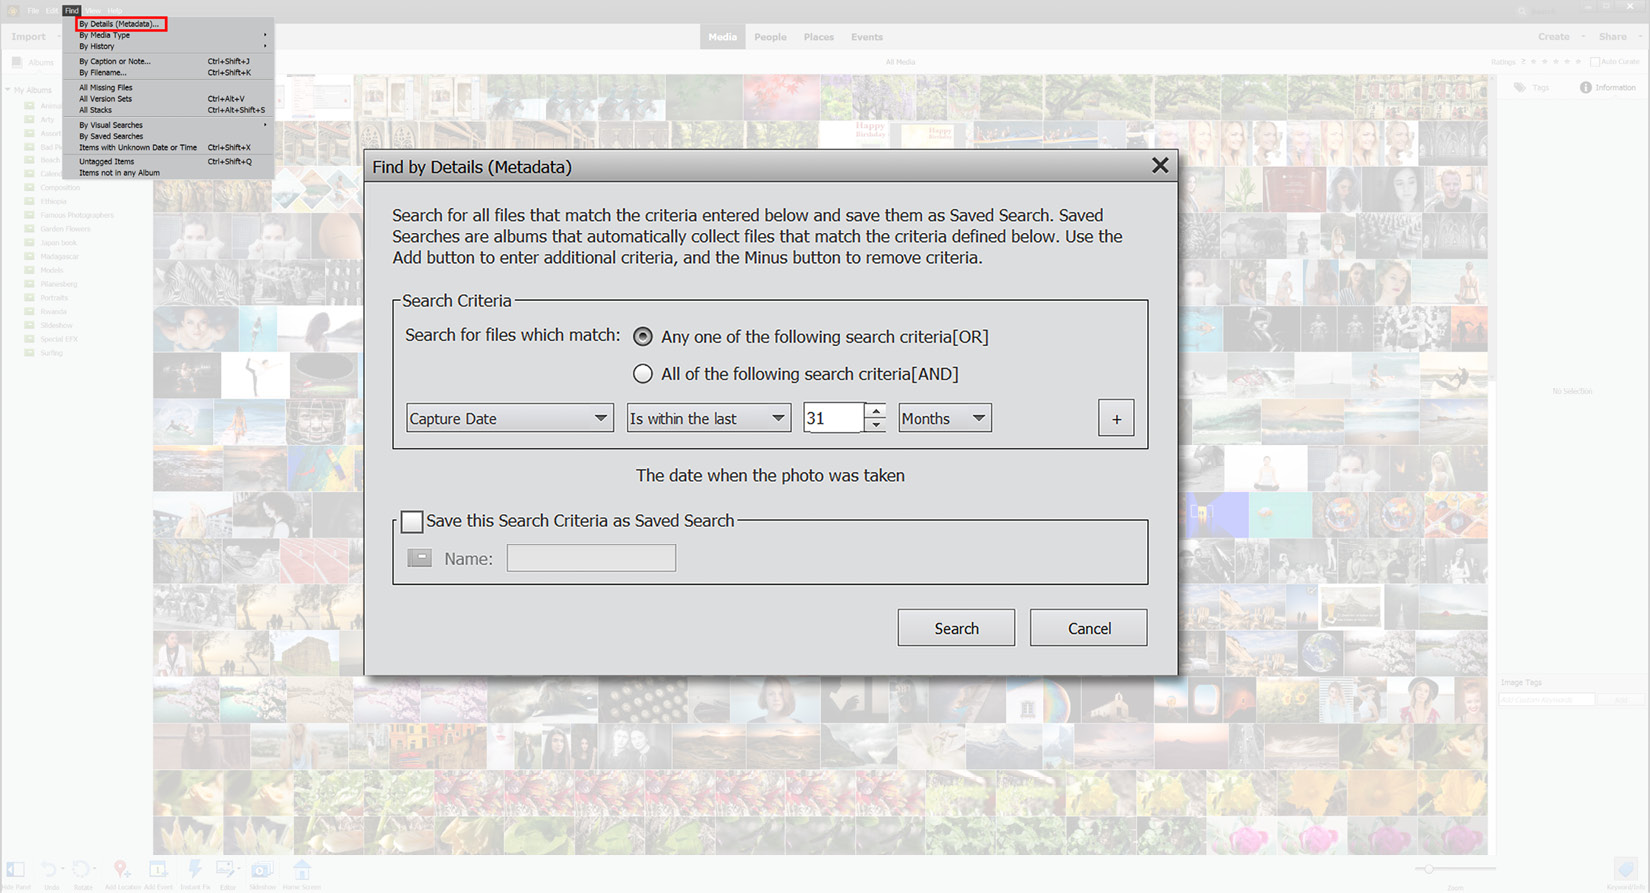
You might find the Find by Details (Metadata) search field a bit confusing because it offers so many ways to look for your images. You can also use this dialog box to save frequently used searches—a real time-saver. It can also be used to search for images by the date and time captured. This is useful if you holiday in different time zones.
The easiest way to do this is to use the aptly named Find menu. By selecting Find | By Details, we can choose from a staggering range of parameters with which to search.
The obvious choices would be to search for camera type, or the date taken—but you can also look for files based on the lens' focal length, the f-stop value, ISO, shutter speed, exposure settings, and many more characteristics. In the Find by Details window (shown in the preceding screenshot), enter your search criteria using the drop-down menu. If what you see in the menu is not specific enough, simply add a second or a third "rule" to the search by clicking the + button to the right of the Search Criteria window.
The Information panel shown here shares space in the right-hand panel with tags, and is quite comprehensive—there's a compact version and an extended version (seen here currently occupying the entire right-hand panel):
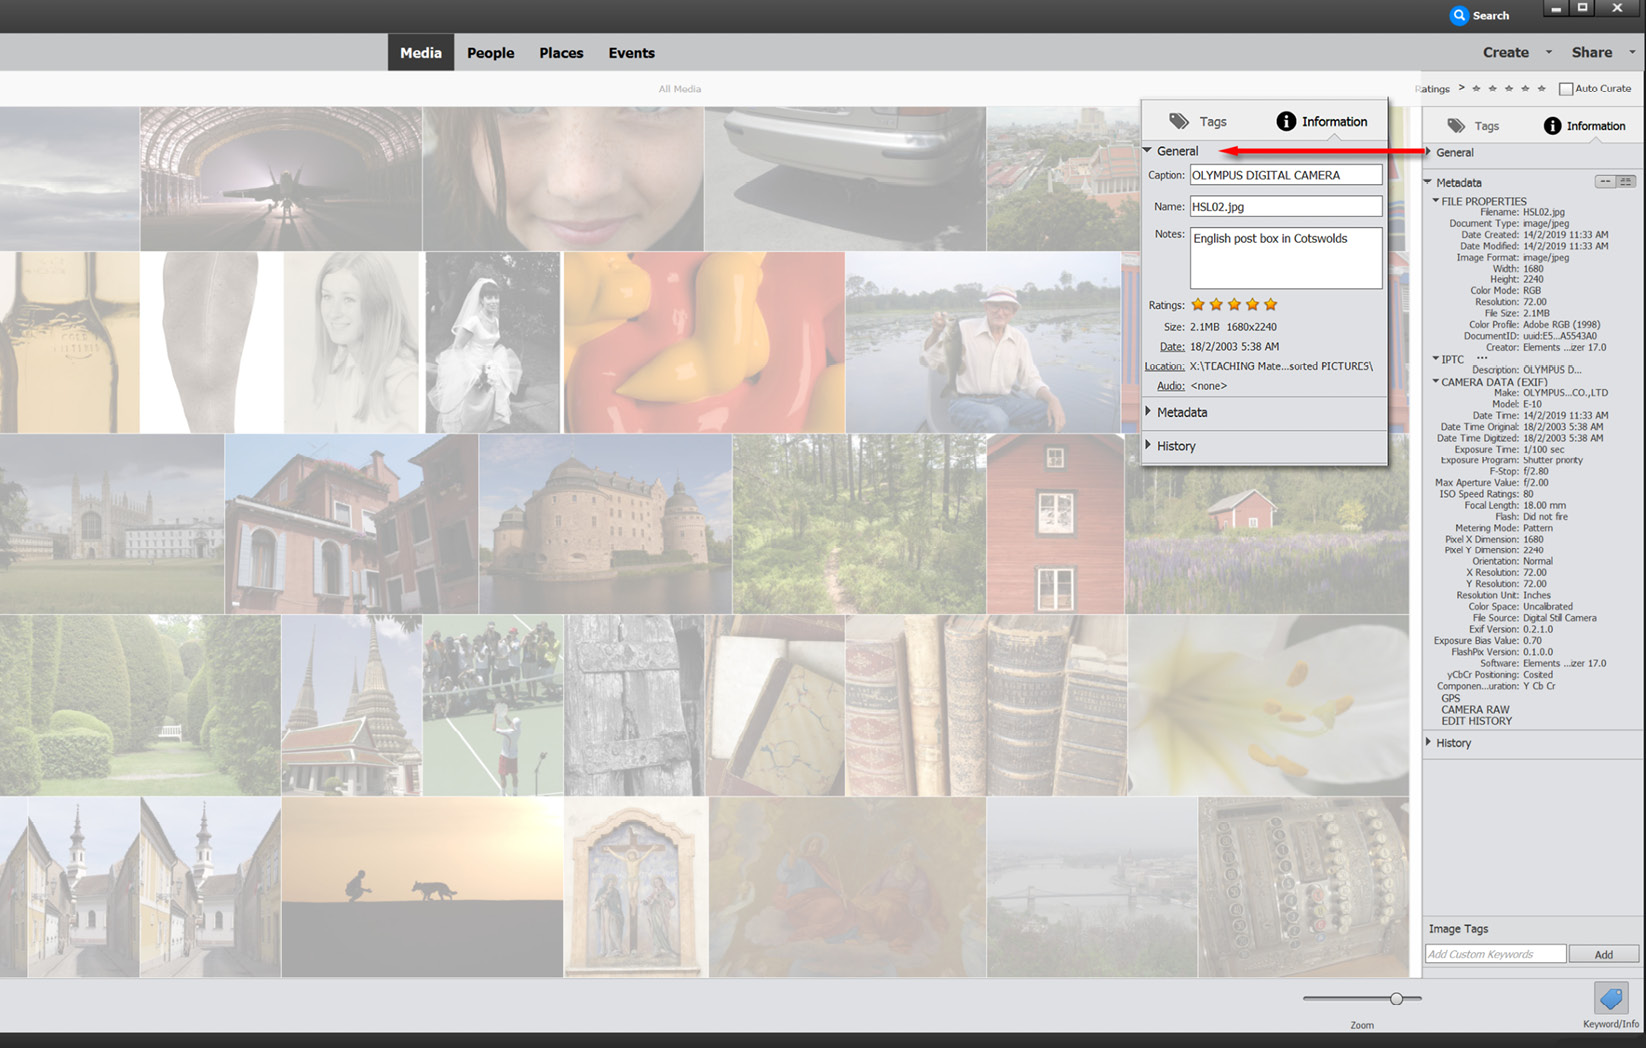
Above that is the General menu (for the purposes of this illustration, it's floating over the thumbnail picture grid, to the left of the extended Information panel). This displays a few snippets of that file's metadata, as well as the star rating and where it physically resides on your hard drives.
Note that searches can be set to use Any one of the following search criteria or All of the following search criteria. Choosing one of these over the other might have a significant effect on the search result. If it is not finding the media you are searching for, flick over to the other search rule and see if that works.
Now let's move on and have a look at what many professionals consider to be the best way to organize your photos, video clips, music files, and more: keyword tags.
Organizing your work – keyword tags
One of the best features in Elements is its ability to sort out hundreds, thousands, or even tens of thousands of images using the tested method of keyword tags.
While viewing a newly imported batch of pictures, select a file by clicking it once and, on the bottom right-hand side of the screen, type in a keyword.
I think keywording is one of the most important setup features in this program. Get in the habit of adding a keyword (or keywords) to everything you import into the Organizer and you will be able to search and find almost any image weeks, months, and even years later. It's an incredibly efficient and effective system of image retrieval.
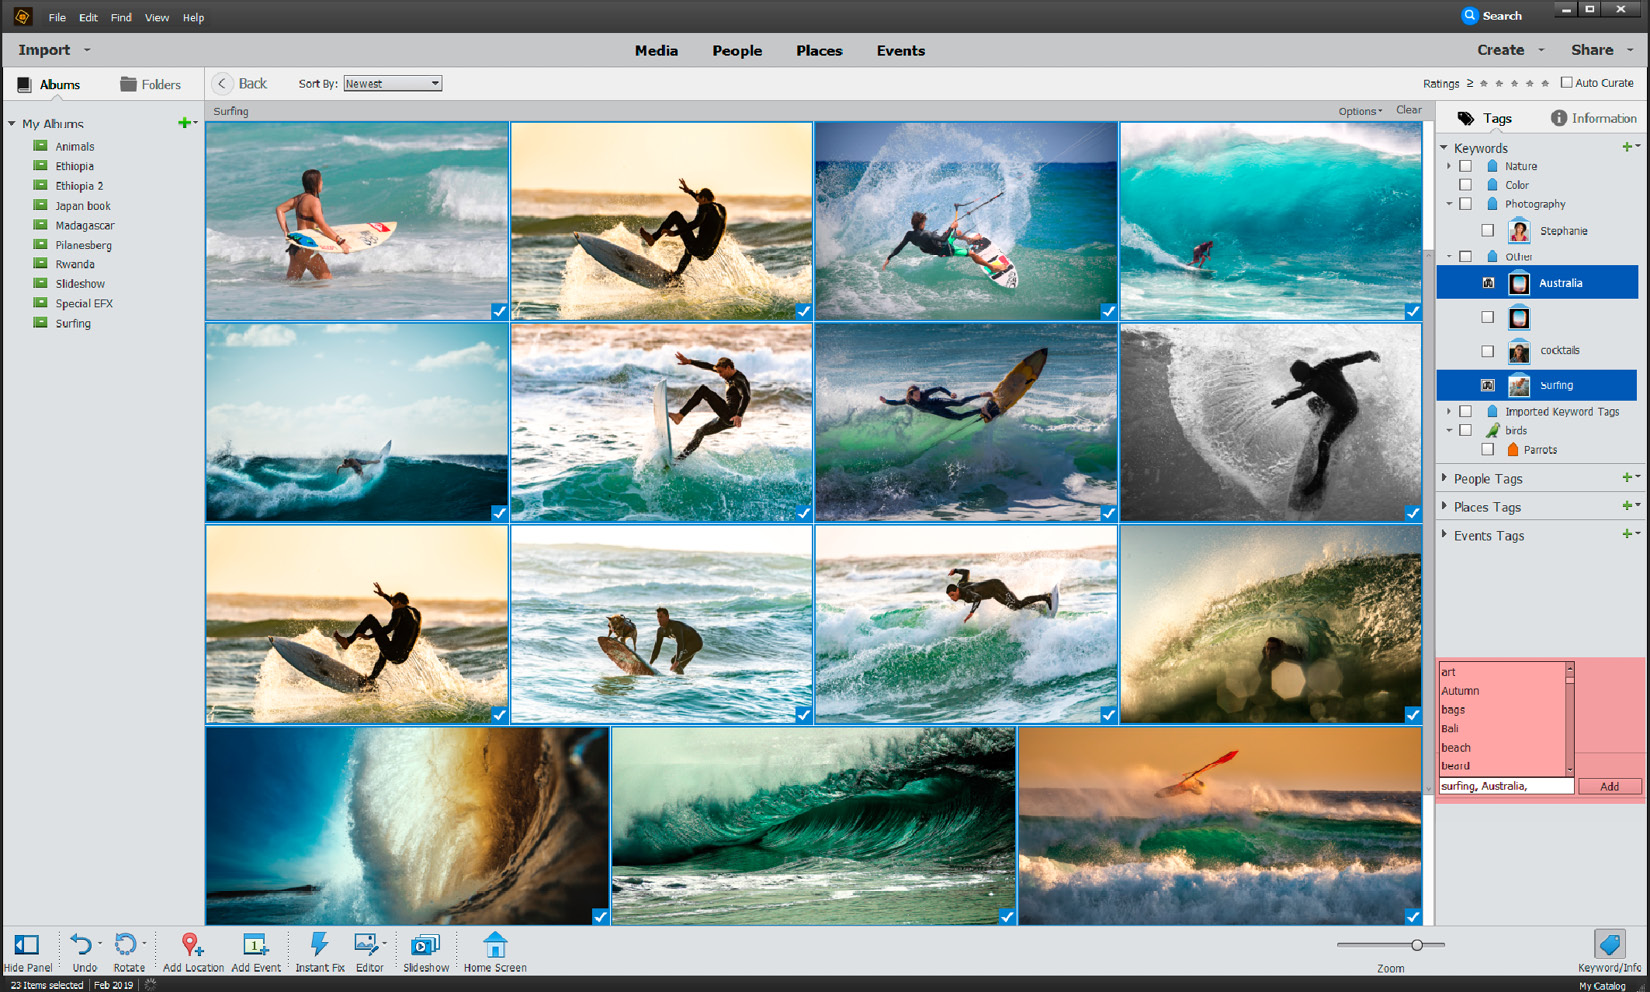
You can see that, in the pink highlighted area in the following screenshot, I have entered the words surfing and Australia. If I import and add keywords to hundreds of surfing images in the Organizer, all I need do is click in the Surfing and/or the Australia tag (both highlighted in blue in the screenshot) to find all those images, which can then be placed in a specific album called Surfing:
Let's say you have got back home from a vacation. Select all the images from the vacation and type the name of the place you visited. If you went to Australia, for example, all images could be keyworded as Australia. But if half that time was spent in the mountains around the town of Katoomba, re-select those images of Katoomba alone and add Katoomba as the keyword. If three days in Australia were spent surfing, select those images only, and add the keyword surfing. This takes only a few minutes and, with a little forethought, you'll quickly be able to keyword all the important events in this album (named Holiday in Australia) so that, months or years later, you can search for Australia, surfing, or cocktails, for example, and Elements will locate those images almost instantly.
Tip
You can take your keywording as far as you have the time and patience for by being increasingly specific. For example, I could also keyword my holiday pictures with the words beaches, restaurants, funny signs, people, markets, nightlife, sunsets, palm trees, cocktails, and so on.
If you add multiple keywords, separate them with a comma (,) to avoid confusing the search engine. Also, limit your keywords to five or six per image. Too many keywords can be counter-productive.
It's an easy process, but the real magic only really begins when you try to search for specific images shot on that trip:

In the Search field (the blue magnifying glass icon at the top right-hand side of the Organizer screen), type in a location and maybe an event using whatever keywords are appropriate (such as Surfing or Australia), and the Organizer will find those images within seconds. It's fast because it only has to sort through its database (which is essentially a text record), not through gigabytes of high-resolution RAW files.
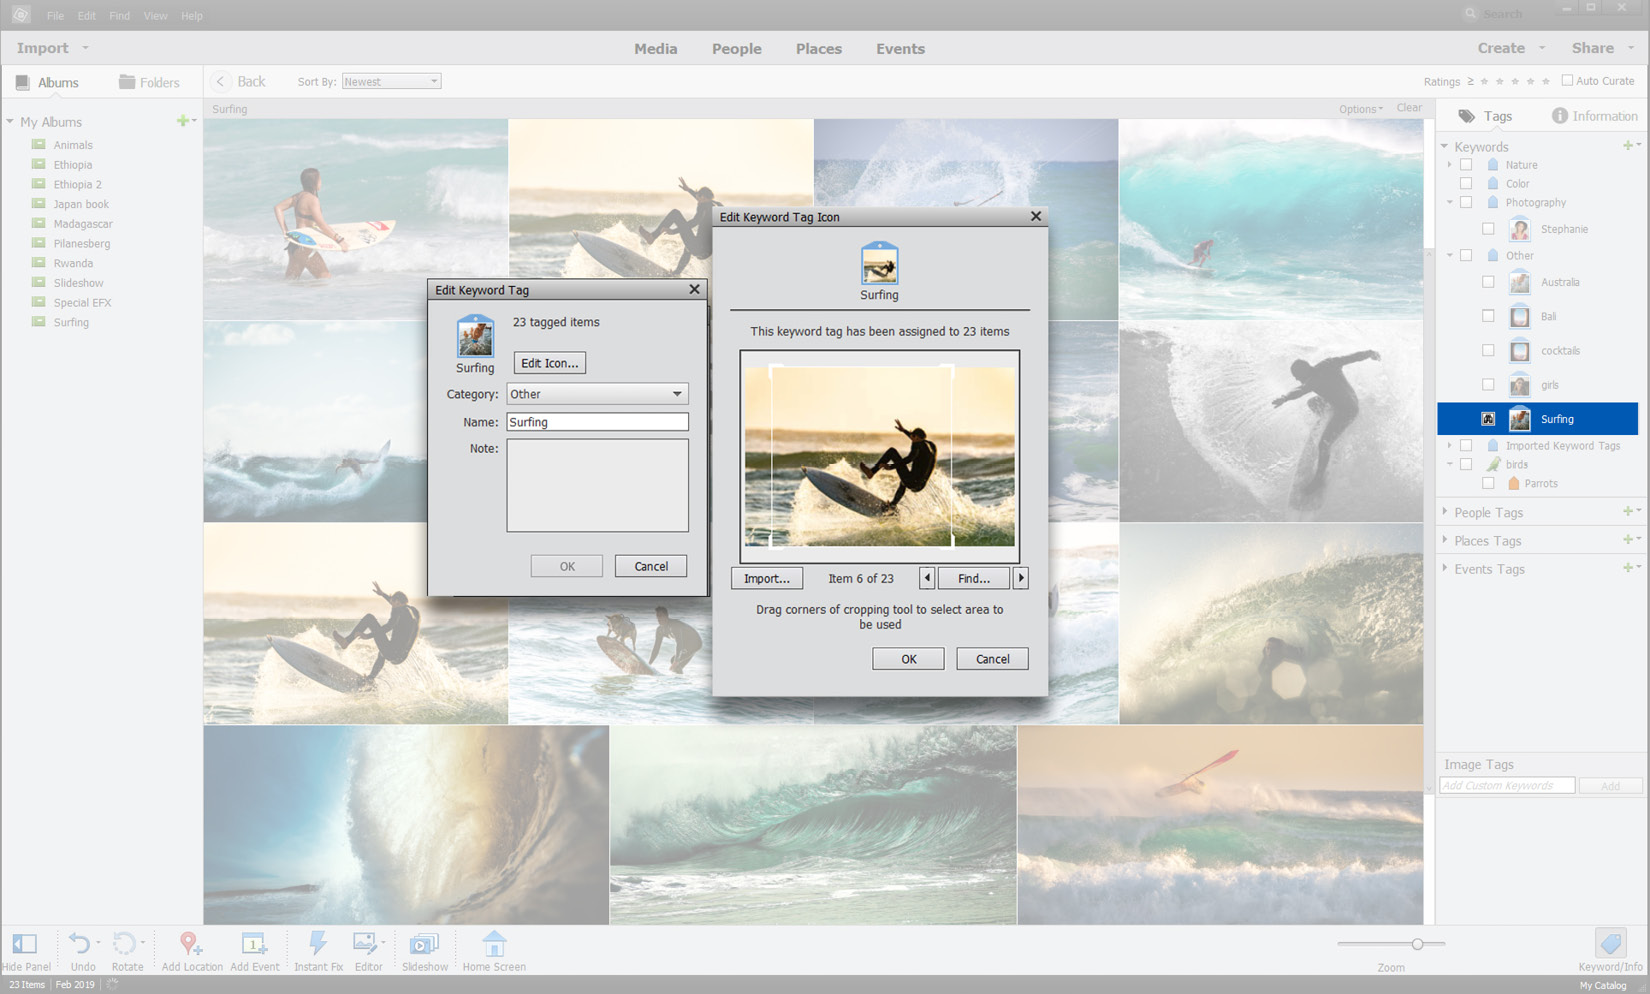
In the following screenshot, I right-clicked my Surfing keyword tag in the right-hand bin and chose Edit from the contextual menu. This brings up the Edit Keyword Tag window (on the left). You can edit the name of the Tag and add comments. Clicking the Edit Icon tab brings up another, larger window, into which you can load a surfing picture. It's a cute feature, but it won't really improve your workflow:
Keyword tags are written into the file so that if I sent a bunch of my (tagged) images to a third party, they would be able to sort them using my attached tags. Elements' tags can be read by a range of other image-editing software programs. An album, on the other hand, is a purely Elements-only feature.
If you create a new tag in the right-hand tag bin, you can apply it to any image simply by dragging that tag onto the photo thumbnail—easy! If you have 100 images that need the same tag, select all of them first, drag the newly made tag onto any one of the selected thumbnails, and it will automatically apply that tag to all selected images. Very smart!
In the following screenshot, I have enlarged the pop-out Tags menu to show its various options. There's everything here that you need to fully label anything you bring into Elements. Pay attention to the tagging process and you'll never lose an image again:
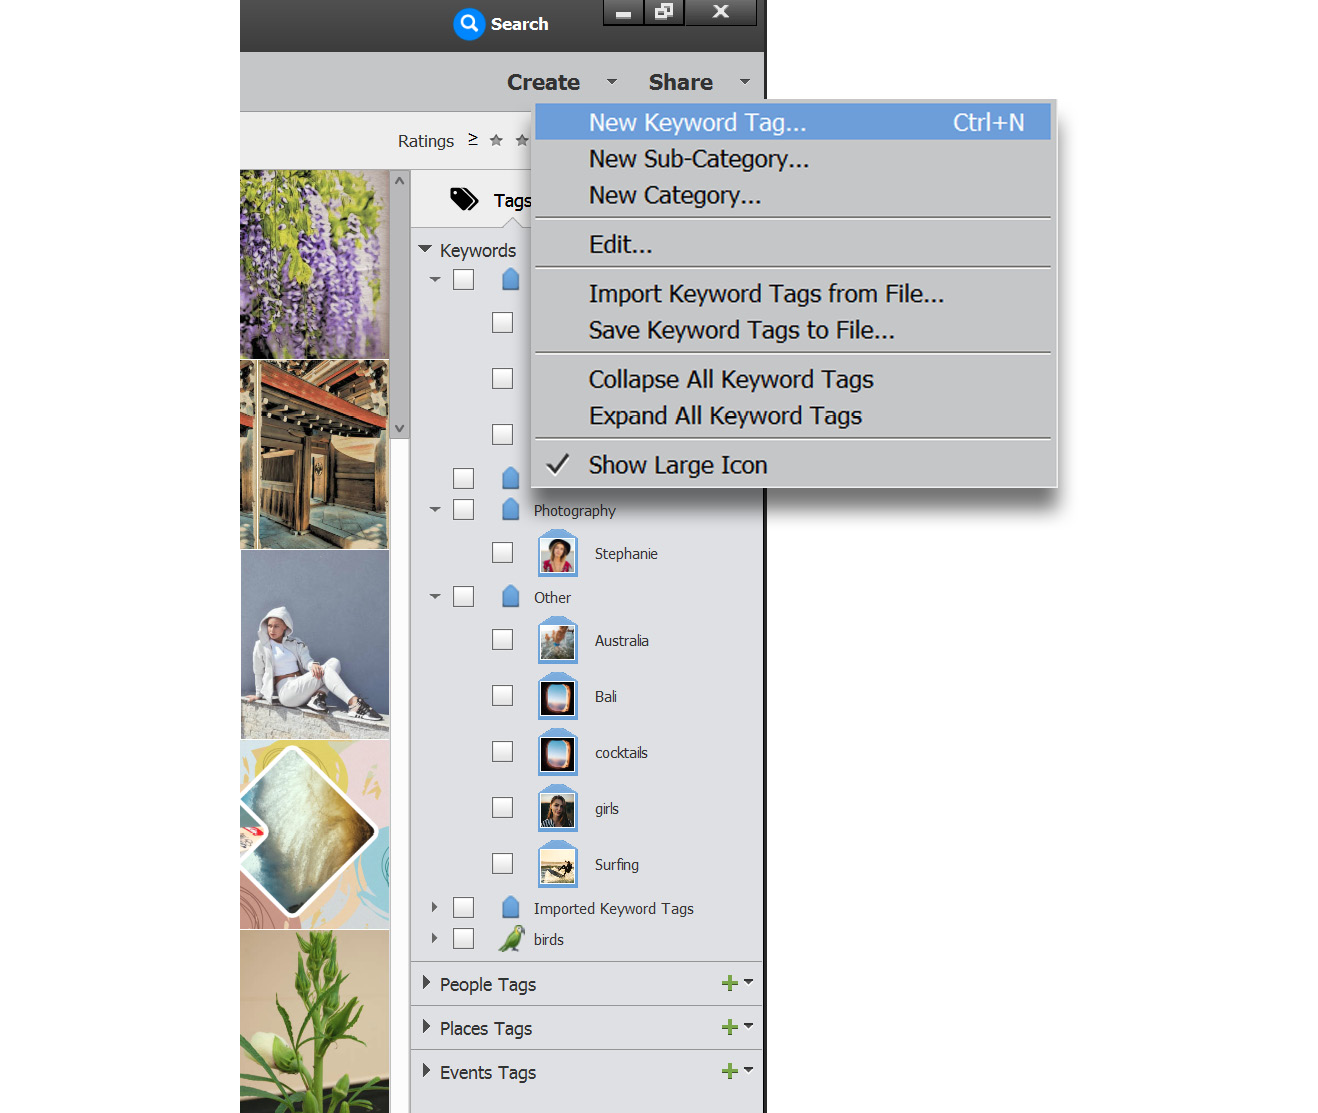
A green + symbol in the Tags bin, or elsewhere in this application, always points to the ability to create a new feature. In the example here, use it to create a new keyword tag, new category, new sub-category, or to import tags from a file, to save tags to a file, or to expand and collapse the tag hierarchy.
Tip
Don't forget that you can also create your own keyword categories and sub-categories to further refine your search criteria.
Elements provides a default subset of People, Places, and Events tags that can easily be expanded as and when needed.
Organizing your work – places
The Organizer has a huge range of features designed to help photographers keep track of, and search for, their images. I think there are too many—but that's just a personal opinion.
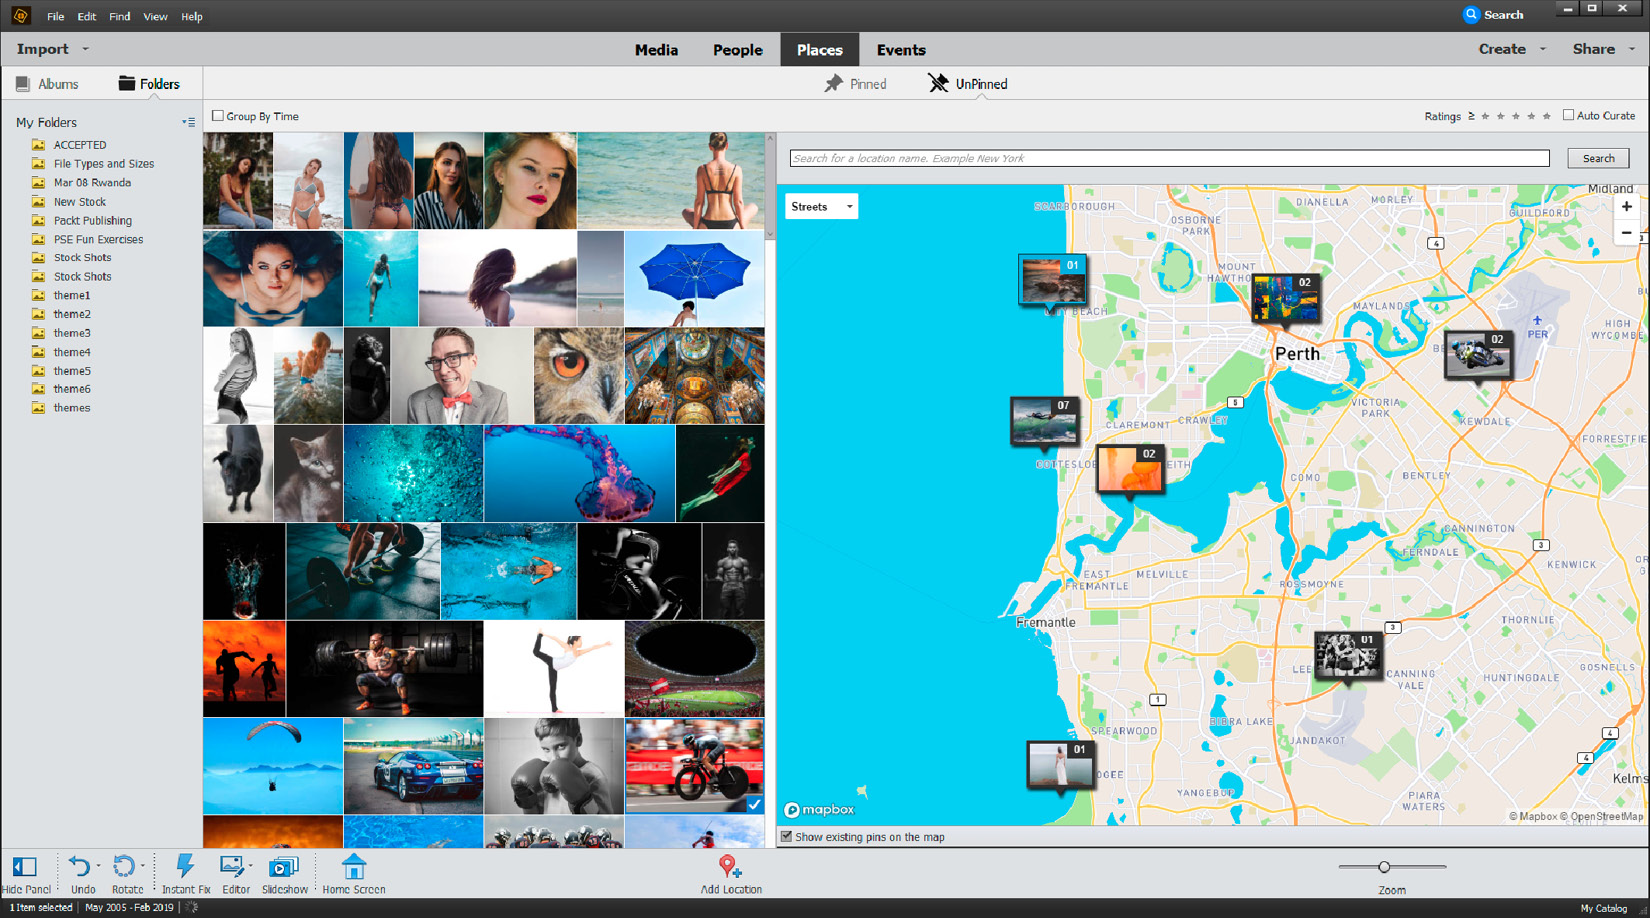
The Places feature has been in Elements for many years. Its principal use is to automatically place any image that contains GPS data onto an internet-driven world map so that users can identify pictures simply by seeing the locations where they were actually shot, as shown in the following screenshot:
In earlier versions of this program (several years ago), few cameras had GPS capabilities, so you had to drag images from the grid on the left-hand side of the screen onto the map to pin them in place instead. You can still do this.
The feature has two view modes: Pinned and UnPinned. In the latter mode, you can select single or multiple images and drag them to the location where they were shot—they are then pinned to the map. Once pinned, they automatically appear under the Pinned tab. If you get the location wrong, simply click and drag the pinned image(s) to a new location. Double-clicking the pinned image thumbnails opens them in Grid view. Double-click once more and they open in fullscreen.
On paper, Places appears to be a nice feature, but after years of teaching Elements, I have yet to meet anyone that uses this feature exclusively. That might well change once all cameras record GPS data. Since 2018, Places no longer works in any of the previous versions of Elements. At the time of going to press, Adobe was not forthcoming about why this is so. It's fully functional in Elements 2020.
Organizing your work – events
The Events category is, I think, more useful to everyday photographers. Why? Because Events starts off by using dates as a way to categorize images. We might take a bunch of shots over a family weekend or on our 12-day trip to Bali. Using the Events feature, these images can be grouped into either events dictated solely by the date, read from the metadata, or they can be grouped and renamed into something more memorable, such as Family Weekend, 2019, or simply Bali Vacation.
Events has two view modes: Named and Suggested. I normally dislike anything that suggests things to me (that is, predictive text), but in this case, it presents all your images grouped by date. This is quite useful because it instantly orders everything in the main window, whether from an album, folder, or all media. That's a good start.
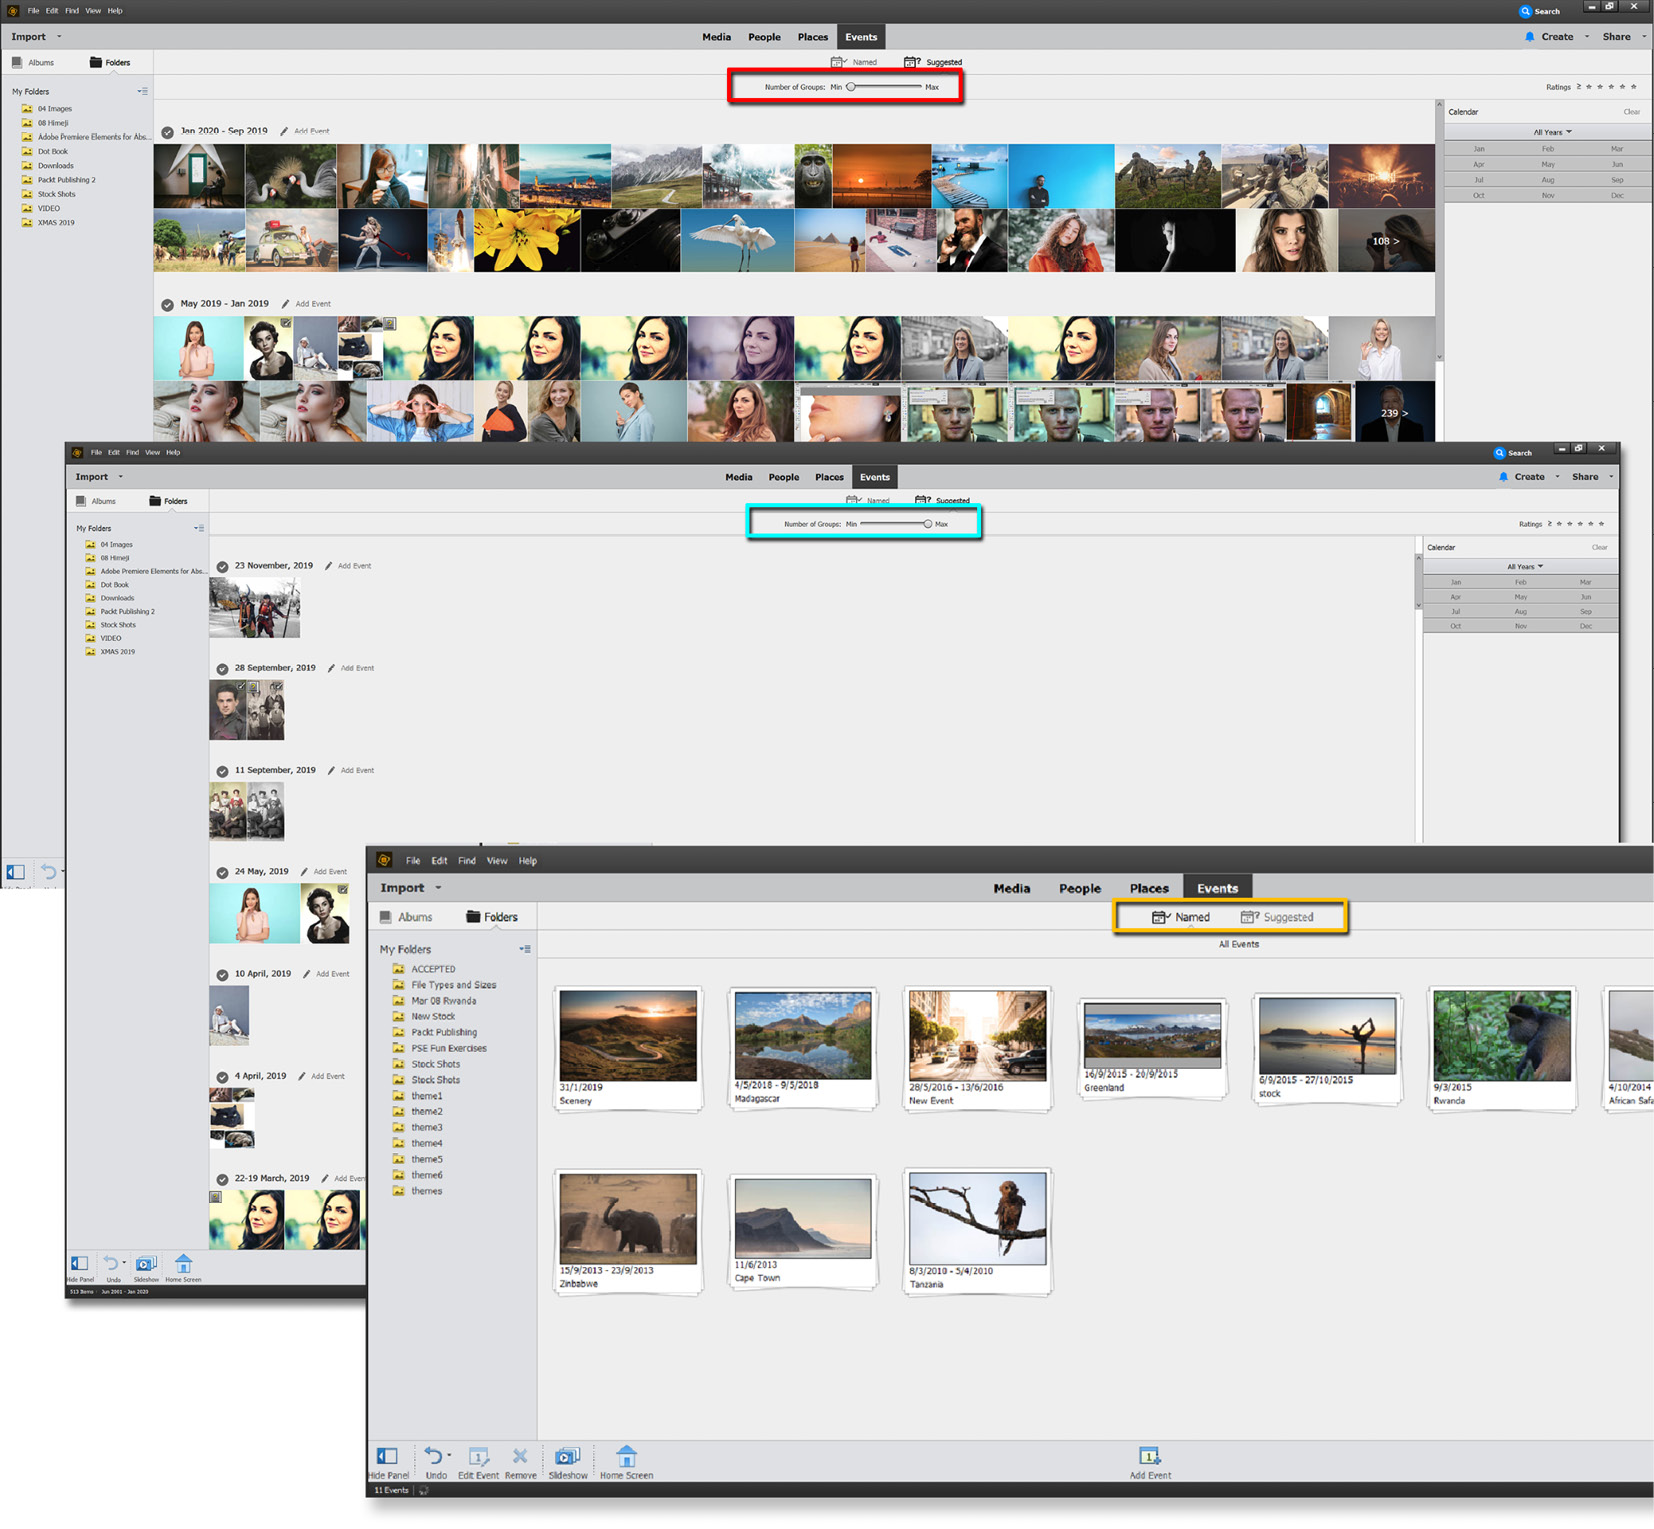
The following screenshot illustrates the power of sorting by date. The base window shows Events, with the Number of Groups slider positioned to the left-hand side (highlighted in red). Everything is pushed against everything else because the search engine is effectively compressing time. The middle window (highlighted in blue) shows how, if the slider is pushed to the right, images are displayed on an almost day-by-day basis, making it easier to find photos from a day shoot or some other short-running function. The front window illustrates what the named Events look like in the Named tab (highlighted in orange). Events can be modified.
To delete an Event, right-click and choose Remove this Event. This pop-out menu also allows you to Edit the Event (that is, to add/subtract images to/from the Event); to Set as Cover, which makes the displayed image the default front page; to Create a Slideshow, which takes all the files in that specific Event stack and puts them into a slideshow that can be saved for further editing in the Organizer; or it can be directly uploaded to social media via the Share menu (at the top right-hand side of the Organizer).
Tip
When drawing a marquee, simply click and drag the cursor so it draws a rectangle over all the images you need. Blue checkmarks appear in all those that are selected. If you accidentally miss one image, add it by holding the Ctrl or the Cmd key down while you click the mouse once (Windows or Mac, respectively). By the same process, if you select too many by accident, you can hold Ctrl or Cmd and click the file to deselect it.
I give my albums and folders real names, rather than going on just the dates—the same can be done using Places. Shift the Number of Groups slider so the setting that displays your Event does so in one group of images (that is, selecting just the weekend, or just that week). Physically select all those images (do this by holding the Shift key down, and clicking the first and then the last image in the group). They are now all selected. If the images you need are in more than one group, it's easy enough to select multiple groups by drawing a marquee around those groups.
Once selected, click the Add Event button at the base of the page and, in the dialog box that opens, give the event a proper name, check the dates to ensure you have grabbed the right sequence, select a Group if that's needed, add a description if required, and click OK.
But what happens to the proper names this group of pictures was just awarded? Click the Named tab at the top of the screen and you'll see all the images that were custom-grouped and Named now appear as stacked thumbnails. Sliding the cursor over a group displays its contents. Double-clicking an Event stack reveals the individual images it contains. Clicking the Back button on the same screen moves those spread-out images back into a stack format.
Tip
As your image collection grows, you can further refine a search, or just what's displayed in this main window, by selecting different dates from the calendar that's posted on the right-hand side of the screen.
You can also create a New Event in the Media window. Click the Add Event tab at the bottom of the page, drag those images you'd like in the new Event to the right-hand side bin, give it a proper name, check the date, and click OK.
Organizing your work – people
Elements' People mode is really all about using face recognition, an algorithm that analyzes images in the background as they are imported into the Organizer for the first time.
If it detects a face in an image, it presents it as a circular thumbnail in the main People window. If it thinks that there are several images of the same person in the import, these will be automatically stacked like a deck of cards. You can view the results in the UnNamed panel. Every image will appear with the label Add Name underneath the thumbnail to begin with. If you recognize the person depicted, click in the Add Name field and type in the name. As soon as you click the check symbol to the right of the field to lock it in, the thumbnail stack disappears. Where's it gone? Click into the Named window and there you'll see the newly named stack. Hover the cursor over the stack and you'll see the words Faces or Photos appear. Click Photos to reveal the full image in which the face was detected, or click Faces to reveal just the face or faces in that group:
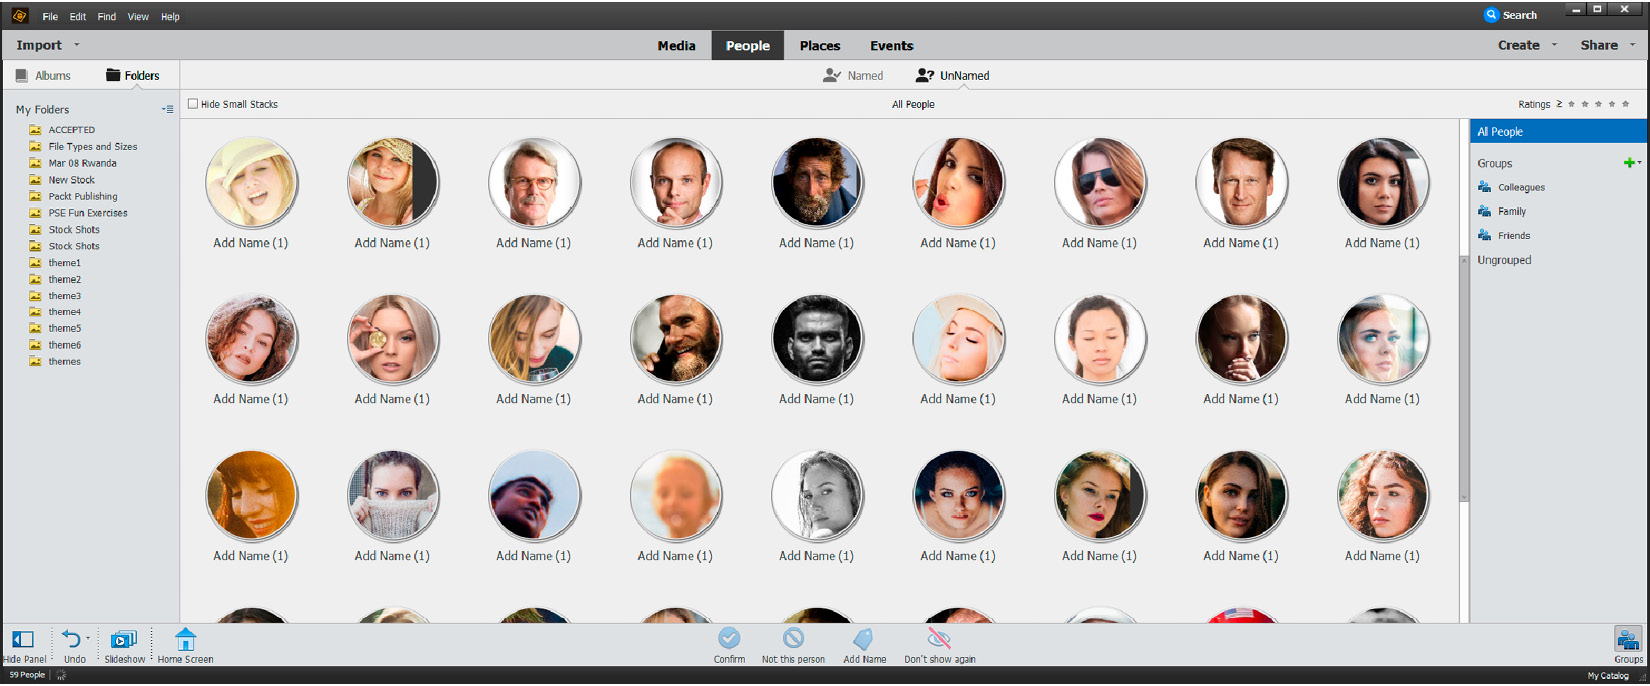
Elements' People window will find images of your friends—but it also finds every image that looks like a face, including in posters and abstract backgrounds, for example. These can easily be discounted by right-clicking the icon and choosing Don't Show Again. As you can clearly see here, I have some naming to do—as soon as an image gets a proper name, it is moved into the Named tab, and stacks with similarly named images.
Tip
You can merge one stack into another simply by click-dragging one file over another. You can further refine the sort process by adding stacks to Groups, such as Family. Click the Groups tab on the bottom-right side of the main window, and either use one of the default groups, or make a new one by clicking the green + symbol. As with most Elements' features, there is no limit to the number of groups you can have.
If you discover an inappropriate face in a stack, open the stack and right-click the Faces icon and choose Not…, or just rename it, which places it out of that stack into its own new stack. You can also use this pop-out menu to Assign that image as a profile photo (that is, this is the default top of the stack). Finally, there's the Don't Show Again command, which hides that image from ever appearing in the People view again.
For those of us that prefer to identify our images based on the content, and specifically on the people depicted in the files, you'll find the People feature very handy:
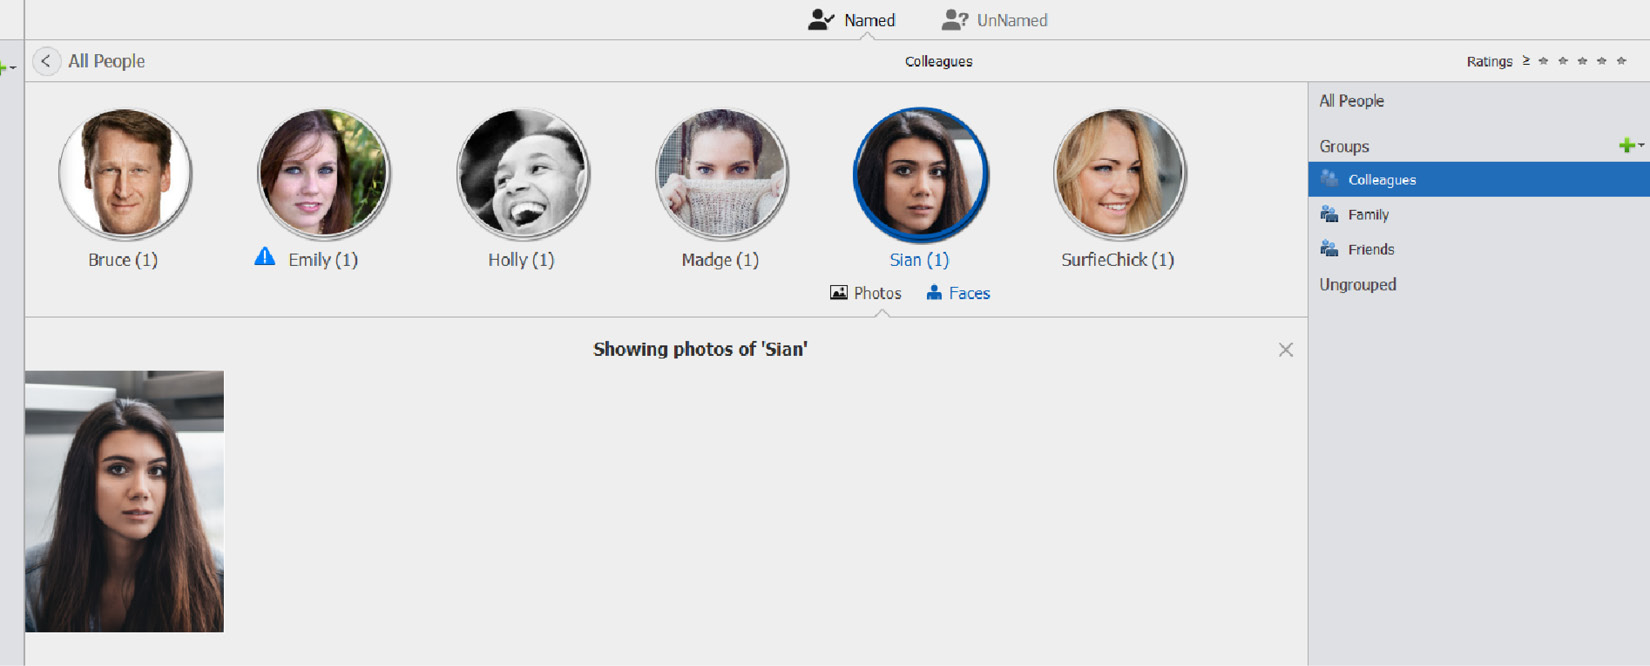
Like the Keywords feature, the People feature, shown in the preceding screenshot, allows you to subdivide your found faces into smaller categories, or Groups, as seen on the right-hand side of the screen. Elements starts you off with Colleagues, Family, and Friends but, of course, clicking the green plus (+) symbol allows you to add new group categories when needed.
Like most organizational tools in Elements, you can choose to work simply by adopting just keywords, or maybe ratings, or you can use a combination of everything covered in this section to create a sophisticated and deep searchable database. The best advice is to make up your mind regarding which way is best for you before you start; that way, you can streamline your workload from day one rather than having to go back over everything that's been imported into the Organizer because you changed your mind about how to organize your images.
Pre-planning will save you a lot of time and effort.