
Creating your first rule
Now that we've covered the key concepts, let's take a look at creating your first automation rule.
Before we dive into the actual rule, we'll take a brief look at the rule editor user interface and its layout.
The rule editor
The following screenshot represents the automation rule editor. As you can see, it is presented in a structured format that makes working with rules straightforward and intuitive:
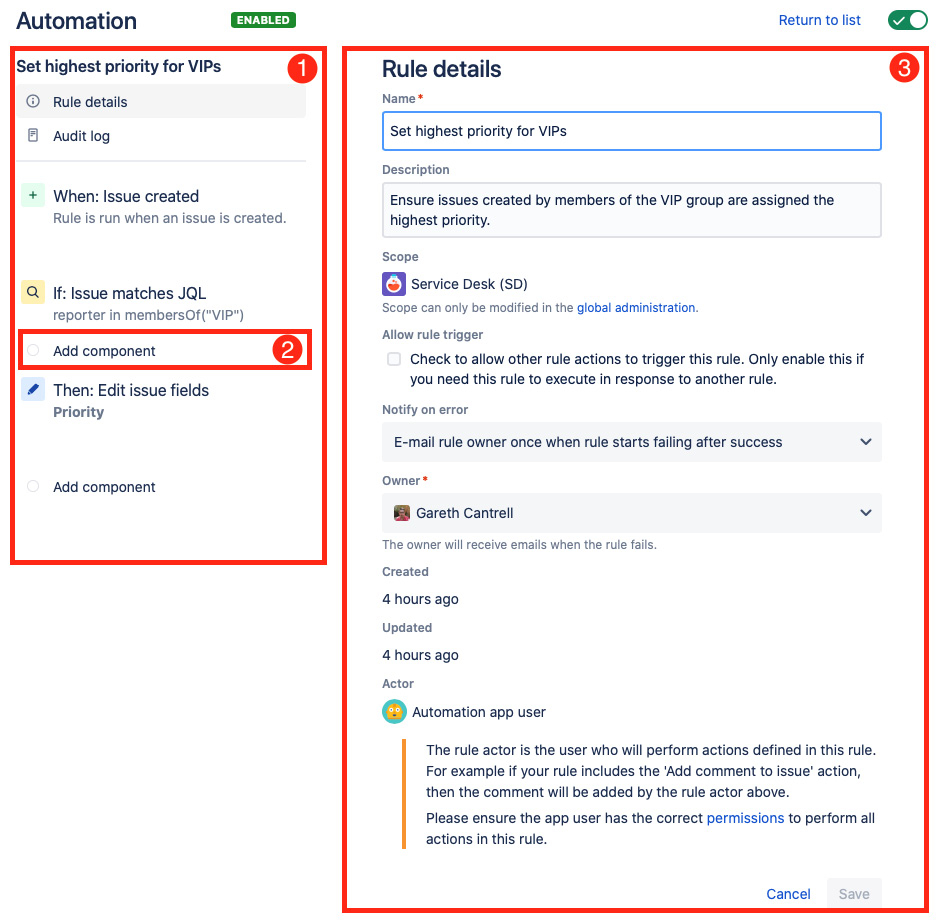
Figure 1.3 – The automation rule editor
Let's take a look at the main components that we have numbered in the preceding screenshot:
- Rule-chain view: In this panel, you can see the name of the rule, along with the components that make up the rule, in the order in which they will be processed during execution. This is also where you can access the rule's main details and its bespoke audit log. You can also drag and drop components in this panel to reorder them.
- Components: You can add new components anywhere in the rule chain by clicking on the Add components link that appears when you move your mouse pointer between any existing components.
- Rule details view: The rule details view allows you to edit the main rule details, view the rule's audit log, and edit the component configurations as applicable.
Creating a rule to assign the highest priority to VIP users' issues
This brings us to our first automation rule. In many organizations, issues raised by VIP users such as managers or executives need to be assigned the highest priority so that they get the attention of the team members immediately.
As this is our first rule, we'll show you step by step, with associated screenshots, how to author an automation rule in Jira so you can see how the rule editor enables us to quickly create a rule intuitively.
Tip
The location of the automation rules configurations differs slightly between Jira Cloud and Jira Server.
In Jira Cloud projects, automation rules can be found under the Automation tab in Project Settings, whilst in Jira Server, they can be found under the Project automation tab.
For this rule, we are going to use a Service Management project. To follow along with this rule, you will need to have a user group defined, called VIP, to which the appropriate users are assigned.
Firstly, in your Service Management project, navigate to Project settings, click on the Automation tab, and then click the Create Rule button in the upper-right corner:
- After you've decided to create a new rule, the first thing you're presented with is the option to choose your trigger.
For this rule, click on the Issue created trigger and then click Save, as shown in the following screenshot:

Figure 1.4 – Selecting the Issue created trigger
- Next we are going to add in a condition that checks whether the user who reported the issue is a member of the VIP user group.
In the following screen, select New condition, followed by the JQL condition component:

Figure 1.5 – Adding the JQL condition component
- The JQL condition component requires further configuration in the form of a JQL query. In the component's configuration screen, enter the following JQL query, then click the Validate query link to ensure the query is valid, and finally, click the Save button:
reporter in membersOf("VIP")Your rule should look similar to the following screenshot:

Figure 1.6 – Configuring the JQL condition component
- Next, we need to insert the action to perform. In this case, we need to use the Edit issue action in order to set the Priority field to highest.
Go ahead and click on New action, followed by Edit issue:

Figure 1.7 – Selecting the Edit issue action
- Like the JQL condition component, the Edit issue component also requires further configuration and we now need to choose the fields we wish to update.
You can set multiple fields in this action. However, for this rule, we are only going to set the Priority field. Start by typing the field name, and then click on the checkbox once you've narrowed your selection:

Figure 1.8 – Selecting the Priority field
- Now that you've selected the Priority field, click out of the Choose fields to set option so that you can access the field values list where you will be presented with a dropdown of available options. Select the value Highest, and then click on Save:

Figure 1.9 – Setting the value of the Priority field
- We have now configured our first rule. All that remains is to give our new rule a name, turn it on, and give it a description.
In the following screen, set the rule name as follows and then click Turn it on to publish the rule:
Set highest priority for VIPsThe completed rule components should look similar to the following screenshot:

Figure 1.10 – Giving the rule a name and turning it on
- Finally, let's give our rule a description and ensure we're happy with the general rule details. Click on Rule details in the Rule-chain view on the left, enter the following description, and then click Save:
Ensure issues created by members of the VIP group are assigned the highest priority.
Figure 1.11 – Adding a description to your rule
- You may have noticed that when you entered the description, the lozenge at the top of the Rule-chain view changed from Enabled to Draft.
This alerts you to the fact that changes have been made to the rule, but not yet published. If you do not wish these changes to be published, either click on the Cancel button at the bottom of the Rule details panel or click the Return to list link in the top-right corner of the Details panel.
For now, click on Publish changes:
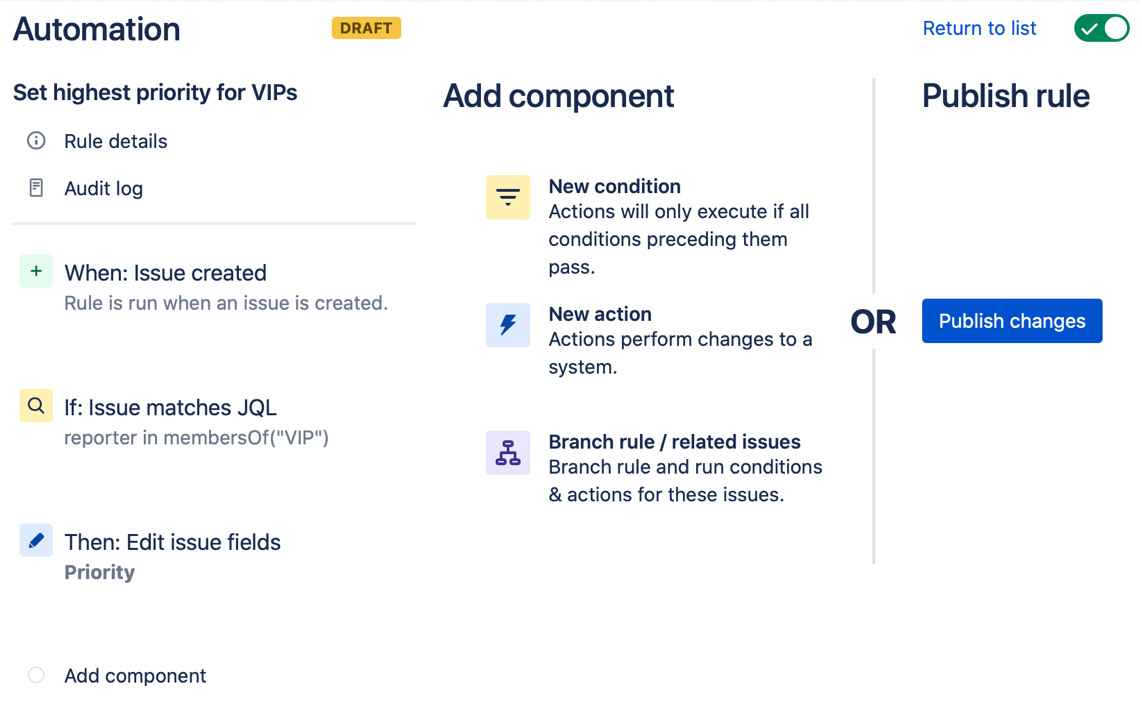
Figure 1.12 – Publishing your rule changes
Your rule will now appear in the rule list against your Service Management project and every time an issue is created by a user in the VIP user group, the priority will automatically update to Highest.
To test this rule, add yourself to the VIP group and create a new service request in your Service Management project. Make sure the priority is set to something other than Highest. Once you have created the issue, navigate to it and examine the activity in the History tab. You should see the priority change from what you selected to Highest, and the activity should be logged against the rule actor.
You have now learned how to create and publish an automation rule in Jira without writing any code.