

What you should know about Revit productivity
Productivity in business is a significant factor when it comes to the performance of a company, and increasing productivity is the process of working smarter in a predefined time frame to match your project deadline.
It is essential to define productivity and gain a better understanding of how you can measure it in your daily activities when working on multiple tasks and utilizing Autodesk Revit, too.
Productivity can be defined as a process to measure a production against efficiency and convert inputs into outputs. This process applies to a machine, factory, or a person, where the results can help companies to take operations-based and investment decisions.
There are multiple methodologies that you can use to measure productivity; the basic formula is output divided by input, which is equal to productivity:
Output ÷ Input = Productivity
The methodologies used to measure productivity depend on which sector your company is involved in, and we have listed a few examples next.
Here are some productivity methodologies:
- Time management
- Tasks completed by the workforce
- Personal performance
- The ratio to manufacture a product
We are going the explore the time management methodology to improve productivity and performance when working with Revit. You can use these principles in any task that involves digital production.
The critical factor when it comes to improving productivity is to have quality and precise inputs producing your model and sheets before you start to work in Revit.
You may be quick when it comes to completing a specific task in Revit, but without quality inputs, there is a risk that you will have to redo the work, which will reduce the overall productivity.
Our time management methodology to improve productivity in Revit is based on quality inputs for digital production. This methodology will allow you to be more efficient in Revit and become a team player who meets every single project deadline.
The first step in this methodology is to research quality inputs. These can come from your company, coworkers, multiple companies within your project, and, ultimately, the client who is the main stakeholder.
Once you have established your quality inputs, you can start working in Revit to produce your model and drawings. The following examples will help us to demonstrate this process.
Example 1: Setting up a Revit project
In this example, the BIM Execution Plan (BEP) defines the quality inputs. However, often, the information required to set up the project is not fully available, and you will need to research quality inputs.
The quality inputs for this example are the naming standards, project standards, collaboration standards, survey strategy, volume strategy, software versions, exchange formats, the level of information need, BIM deliverables, the Common Data Environment (CDE), the project location, coordinates, levels, and grids.
Changes in the project number are a common issue in many projects, and by using this methodology, you will need to request this information from your project lead and a confirmation from your client before setting up the Revit files. The project number should be defined clearly in the BEP with the client's approval to avoid any changes during the design and construction phases.
Managing information to work smarter is a fundamental part of our methodology, and if you combine this with Revit's best practices, it can take you to the next level of productivity.
A simple change in the project number can affect the productivity of multiple coworkers from different areas, such as the document controller, information manager, and the commercial and legal departments.
Note that the legacy information from previous drawings will be affected; it will lose its connection to the new drawings because of the new project number.
In this example, you can see the importance of having the correct information at the right time, and it needs to be confirmed by the main stakeholder or client.
Example 2: Defining the room numbering system
In this example, the client needs to approve the room numbering system, which also needs to be aligned with the facility management system to guarantee a continuous flow of data.
By using this methodology, you can reduce the chances that the room numbering system will be changed in the future, which ultimately improves your and your team's productivity.
If you are familiar with Dynamo as a visual programming tool for Revit, you might suggest using Dynamo to rename all of the rooms in your project quickly. Yes, Dynamo can rename the room quickly. Our methodology uses the principle that you should get it right the first time, so you don't need to rework and use Dynamo to rename the room because it was agreed at the beginning of the process.
In this example, you can improve your productivity by avoiding having to redo the work twice and wasting time with tasks that can be easily agreed upon at the beginning of the project.
Example 3: Training versus productivity
Some projects start with a design team without the required knowledge of specific software, which will slow down productivity.
Revit training is essential to increase productivity, but the time to provide or receive training needs to be adjusted.
Designers will benefit if the training is delivered just days before starting the project because the computational knowledge needs to be fresh. Otherwise, a designer will only retain the main points over a period of time.
The trainer needs quality information about when the projects are starting to be able to define the best time frame to provide training.
By using this process, the Revit trainer will note a reduction of requests to reattend the training, which will demonstrate the effectiveness of the training and their productivity in providing the training.
Revit is an intuitive software in which designers can learn the basic commands quickly, and it benefits the company strategy to switch platforms or provide training for new staff.
The following graph shows the benefits of investing in training for quick project implementation, and it will reflect a reduction in the amount of time needed to achieve the Return on Investment (ROI). Overall, it will lead to the improvement of team productivity in Revit and BIM:
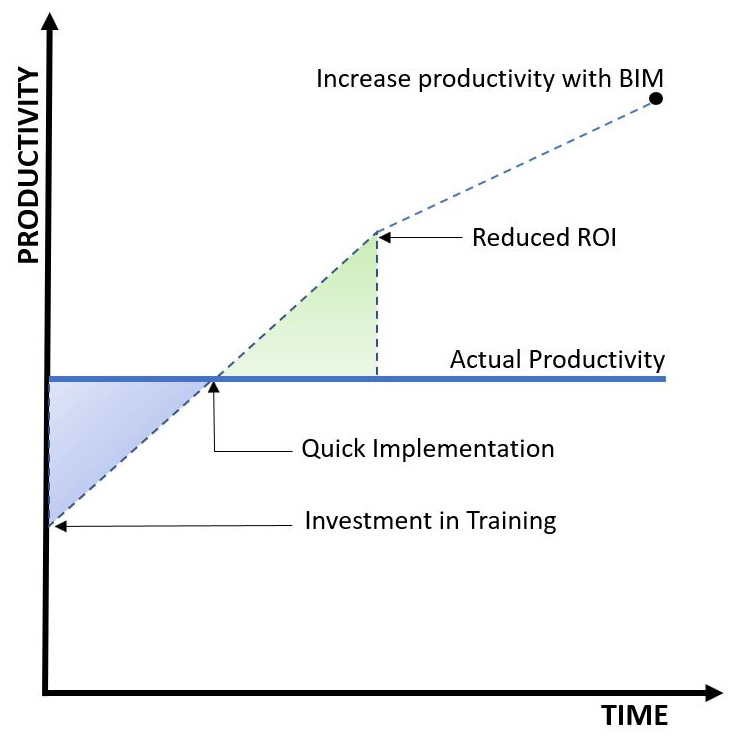
Figure 1.1 – Investment in training
Another common issue is when a team member does not have time to attend the Revit training, or they decide to learn Revit on a live project. This process will give you the false feeling that these team members are ready to work in Revit, and the optimal level of productivity will take longer to achieve.
In this situation, the trainer needs to provide short slots of training to improve their Revit knowledge and avoid mistakes on the project.
In this example, providing training at the right time improves productivity and reduces the time to reach the ROI.
Example 4: Revit versus 2D CAD – productivity
BIM has promoted a transformation in the Architecture, Engineering, Construction, Owner Operator (AECOO) industry, where information is the core of a methodology that improves productivity and brings many benefits when compared with the traditional 2D CAD process.
Revit is information-centric in that it offers multiple advantages compared to traditional 2D CAD, and we can easily measure a significant increase in productivity.
BIM platforms, such as Revit, give us federated information, which means quality data that can be applied for multiple uses, and this is part of our methodology to work with quality data.
Of course, that all depends on the designer using the correct input information and modeling in 3D precisely to optimize the analysis benefits.
In this example, we can understand the increase in productivity when switching from 2D CAD to Revit, but quality information is paramount to improve productivity.
Example 5: Planning your work in Revit
Time management principles focus on the process of planning your work before starting a task, and it is not very different when you work in Revit by yourself or when working in a large design team.
Your productivity will increase if you plan your task prior to modeling and search for quality information to avoid any rework.
During this process, you can select activities that will have a high impact on your task and consider other activities that can be postponed.
The following graph shows the process to prioritize tasks that will have a high impact on the project:
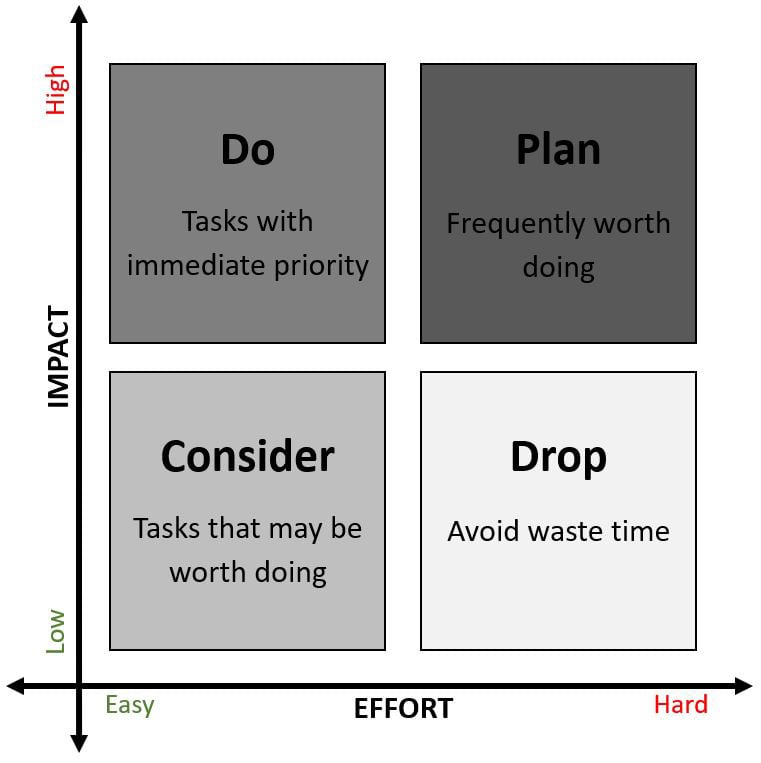
Figure 1.2 – Effort versus Impact
For this example, we will utilize a process to create a door schedule that has many activities to check and collect quality information.
High impact
Do the following:
- Use a door numbering system that has been approved by the client.
- List the fire door rating.
- Decide which fields will be included in the door schedule.
- Check the structural opening.
- Check whether the door parameters are reporting the correct data.
Plan the following:
- Check whether the doorframe dimension is correct.
- Check that the family name is the same as the project standard.
Low impact
Consider the following:
- Depending on the project stage, the door material can be generic.
- Depending on the project stage, check the door tolerances.
Drop the following:
- Depending on the project stage and scope of work, team members could postpone their selection of the ironmongery set.
- Check the gap between the door panel and the floor.
In this example, we can use time management principles in the Revit modeling process to improve productivity and define the priorities that will have a high impact on the project.
Following our methodology, time management processes with quality information will provide a jump in the efficiency of your work.
We have reached the end of our examples to define the importance of research and get quality information before doing a task. We have learned how to avoid proceeding based on the immediately available data, which may not be 100 percent reliable or complete.
There are other technical factors in Revit that can help you to improve productivity and make your work more efficient. Let's explore them in the next section.
Computer maintenance
It is essential to do some housekeeping in order to get the best Revit performance possible. We recommend that you perform the following steps on a fortnightly basis.
Revit local files
When working on a worksharing environment, Revit will automatically create local files on the user's computers in the Documents folder. This process will make the Revit local file (that is, the work-in-progress file) a copy of the Revit central file with the addition of your name in the filename.
The objective of this process is to remove the local files in order to provide more space on your C:\ drive and consequently improve performance:

Figure 1.3 – The Revit local file
These file and folder locations are defined under Revit Options:
- In the upper-left corner, click on File | Options:

Figure 1.4 – Revit Options
- From the left-hand menu, click on File Locations:

Figure 1.5 – Default path for Revit local files
- Underneath Default path for user files is where Revit saves the local files and folders.
It's recommended that you delete any files that are older than two months.
To improve this process, it's recommended that you create a folder called Revit_20XX_Local_Files (where 20XX is the Revit version), so the Revit files will not mix with any other files located in the Documents folder:
C:\Users\<username>\Documents\ Revit_20XX_Local_Files\

Figure 1.6 – The path for Revit local files
Tip
The location might differ depending on the Revit Options you have set. This information will be saved in the Revit.ini file and used for future Revit sessions.
Temporary Windows files
Applications that are being used by the user normally create temporary files and often. Therefore, users should delete them on a regular basis.
Before running this process, make sure that all Revit sessions are closed.
To access this folder, perform the following steps:
- Open Windows Explorer.
- In the top bar address, type in
%temp%and press Enter:
Figure 1.7 – Temporary Windows files location
- Select all of the files and click on Delete. If a warning window pops up, ignore all of the read-only files (these are being used by the applications and cannot be deleted at that moment).
Disk cleanup
Another task that users should be running is the Disk Cleanup tool. This tool will also delete files that are no longer needed.
To access this tool, perform the following steps:
- In the Windows search bar, type in
disk cleanup. - From the list, select the tool you need:

Figure 1.8 – Disk Cleanup
- From the list, select which files you want to delete:

Figure 1.9 – Clean up system files
- Click on the Clean up system files button to start the deletion process.
- When the process has finished, click on OK.
Restarting Revit
If users experience a decrease in performance after carrying out high-demanding tasks (such as exporting, printing, rendering, or upgrading models), Revit should be restarted.
This will allow all of the data cached in memory and on the hard disk to be deleted.
Restarting Windows
Following on from what we mentioned earlier about restarting Revit, the same should also be done with Windows. This suggestion depends on how many applications the user has been working on.
Tip
We recommend that users should restart their computers every day, or at least every other day, to allow the system to clean up, get rid of temporary files, and update itself.
Always use the same Revit update release
Quite often, Autodesk deploys new update releases with some new features and bug fixes.
It is essential to make sure that when working on a project with other team members, everyone has the same update release to avoid any potential software issues.
Tip
In the same Revit version – Revit 2021, for example – we can have different update releases, such as the following:
Revit 2021.1.1 – Release Date: 18-Sept-2020
Revit 2021.1 – Release Date: 22-July-2020
To confirm which Revit update release you have installed, please start Revit.
After Revit has opened, follow this step-by-step guide:
- In the upper-right corner, click on the small dark arrow close to the Help menu:

Figure 1.10 – Accessing Revit Help
- Click on the About Autodesk Revit 2021.1.1 option:

Figure 1.11 – Revit version release information
Tip
The version available varies depending on which Revit version you have installed on the user's computers.
- On the right-hand side, it is possible to confirm which Revit release is installed:
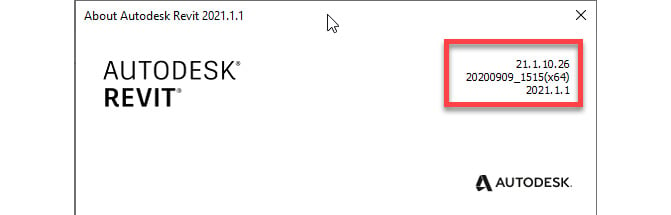
Figure 1.12 – Revit release: full description
It is recommended that you keep Revit updated; however, before the deployment, make sure that the version you are about to install is stable enough.
You can find and download the latest updates from the following locations:
- The Autodesk Manage Account portal:
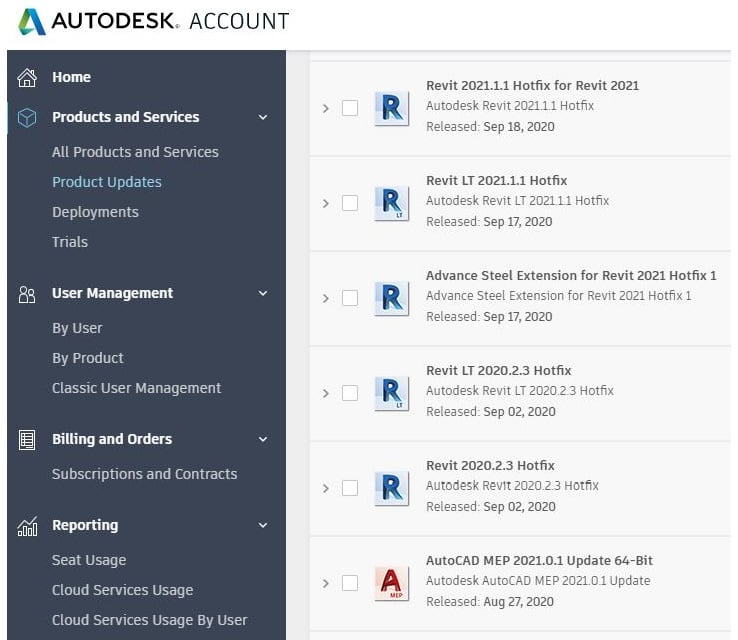
Figure 1.13 – The Autodesk Manage Account portal
- The Autodesk Desktop App:

Figure 1.14 – Autodesk Desktop App
Tip
It is not recommended that you update the Revit release immediately after the new version is rolled out.
Revit's recommended settings
Revit is a high-demanding software in terms of using up computer resources. It is highly recommended that you keep the settings as least demanding as possible. We will only highlight a few recommendations, but others might also apply, depending on which discipline it is or even the task you want to do.
The following is accessible through the Revit Options button:
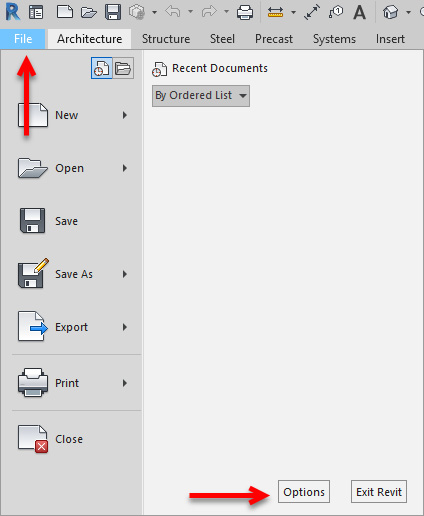
Figure 1.15 – Revit Options
- User Interface | Tools and analyses
It is recommended that you switch off all the analysis tools that you don't need to use. By accessing the User Interface menu, you can untick all of the unnecessary ones:
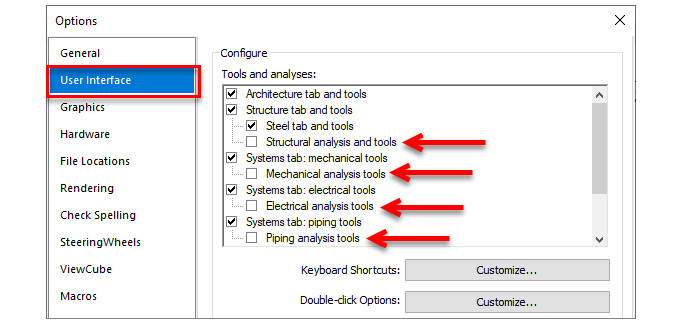
Figure 1.16 – The Tools and analyses options
- Hardware | Hardware setup
Under the Hardware menu, make sure that the Use hardware acceleration (Direct3D®) and Draw visible elements only options are ticked.
This helps when navigating through the model, as all hidden elements will be ignored during the navigation, which will improve performance:
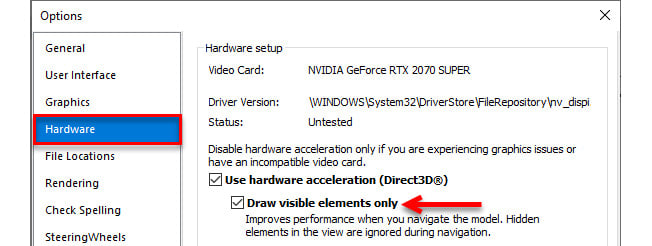
Figure 1.17 – Draw visible elements only
Tip
This hardware acceleration feature should be disabled when navigating through a view, when users are experiencing graphics-related issues, or when this feature is incompatible with the graphics card.
File size
A Revit file size doesn't depend only on the project size but on many other factors too, such as the geometry complexity, file formats imported, amount of families imported, and any warnings.
Auditing the models every week will help to keep the model both in a workable condition and healthy without affecting or reducing the Revit performance.
As a reference, and depending on your computer's specifications, Revit models should not be bigger than 300 MB.
If the file needs to be bigger, users must decide whether it should be kept as a single model/volume, or if the model segregation and model volume breakdown should be reviewed.
For a federated model (that is, files with multiple links), the recommended maximum file size is approximately 500 MB.
Tip
As a good practice, both project and family files should be purged to reduce the file size by deleting any unwanted or unused elements and settings.
Family creation
Family creation is one of the big topics when it comes to performance, as the more complex we develop them (for instance, with multiple formulas, over-modeling, nested families, arrays, voids, or overconstrained with parameters), the bigger the file becomes.
When creating families, users should bear the following in mind:
- Standard families should be used instead of model in-place families (especially when they will be repeated).
- Nested families must be limited to a certain level – they should be kept to one nest level, if possible.
- When downloading families from websites or suppliers, make sure they are not over-modeled and that they are using native geometries (by using different CAD formats imported, or over-modeled geometry, it will affect the model performance significantly).
- Families that cut hosts will consume computing resources when compared to a typical family (that doesn't cut any hosts).
When creating a family, users should take the following into consideration:
- A Revit family file between 250 KB and 500 KB indicates a suitable file size.
- A Revit family file over 1 MB = 1000 KB should be reviewed to reduce the size if possible.
- A Revit family file over 2 MB = 2000 KB should definitely be reviewed.
- A nested family file size tends to be bigger, so we need to check the larger family files. We do not recommend you to have more than two levels of nested families.
Tip
Before saving your family file, use the Purge command to reduce the file size and delete any unused objects.
Model groups
Revit Groups is a feature that keeps and maintains consistency among repeated elements in a project and facilitates different design interactions.
Nevertheless, there are a few topics that should be taken into consideration when working with groups:
- Hosted elements: Users should avoid creating groups with hosted elements (such as doors) without the host element included (that is, the wall that hosts the door).
- Nested groups: Users should avoid creating groups within other groups as they might become unmanageable and unstable.
- Datum objects: Users should avoid adding datum elements (such as levels and grids) inside a group.
- Mirroring and rotating: Users should avoid rotating and/or mirroring groups. As a best practice, it should be considered to model different groups that would cover other mirroring options.
- The excluding elements option: Users should use the Exclude Members feature for minor exclusion.
- Design options: Users should avoid using groups in design options.
- Levels constraints: Users should not constrain elements to levels (for example, a top constraint of a wall).
- System families: Users should avoid using system families in groups as they are constrained to a specific level. When copied to different levels, the first level reference will be kept, and any further editing will get more complicated (remember that the further we are from the reference level, the lower the performance we will get).
- Worksets: On a worksharing project, when creating a group with elements from different worksets, Revit will ignore the existing worksets and will include all elements in the current workset when creating the group – this workset cannot be edited.
- Links: Users should not add Revit links to a group as it will be duplicated and, consequently, affect performance.
In-place families
In-place families are bespoke families that users can create within a project context. They should not be used in a project because they will reduce performance and a standard family (that is, a loadable family) can cover most situations:
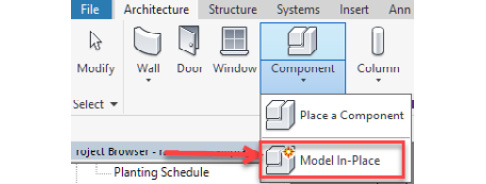
Figure 1.18 – Model In-Place families
If users create an in-place family to be used more than once, they should use the standard family (the loadable family). This is because if an in-place family is copied across, Revit will deal with these instances as different families. This will duplicate the family multiple times, which will affect the performance:
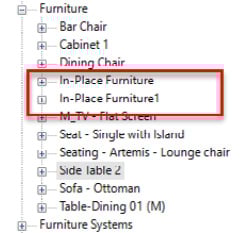
Figure 1.19 – Duplicated In-Place families
Arrays
When using arrays to copy elements, users should decide whether elements should be kept grouped or not grouped, as this will affect the performance as well. Groups should be kept as minimally associated as possible. Otherwise, they should be ungrouped:

Figure 1.20 – Creating groups within the Array tool
Constraints
Using Constraints will affect model the performance. They should be used sparingly across the project.
Constraints can include the following:
- Join geometry constraints
- Dimensional constraints
- Lock alignment constraints
When using these constraints, bear in mind that it is almost impossible to see where they are as they can be placed in any view.
Revit has, underneath the View Control bar, the Reveal Constraints tool, which allows you to check dimensional and locked alignment constraints by adding a kind of "filter" on top of the view. When using the tool, Revit will apply a garnet border to wrap the view, and all constraints will be highlighted in the same color:

Figure 1.21 – Reveal model constraints
When using a worksharing environment
Worksharing is a working method in Revit that allows team members to work on the same model at the same time:
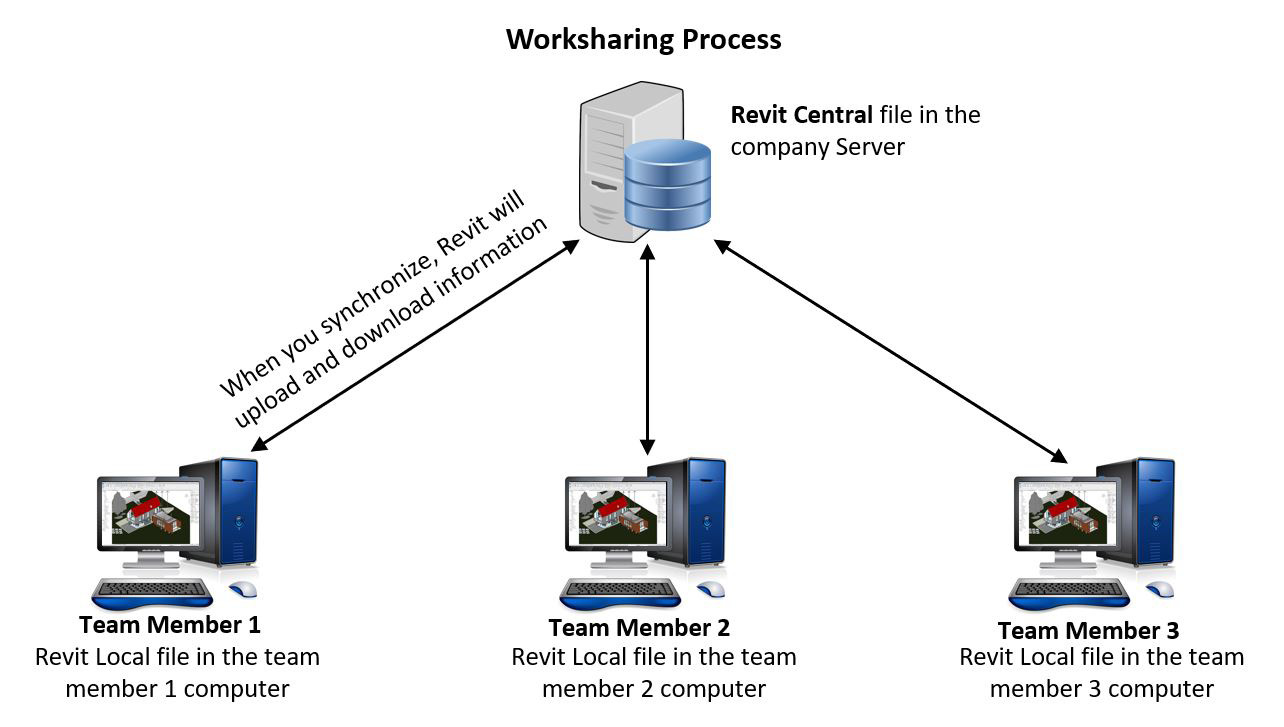
Figure 1.22 – A worksharing environment
In this working methodology, Revit needs to work with worksets to accommodate such environments.
There are a few native tools in Revit related to the worksharing method that require an in-depth understanding, and we will be covering them in the upcoming chapters of this book.
Worksets are crucial during this working method, as users can keep ownership of the elements and/or views. Typically, users will be assigned to specific areas of the project or even to a specific functional area to work on.
Based on this process of managing elements or parts of the project, Revit allows users to open/close worksets not only when opening the file, but also when working in views. Therefore, Revit will become faster as if we have worksets switched off, it doesn't need to process all information when working in the model.
Recommendations can be followed, but we believe that communication is the way to succeed. It is important to keep all team members informed about what is happening in the design process and how it might affect model organization and even the workset structure.
Tip
There are several tools that you can use to enhance team collaboration and communication, such as Skype, Microsoft Teams, Microsoft OneNote, Microsoft Planner, Slack, and more.
Opening a worksharing model
When opening a worksharing model, Revit allows users to select which worksets should be open. If you close a workset that is not required, Revit will open the file faster and, consequently, improve performance. The closed worksets will not be visible, so you can keep only the information that you need open.
To select which worksets users can open or close, follow these steps:
- Go to the File menu, select Open, and then click Project.
- Select the Revit Central model to open.
- On the right-hand side of the Open button, click on the drop-down arrow and select Specify…:

Figure 1.23 – Specifying which worksets to open
- An Opening Worksets window pops up. By selecting particular worksets, it's possible to Open/Close them as needed by clicking on the Open and/or Close buttons:

Figure 1.24 – The Opening Worksets window
- Click on OK and Revit will open the model only with the elements within the opened workset.
Tip
This process can be reverted at any time without closing the file by switching between open and closed worksets.
Not only the file will open more quickly, but when navigating through the model, opening views, and even synchronizing with the central model, everything will be quicker than if all of the models and worksets are loaded.
As a good practice, whenever a design team is working on a multidisciplinary project, it's highly recommended that you use a separate workset for each link, no matter if it is a Revit link or a CAD link. With this process, it's easier to switch off any unrequired links when opening the file.
Tip
When working in a worksharing environment, users should not double-click on the file to open it. Users need to use always the Open tool to create the local file.
Working with an opened workset
If, in a specific view, there is no need to have all of the worksets opened, it's highly recommended that you turn them off as it affects the view processing as well. It is possible to change the workset's visibility when the workset is open in the model.
Tip
Users will only be able to change a workset's visibility if the workset is open in the Revit session. If the workset is not loaded (that is, open), it needs to be switched to Open. Afterward, the workset visibility can be edited in a specific view.
To select which worksets users can change the visibility of in a view, follow these steps:
- Open the view in which you want to change the workset's visibility.
- Underneath Properties, click on Visibility/Graphics Override (this can also be shortened to VV or VG):

Figure 1.25 – Visibility/Graphics Overrides
- Underneath the Worksets tabs, change the Visibility Setting accordingly:

Figure 1.26 – Controlling a workset's visibility in a view
There are three options available:
Show: Here, the workset will be visible in the current view.
Hide: Here, the workset will be invisible in the current view.
Use Global Settings (Visible): Here, workset visibility will depend on whether the workset is defined to be visible in all views or not.
- Click on OK.
If there is a workset that is closed in all models, it's possible to confirm this from the Visibility/Graphics Overrides window. The asterisk (*) tells you how to switch the workset to Open:
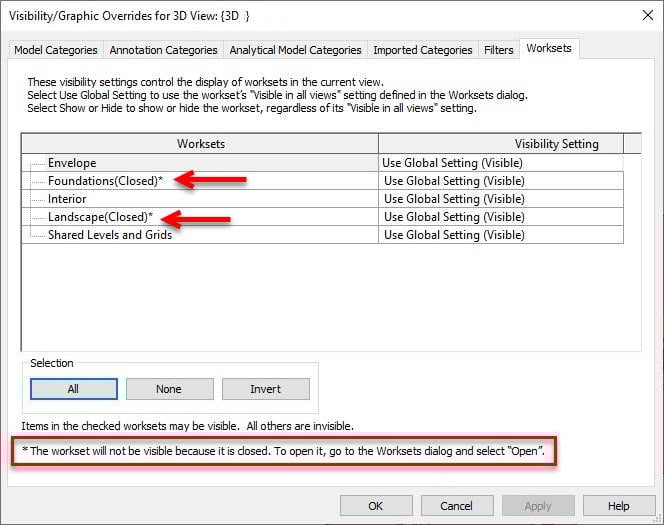
Figure 1.27 – Closed worksets
Worksharing Monitor
When working within a worksharing environment, it is crucial to know who is working in a file. The Worksharing Monitor will inform you of the following:
- Who has the model open: Depending on the number of team members working in the same file, this affects the model's performance.
- Who is synchronizing: This will inform you who is synchronizing, and you can wait until this person finishes the process.
- Who is working directly in the central file: If someone is working directly in the central file, the person needs to close the file immediately without saving.
To access the Worksharing Monitor tool, follow these steps:
- Underneath Collaborate, click on the Worksharing Monitor tool:

Figure 1.28 – The Worksharing Monitor tool
- A new window will open, as shown in the following screenshot:
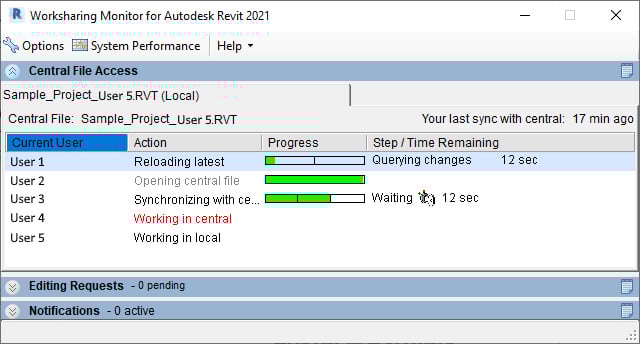
Figure 1.29 – Identifying users in the model with Worksharing Monitor
Splash screen
By using a 2D view for a splash view, you will improve performance when opening the model, as Revit doesn't need to regenerate the entire project. The Starting View tool can be defined under Manage | Starting View:

Figure 1.30 – The Starting View tool
Tip
In the splash screen, you can retrieve project information, model issue dates, model coordinates, and the disclaimer note.
To conclude, we have learned about the importance of Revit productivity and or researching for quality information. By following the Revit recommended settings, you will improve the efficiency and productivity of your project.
In the next section, we will learn how to choose the correct hardware specification to improve Revit's performance.