
Organizing your work – Events
The Events category is, I think, more useful to everyday photographers. Why? Because Events starts off by using dates as a way to categorize images. We might take a bunch of shots over a family weekend or on our 12-day trip to Bali. Using the Events feature, these images can be grouped into either events dictated solely by the date, read from the metadata, or they can be grouped and renamed into something more memorable, such as Family Weekend, 2019, or simply Bali Vacation.
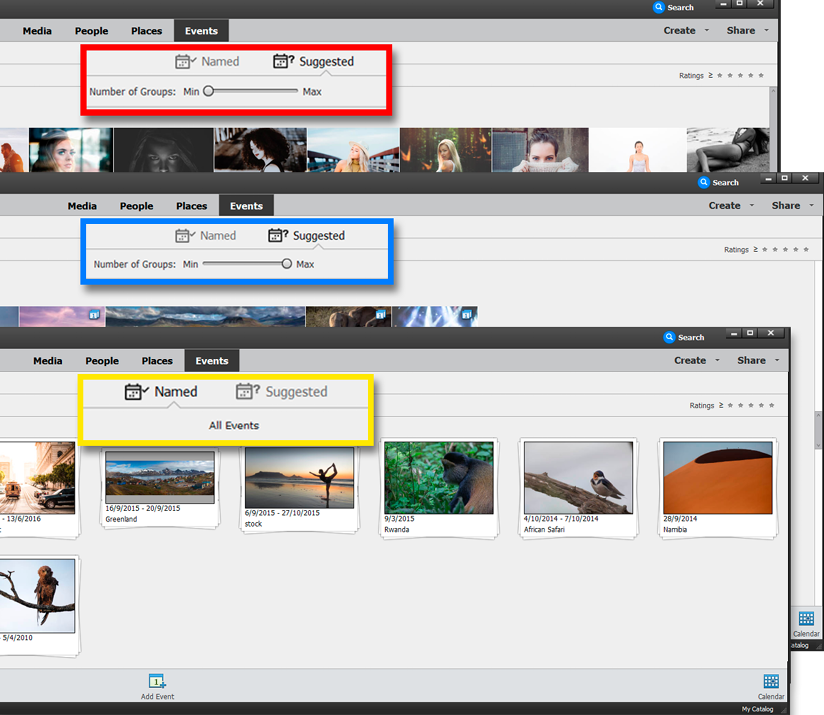
Events at work: This screenshot illustrates the power of sorting by date. The bottom window shows Events, with the Number of Groups slider positioned to the left-hand side (highlighted in red). Everything is pushed against everything else because the search engine is effectively compressing time. The middle window (highlighted in blue) shows how, if the slider is pushed to the right, images are displayed on an almost day-by-day basis, making it easier to find photos from a day shoot, or some other short-running function. The front window illustrates what the named events look like in the Named tab (highlighted in orange). Events can be modified.
Events has two view modes: Named and Suggested. I normally dislike anything that suggests things to me (such as predictive text), but in this case, it presents all your images grouped by date. This is quite useful because it instantly orders everything in the main window, whether from an album, folder, or all media. That's a good start.
To delete an Event, right-click and choose Remove this Event. This pop-out menu also allows you to edit the event (that is, to add/subtract images from the event), to use Set as Cover, which makes the displayed image the default front page, and to use Create a Slideshow, which takes all the files in that specific event stack and puts them into a slideshow that can be saved for further editing in the Organizer, or directly uploaded to social media via the Share menu (top right-hand side of the Organizer).
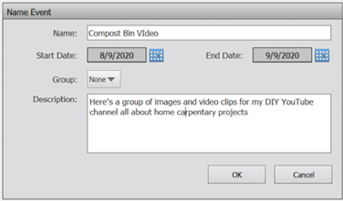
Name that event:
Once selected, click the Add Event button at the base of the page and, in the dialog box that opens, give the event a proper name, check the dates to ensure you have grabbed the right sequence, select a Group if that's needed, and add a description if required, and click OK.
It's a good idea to award albums and folders real names, rather than going on just the dates—the same can be done using Places. Shift the Number of Groups slider so the setting that displays your event does so in one group of images (that is, selecting just the weekend, or just that week). Physically select all those images (do this by holding the Shift key down, and clicking the first and then the last image in the group). They are now all selected. If the images you need are in more than one group, it's easy to select multiple groups by drawing a marquee around those groups.
But what happens to the proper names this group of pictures was just awarded? Click the Named tab at the top of the screen and you'll see all the images that were custom-grouped and named now appear as stacked thumbnails. Sliding the cursor over a group displays its contents. Double-clicking an event stack reveals the individual images it contains. Clicking the Back button in the same screen moves those spread out images back into a stack format.
Tips:
When drawing a marquee, click and drag the cursor so it draws a rectangle over all the images you need. Blue check marks appear in all those that are selected. If you accidentally miss one image, add it by holding the Ctrl/Command key down while you click the mouse once (Win/Mac).
By the same process, if you select too many by accident, you can hold Ctrl/Cmd and click the file to deselect it.
As your image collection grows, you can further refine a search, or just what's displayed in the main window, by selecting different dates from the calendar that's posted on the right-hand side of the screen. You can also create a new event in the media window. Click the Add Event tab at the bottom of the page, then drag those images you'd like into the new event to the right-hand side bin. Give it a proper name, check the date, and click OK.