
Adding and maintaining columns on a list
Columns are used to provide structure for lists and store individual pieces of data. Now that you have created your first list, you will want to add some additional columns to your Leave Tracker so that you can track information properly.
There are various column types that can be used, all of which will be shown in more detail in Chapter 3, Microsoft Lists Core Features. In this chapter, we will use a subset of them to explain their purpose and usage. To continue with the Leave Tracker list, we are going to add the following columns with the corresponding column types:
- Start Date: A Date and Time column that will be used to track the beginning of when you take leave
- End Date: A Date and Time column that will be used to track the last day of when you take leave
- Days: A Number column where we manually provide the number of days in the leave period
- Leave Type: A Choice column to track whether it is Annual Leave, Medical Leave, or Others
- Status: A Choice column to track whether it is Planned, Approved, Cancelled, or Taken
Adding columns to a list
To add a new column, open your list. At the top of your list is a header bar showing various columns that are available. How you can control the visibility of these columns, and how you can manage different views to provide various viewpoints of your data, will be covered in Chapter 5, Creating Microsoft Lists Views.
Selecting Add column provides you with a list of the available column types that can be used for your new column:

Figure 2.11 – Adding a new column to your list
Once you've selected any of these types, a new pane will open on the right-hand side of your browser, giving you even more fields that you can fill in and provide information about the column that you want to create.
The first three fields are always shown by default:
- Name asks you for the name you want to use for your new column.
- Description allows you to provide further information about the purpose of your column.
- Type lets you decide on the column type you want to use. The type you chose initially is selected here, but you can still switch to any of the other types during the creation process. Please note that once you have made a selection and created a column, it is not always possible to switch the type. While some types allow you to change to another type after column creation, such as from Single line of text to Multiple lines of text, other types, such as Person or Group, are not as flexible and are locked after creation. Due to this, you should be clear about the type of data you want to store in your column from the beginning and make a conscious choice.
When you choose a Type, the bottom section of the pane gets updated dynamically with additional configuration options. We will look at all the column types and their respective options in Chapter 3, Microsoft Lists Core Features. For example, for the Date and Time column, you can decide whether it should be a date-only field, whether the time should be included as well, and whether the column data should be displayed in a friendly format. Friendly format means that instead of having the date shown in your regular locale, such as 3/2/2021, a more appealing format will be used and might say "4 days from now" or "March 2," as an example. In addition, you can define a Default value to be used for any new items, and you can set the column to be optional or mandatory:
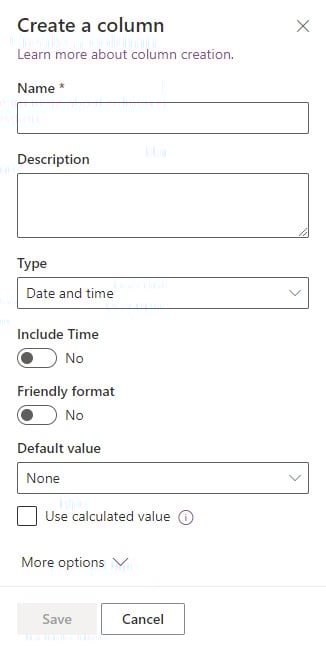
Figure 2.12 – Creating a Date and Time column
As we mentioned previously, different types offer you different configuration options. The Choice column type, for example, allows you to define different available and valid choices, and even a supporting color for each that will be used as the background color to highlight the value. That way, you not only let people who view your data see the different values, but make it more appealing to them and help them differentiate between these values easily. If you use a Choice column to keep track of projects, you can easily create a Red, Amber, Green (RAG) status column to let project managers select the corresponding status value, such as on track, while also providing a visual clue about the value itself:
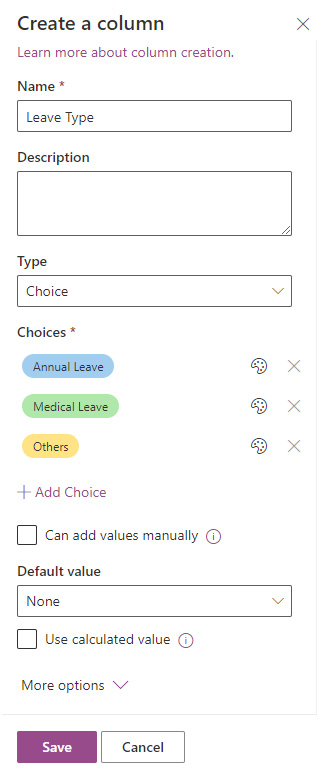
Figure 2.13 – Creating a Choice column
Once you have added multiple columns and added some data, this is what your Leave Tracker should look like:
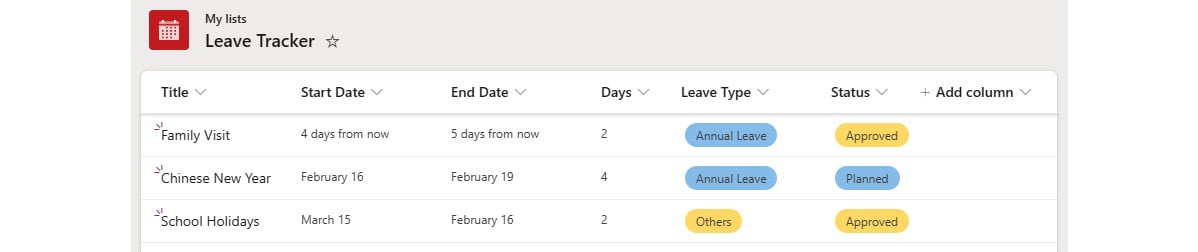
Figure 2.14 – List with multiple columns and data
Now that we have seen how to add columns, let's look at how we can edit and delete them.
Editing and deleting columns from a list
Often, you will find yourself in a situation where you need to modify your column's settings. This could be changing your Single line of text column to a Multiple lines of text column, switching the Friendly format option of your Date and Time column on/off, adding an additional option to a Choice column, and so on. In other cases, you will want to delete a column completely, such as when it does not capture any relevant information and you do not require it or any previously captured data anymore.
To make any such changes, you need to access your list's settings. This can be done by clicking on the gear icon in the top-right corner of Office 365 and selecting List settings while you have your list open. While the menu that appears when you click on the Gear icon is context-dependent, which means that, in a SharePoint site, you will see different additional options compared to what you do in the Microsoft Lists app, the List settings option will appear in both cases:
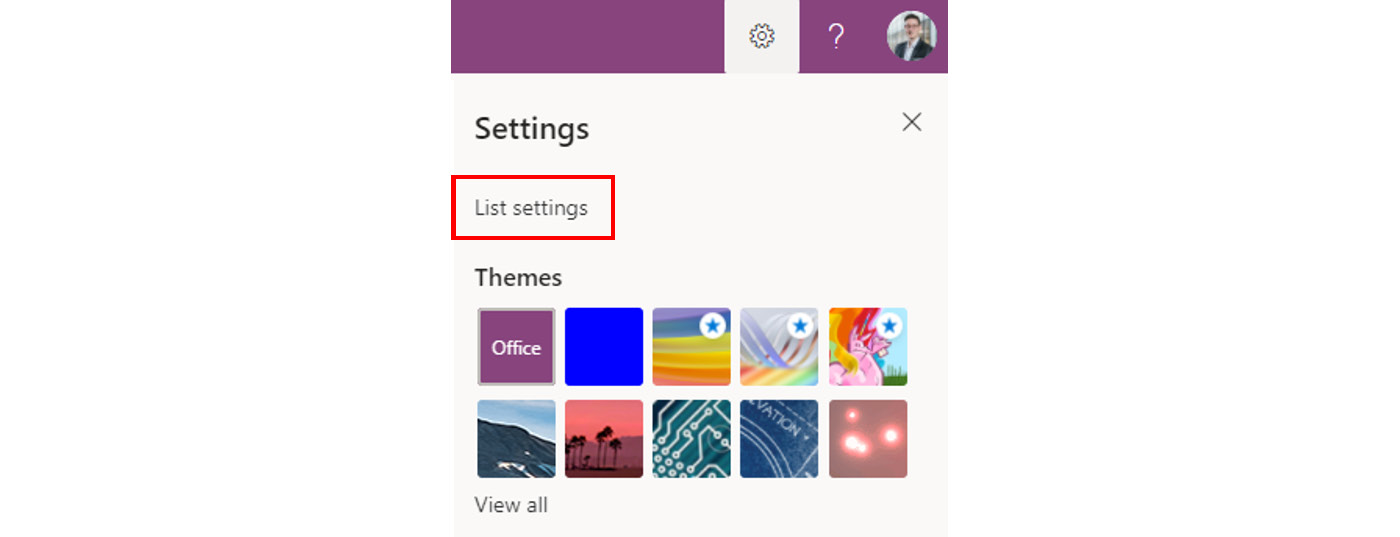
Figure 2.15 – Accessing List settings
On the List settings page, you will find a dedicated section for the columns of the selected list. All the columns are listed with their respective types, and it is specified if a column is mandatory:
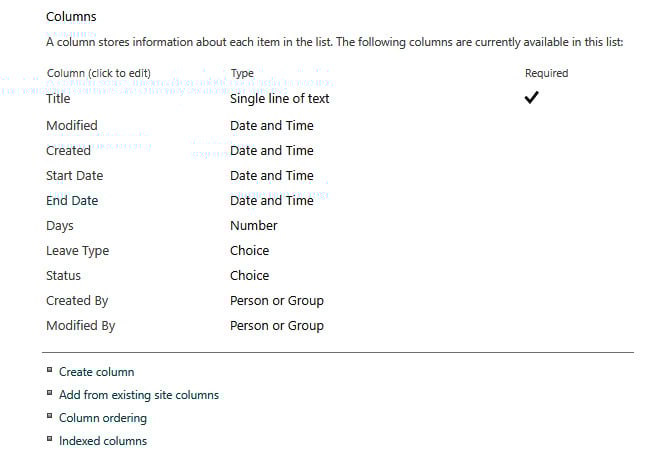
Figure 2.16 – Columns section of the List settings page
Clicking on a column's title will bring you to the column's settings page. This page shows all the available type-specific properties and provides you with information about any potential type changes. As we mentioned previously, not all types can be switched to another type once a column has been created, and such an option may not be available:
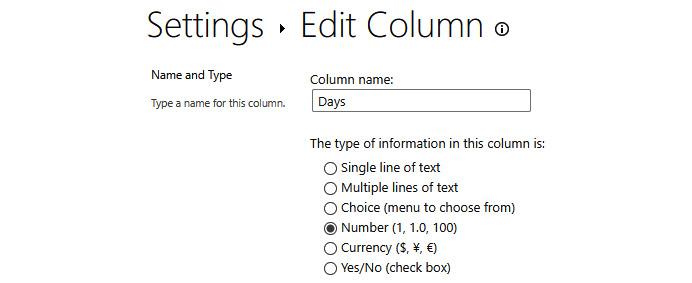
Figure 2.17 – Changing your column's type
In the Additional Column Settings section, you can update the column's available options, similar to when you created the column initially. For the Days column, which uses the Number type, you can specify Number of decimal places as 0 so that only whole numbers are accepted, and even provide a minimum and maximum allowed value:
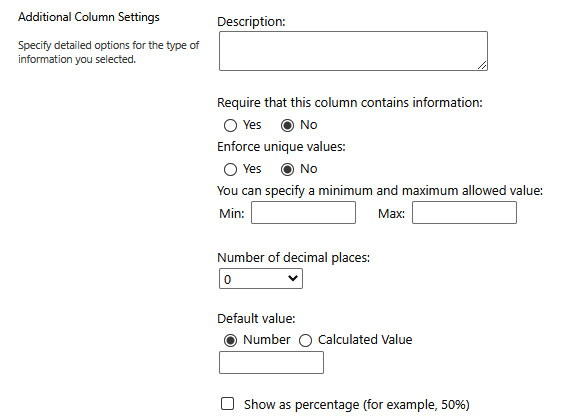
Figure 2.18 – Additional Column Settings window
At the bottom of the page, you will find three buttons to complete your desired action. You can click Cancel to discard any changes, click OK to save all the updates that you've made, or click Delete to remove your column from the list permanently.
Deleting a Column
When you delete a column from a list, all the information that was entered previously will be removed as well. If you want to retain the data but do not want the column to appear anymore in your list's public views, you can simply hide the column from any such locations.
Deleting a column and the corresponding data is a process that cannot be reversed. Once you've deleted it, the column and the data cannot be restored anymore.
In this section, you learned how to set up your list with a structure for your data, and you also know how to add, edit, and delete columns. This way, you can create and maintain lists according to your requirements easily. However, there are also other, more efficient ways to create lists from an existing structure, all of which will be covered in the next two sections.