

Running a Compose app
If you want to see how a composable function looks and feels on the Android Emulator or a real device, you have two options:
- Deploying a composable function
- Running the app
The first option is useful if you want to focus on a particular composable rather than the whole app. Also, the time needed to deploy a composable may be significantly shorter than deploying a complete app (depending on the app size). So, let's start with this one.
Deploying a composable function
To deploy a composable function to a real device or the Android Emulator, click on the Deploy Preview button, which is a small image in the upper-right corner of a preview (Figure 1.6):

Figure 1.6 – Deploying a composable function
This will automatically create new launch configurations (Figure 1.7):
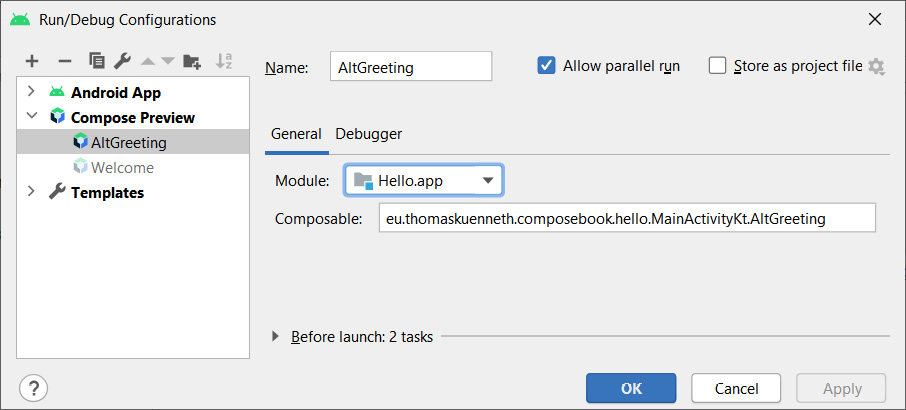
Figure 1.7 – Launch configurations representing Compose previews
You can modify or delete Compose preview configurations in the Run/Debug Configurations dialog. To access them, open the Compose Preview node. Then you can, for example, change its name or deny parallel runs by unchecking Allow parallel run.
The goal of this chapter is to deploy and run your first Compose app on a real device or the Android Emulator. You are almost there; in the next section, I will show you how to embed composable functions in an activity, which is a prerequisite. You will finally be running the app in the Pressing the play button section.
Using composable functions in activities
Activities have been one of the basic building blocks of Android apps since the first platform version. Practically every app has at least one activity. They are configured in the manifest file. To launch an activity from the home screen, the corresponding entry looks like this:
...
<activity
  android:name=".MainActivity"
  android:exported="true"
  android:label="@string/app_name">
  <intent-filter>
    <action android:name="android.intent.action.MAIN" />
    <category
     android:name="android.intent.category.LAUNCHER" />
  </intent-filter>
</activity>
...
This is still true for Compose apps. An activity that wishes to show composable functions is set up just like one that inflates a traditional layout file. But what does its source code look like? The main activity of the Hello app is called MainActivity, shown in the next code block:
class MainActivity : ComponentActivity() {
  override fun onCreate(savedInstanceState: Bundle?) {
    super.onCreate(savedInstanceState)
    setContent {
      Hello()
    }
  }
}
As you can see, it is very short. The UI (the Hello() composable function) is displayed by invoking a function called setContent, which is an extension function to androidx.activity.ComponentActivity and belongs to the androidx.activity.compose package.
To render composables, your activity must extend either ComponentActivity or another class that has ComponentActivity as its direct or indirect ancestor. This is the case for androidx.fragment.app.FragmentActivity and androidx.appcompat.app.AppCompatActivity.
This is an important difference; while Compose apps invoke setContent(), View-based apps call setContentView() and pass either the ID of a layout (R.layout.activity_main) or the root view itself (which is usually obtained through some binding mechanism). Let's see how the older mechanism works. The following code snippet is taken from one of my open source apps (you can find it on GitHub at https://github.com/MATHEMA-GmbH/TKWeek but it won't be discussed any further in this book):
class TKWeekActivity : TKWeekBaseActivity() {
  private var backing: TkweekBinding? = null
  private val binding get() = backing!!
  override fun onCreate(savedInstanceState: Bundle?) {
    super.onCreate(savedInstanceState)
    backing = TkweekBinding.inflate(layoutInflater, null,
              false)
    setContentView(binding.root)
    ...
If you compare both approaches, a striking difference is that with Jetpack Compose, there is no need for maintaining references to the UI component tree or individual elements of it. I will explain in Chapter 2, Understanding the Declarative Paradigm, why this leads to code that is easily maintainable and less error-prone.
Let's now return to setContent(). It receives two parameters, a parent (which can be null) and the content (the UI). The parent is an instance of androidx.compose.runtime.CompositionContext. It is used to logically link together two compositions. This is an advanced topic that I will be discussing in Chapter 3, Exploring the Key Principles of Compose.
Important Note
Have you noticed that MainActivity does not contain any composable functions? They do not need to be part of a class. In fact, you should implement them as top-level functions whenever possible. Jetpack Compose provides alternative means to access android.content.Context. You have already seen the stringResource() composable function, which is a replacement for getString().
Now that you have seen how to embed composable functions in activities, it is time to look at the structure of Jetpack Compose-based projects. While Android Studio sets everything up for you if you create a Compose app using the project wizard, it is important to know which files are involved under the hood.
Looking under the hood
Jetpack Compose heavily relies on Kotlin. This means that your app project must be configured to use Kotlin. It does not imply, though, that you cannot use Java at all. In fact, you can easily mix Kotlin and Java in your project, as long as your composable functions are written in Kotlin. You can also combine traditional views and composables. I will be discussing this topic in Chapter 9, Exploring Interoperability APIs.
First, make sure to configure the Android Gradle plugin that corresponds to your version of Android Studio in the project-level build.gradle file:
buildscript {
  ...
  dependencies {
    classpath "com.android.tools.build:gradle:7.0.4"
    classpath "org.jetbrains.kotlin:kotlin-gradle-               plugin:1.5.31"
    ...
  }
}
The following code snippets belong in the module-level build.gradle file:
plugins {
    id 'com.android.application'
    id 'kotlin-android'
}
Next, please make sure that your app's minimum API level is set to 21 or higher and that Jetpack Compose is enabled. The following code snippet also sets the version for the Kotlin compiler plugin:
android {
  defaultConfig {
    ...
    minSdkVersion 21
  }
  buildFeatures {
    compose true
  }
  ...
  compileOptions {
    sourceCompatibility JavaVersion.VERSION_11
    targetCompatibility JavaVersion.VERSION_11
  }
  kotlinOptions {
    jvmTarget = "11"
  }
  composeOptions {
    kotlinCompilerExtensionVersion compose_version
  }
}
Finally, declare dependencies. The following code snippet acts as a good starting point. Depending on which packages your app uses, you may need additional ones:
dependencies {
    implementation 'androidx.core:core-ktx:1.7.0'
    implementation 'androidx.appcompat:appcompat:1.4.0'
    Implementation
      "androidx.compose.ui:ui:$compose_version"
    implementation
      "androidx.compose.material:material:$compose_version"
    implementation
      "androidx.compose.ui:ui-tooling-
       preview:$compose_version"
    implementation
      'androidx.lifecycle:lifecycle-runtime-ktx:2.4.0'
    implementation
      'androidx.activity:activity-compose:1.4.0'
    debugImplementation
      "androidx.compose.ui:ui-tooling:$compose_version"
}
Once you have configured your project, building and running a Compose app works just like traditional view-based apps.
Pressing the play button
To run your Compose app, select your target device, make sure that the app module is selected, and press the green play button (Figure 1.8):

Figure 1.8 – Android Studio toolbar elements to launch an app
Congratulations! Well done. You have now launched your first Compose app, and you have achieved quite a lot. Let's recap.