Book Image

Workflow Automation with Microsoft Power Automate - Second Edition

By : Aaron Guilmette
4 (2)
Book Image

Workflow Automation with Microsoft Power Automate - Second Edition

4 (2)
By: Aaron Guilmette

Overview of this book

MS Power Automate is a workflow automation tool built into MS 365 to help businesses automate repetitive tasks or trigger business processes without user intervention. It is a low-code tool that is part of the Microsoft applications framework, the Power Platform. If you are new to Power Automate, this book will give you a comprehensive introduction and a smooth transition from beginner to advanced topics to help you get up to speed with business process automation. Complete with hands-on tutorials and projects, this easy-to-follow guide will show you how to configure automation workflows for business processes between hundreds of applications, using examples within Microsoft and including third-party apps like Dropbox and Twitter. Once you understand how to use connectors, triggers, and actions to automate business processes, you’ll learn how to manage user input, documents, and approvals, as well as interact with databases. This edition also introduces new Power Automate features such as using robotic process automation (RPA) to automate legacy applications, interacting with the Microsoft Graph API, and working with artificial intelligence models to do sentiment analysis. By the end of this digital transformation book, you’ll have mastered the basics of using Power Automate to replace repetitive tasks with automation technology.
Table of Contents (22 chapters)
20
Other Books You May Enjoy
21
Index

Creating a sentiment analysis flow

By this point, we’ve configured mechanisms for data capture and storage. Now, we’ll turn to analyzing the data. To start building the flow, follow these steps:

  1. Navigate to the Microsoft Power Automate web portal (https://flow.microsoft.com) and click Create.
  2. Select Automated cloud flow.
  3. Enter a name and choose the When a new response is submitted Microsoft Forms trigger, as shown in Figure 17.10:

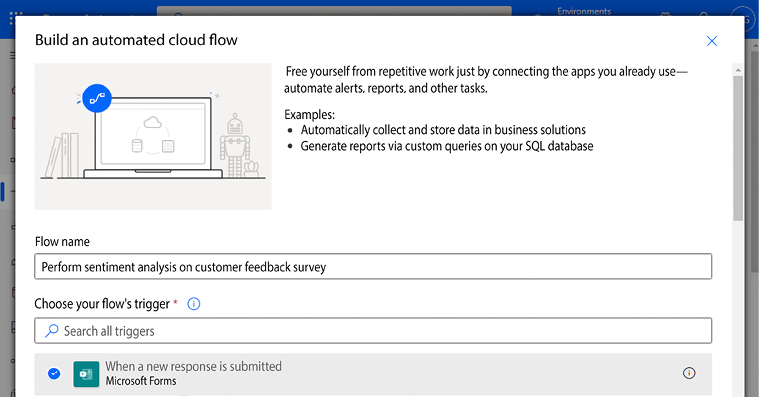
Figure 17.10: Creating a new automated cloud flow

  1. Click Create.
  2. In the When a new response is submitted trigger, select the Customer Feedback Survey form that you created during the prerequisites. If you don’t see your form listed, you can select Enter custom value and use the ID value (the highlighted portion after id=) that you captured at the end of the Creating a Forms survey section:

Figure 17.11: Extracting the form ID value

  1. Click New step.
  2. Select...