
How to apply for the exam
The first thing you can do to apply online at www.pmi.org is to go to the Certification tab and choose your exam: PMP® or CAPM®. You will want to create a username and password on the site because that is where your application will be and where you will update your progress post-certification (more on that in Chapter 15, Next Steps and Study Tips). Once you create a username and password, you can begin your application. Here are a few need-to-know items before we begin:
- You can start and save your progress when you use the online application. The servers will store your application for up to 90 days, so don't worry too much about getting it done in one sitting.
- You will only need the names and addresses of all organizations you have worked for so that you can document the hours spent working on projects if you were to be audited, rather than on the application itself.
- You will need the names and contact information of anyone who can validate your experience in the case of an audit.
Wait… what? Audit?? One in every four applications is randomly selected for audit. Don't take it personally, it is how the applications are quality controlled. This is designed to make sure nobody is lying on their applications. That brings us to the next need-to-know item.
- Don't lie on your applications. You must have led and directed project work for all of the hours and months you submit. I highly recommend sending your application to anyone who can validate that experience in advance. Let them know what you are doing and ask whether they are willing to validate the documented experience in the case of an audit. I often suggest to my students that they do their applications in a word processing program or spreadsheet program first. Once they are organized, they can put it all into the online application. Totally up to you.
What if the organization has closed or the people I worked with are gone and I can't find them?
It happens and PMI® knows it's a possibility. You can either find another person you can contact and ask whether they would be willing to validate your work or use another project.
These days, it is easier to track people down via LinkedIn and the like. Do your due diligence and in the worst case, locate a customer, functional managers, other project managers, or really anyone who worked with you on that project and will respond to an audit request for information.
Once you submit your application, it will take about 5 business days for the review to occur. Once they have accepted your application, you will see a link to pay for your exams on your "My PMI" page and the next step is paying for and scheduling your exam.
Once you pay for your exam and get a confirmation, sit there for about another 5 minutes. If you get another email, you have been selected for an audit. If you are selected, PMI® will give you and your contacts up to 90 days to complete everything. If you are prepared, it won't take you that long to do. Once submitted, it will take another 5 business days to complete. Then you can schedule your exam. No email after payment confirmation and you are in the clear! Whew.
Now, let's focus on actually filling out the application. This is where I gently remind you to not be upset with the messenger. That would be me. The application is comprehensive and will ask you to itemize all the projects you have led and directed.
The application
I would highly recommend you go to www.pmi.org and on the PMP® page, at the lower right, you will see a link to a handbook (https://www.pmi.org/-/media/pmi/documents/public/pdf/certifications/project-management-professional-handbook.pdf).
It's the same process for CAPM®, except you will need to download from the CAPM® page instead. The exam content outline can be found there as well. More on that later.
The reason I suggest reading through the handbook is that it gives you an overview of what to expect on the application and so on. I'll give you the information here as well but since things tend to change, it's best to always check the PMI® site for any updates.
With that being said, here we go. The number one thing to know is that you need both the hours and requisite months to align on your application and that you can't document overlapping projects across time. If you just read that and said, "uh… I work on multiple projects all the time. What do you mean I can't overlap??" I mean you can't overlap. In the following diagram, you can see an example of what I mean:
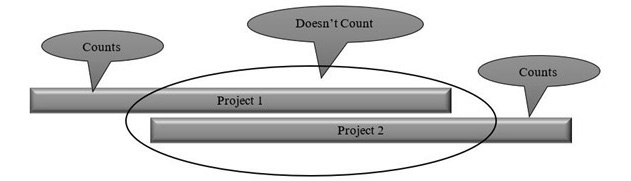
Figure 1.2 – Overlapping projects
Let me explain this in more detail:
- Scenario 1: Project 1 is longer than Project 2. I would suggest you use the project with the longest duration, even if it overlaps with another project, which in this case is Project 1. You can't use Project 2 in total because it overlaps with Project 1.
- Scenario 2: Use the parts of Project 1 that don't overlap and the parts of Project 2 that don't overlap, but only if it makes sense in terms of the hours and/or months you'll be spending on this.
- Scenario 3: Use the longest in duration and then use the beginning and/or end of the other, whichever works out the best. For example, use the entire Project 1 duration and then use the end of Project 2's duration that isn't overlapping.
I know this is confusing, but the good news is that the application will let you know what counts and what does not as you go. 60 or 36 months also have to be accommodated based on your education level, along with the hours. For example, let's say you have 4,500 hours but not the 36 months covered. Your hours will need to increase to match up with the 36-month requirement. Conversely, if you have the months but not the hours, you would need to increase the hours, which will also extend the months. Both planets have to align before you can submit the application. You will see a breakdown during the online application process of what has been calculated and how many more of each or is needed to complete the application. It isn't unusual to have more months documented to accommodate all of the hours needed.
The other consideration is that you do not have to have an entire start to finish of the documented project for every single documented item on the application. There might have been times where a project has been canceled but you spent 3 months planning. Totally count that! Projects can also count if they are in progress and there is a box you can check if that is the case. In the following figure, you can see part of a demo application that I put together. The first page is your academic education and it's fairly easy to work through:
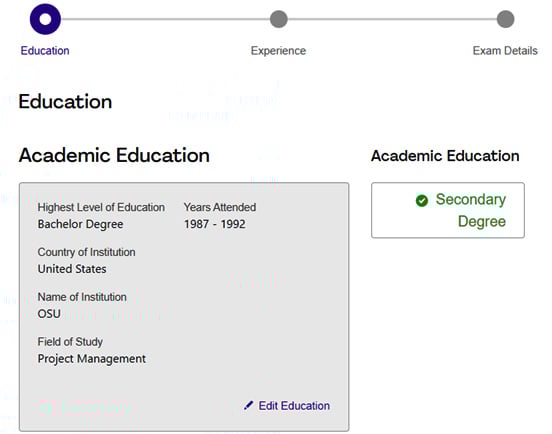
Figure 1.3 – Academic education
This next section is perhaps the most important as it describes your project experience. You will do this for every project you want to document to reach your hours. The application will keep track of what counts and what doesn't and there are easy drop-down menus. The description is the most important. Notice I used the word "I." I did this to help explain my role on the project:
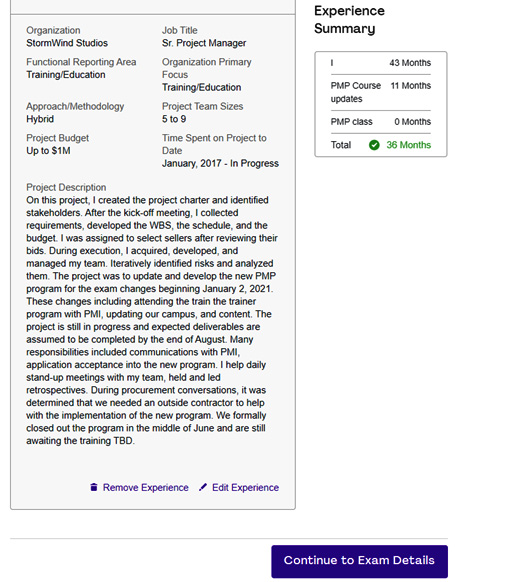
Figure 1.4 – Project experience
The next page is your contact information and what country you will be taking your exam in:
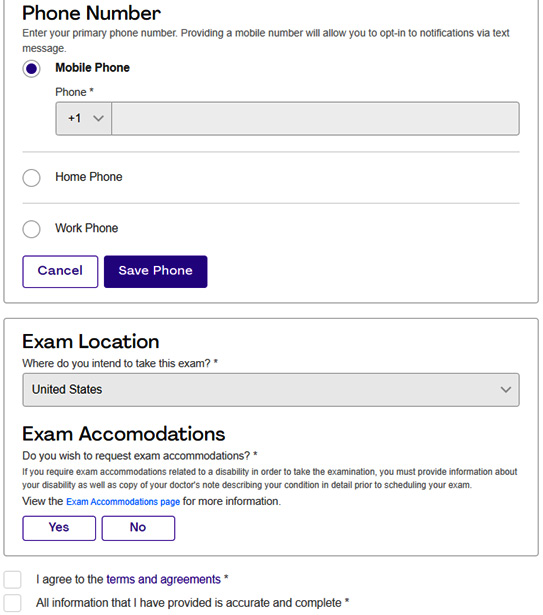
Figure 1.5 – Contact information
Then, on the last page, you will document where you got your 35 contact hours of training:
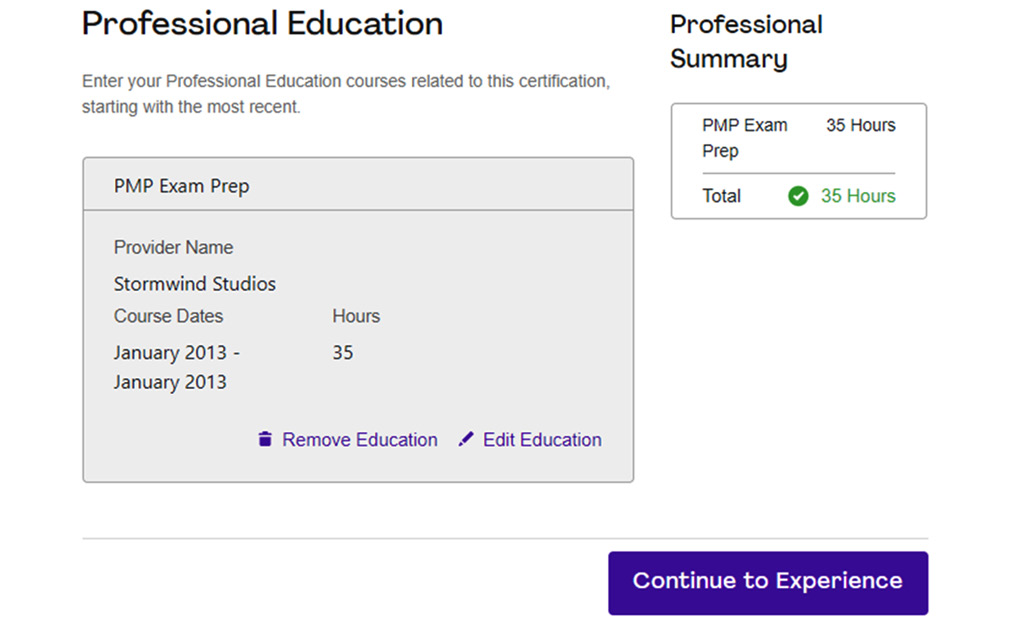
Figure 1.6 – Professional education
Note
The Project Management Professional (PMP), PMBOK Guide and the Project Management Institute Agile Certified Practitioner (PMI-ACP), the Agile Practice Guide, the PMP® application are a registered trademark of the Project Management Institute, Inc.
Now that you have seen the majority of the application, be aware that you will need to do the hours and add explanations for every single project until you meet the criteria, as well as where you obtained your 35 hours of project management education.
Here are some pointers to keep in mind while applying:
- Go in chronological order. This helps with the documentation and making sure nothing is missed. Either go from present to past or past to present. Whatever works for you.
- Have a robust explanation planned and point out the best practices you used that align with the best practices on the exam.
- Be sure to make each description unique. If you work on similar projects, it is sometimes difficult to document in a unique way. If you have two projects you would like to use where you are installing servers across multiple locations for totally different clients, you may want to choose what was unique about each, as in the following example:
a) Project 1: I created the project charter and engaged stakeholders.
b) Project 2: I assessed risk and created responses, as well as created the formal scope statement and gained approvals.
- Be honest. Don't fudge the hours and if you did work 50 hours a week on one project, then by all means, document that. Just do not pad your numbers to get through this quickly. If you get audited, it could be a long, painful process trying to explain that.
- Try to gather all of the information you need first. Perhaps build everything out in Excel or Word before adding it to the online application, and then email your contacts the breakdown and ask them whether everything looks legit. If so, they will be well prepared in advance for the audit and nobody will be surprised by a person they haven't seen in 3 years asking for documentation.
- Don't worry too much about this now. If you haven't attended a training class or even begun this process yet, then this should be the last step aside from paying for and scheduling your exams.
One final piece of advice. Don't worry – it sounds worse than it is. I offer application support to my students and I review their applications. Red flags for me and PMI® are overlapping projects, too many hours for the timeframe listed, the descriptions being vague and not using the language of the PMBOK® Guide, or you do not list yourself as the project manager. This is as important as the months. You must be leading and directing projects. Not a coordinator, not a contributor, but a project manager or leader. If, in fact, you were only a contributor, then you will need to look for projects that you managed instead. This does not apply for the CAPM® exam because the assumption is you are a coordinator and therefore do not need to prove you managed projects.
As I mentioned previously, this is probably not the time to fill out your application unless you are beginning the process of studying after taking a prep class. Otherwise, it may be best to circle back to this chapter once you are ready to go. In Chapter 15, Next Steps and Study Tips, I will revisit some of the items in this chapter to help you get your best start. Remember that it's a marathon, not a sprint. Don't worry, though – you've got this, I promise!