Sign In Start Free Trial
Account

Add to playlist

Create a Playlist

Modal Close icon
You need to login to use this feature.
  • Book Overview & Buying BackTrack - Testing Wireless Network Security
  • Table Of Contents Toc
BackTrack - Testing Wireless Network Security

BackTrack - Testing Wireless Network Security

By : Kevin Cardwell
4 (1)
close
close
BackTrack - Testing Wireless Network Security

BackTrack - Testing Wireless Network Security

4 (1)
By: Kevin Cardwell

Overview of this book

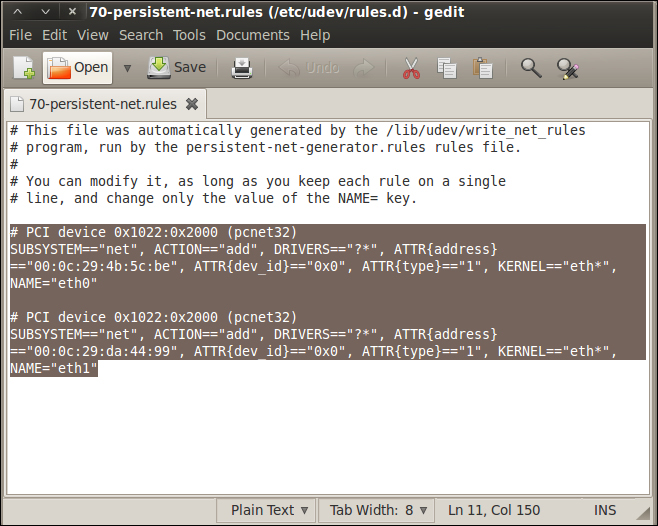
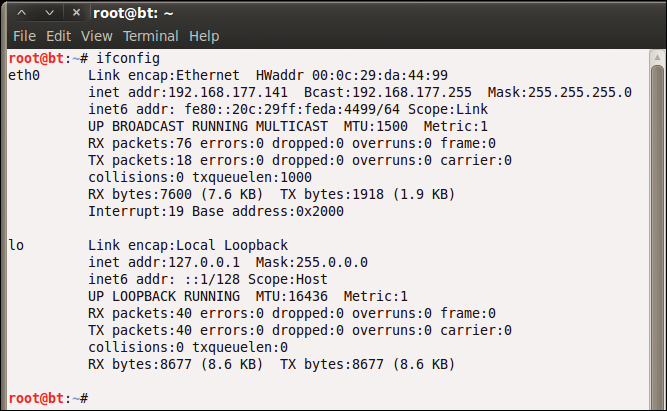
Wireless networks are everywhere. You have probably set one up yourself, but have you ever wondered just how safe you are while browsing online? In the majority of cases, the default settings for your networks are not enough to protect you. With your data being transferred over the air, it can be easily plucked and used by anyone who knows how. Don't let it happen to you.BackTrack - Testing Wireless Network Security will help you secure your wireless networks and keep your personal data safe. With this book, you will learn how to configure your hardware for optimum security, find network security holes, and fix them.BackTrack - Testing Wireless Network Security looks at what tools hackers use and shows you how to defend yourself against them. Taking you from no prior knowledge all the way to a fully secure environment, this guide provides useful tips every step of the way. Learn how to select a wireless card to work with the Backtrack tools, run spectrum analysis scans using kismet, set up test networks, and perform attacks against wireless networks. Use the tools aircrack-ng and airodump-ng to crack the wireless encryption used on the network. You will learn everything you need to know to set up your wireless network for use within Backtrack and also how to defend yourself against the included attack tools.
Table of Contents (13 chapters)
close
close

Validating the interfaces


There is one more thing we want to correct when it comes to our network, because there is a problem with the allocation of the interfaces at boot time when you make copies of a Linux virtual machine. If you enter ifconfig and your interface does not say eth0, you should correct the network.

root@bt:~# ifconfig

We do this by opening the configuration file and removing all references to the network interfaces that are there. In your shell, enter gedit.

root@bt:~# gedit

This will open the graphical editor that is contained within the Gnome distribution. In the editor, navigate to File | Open; when the window opens, navigate to the configuration file that is located at /etc/udev/rules.d/. To navigate to the folder, click on the File System folder in the window. This will put you in the root of the file system; then, it is only a matter of drilling down until you get into the rules.d folder. Select and open the 70-persistent-net.rules file. Once you are in the file, delete the old interfaces that are there; highlight the line that starts with # PCI Device and all the lines after that right up to the end of the file, and then delete them as shown in the next screenshot:

Once you have deleted the interface references, save the file, and quit the program. Click on Save and then Quit. This will return you to the terminal window and your shell. Now, enter reboot and let the machine reboot and regenerate your interfaces.

Once the machine reboots, log in to the machine with the username root and whatever password you set earlier (you do remember it, right?). Once you are logged in, start XWindows by entering the startx command.

root@bt:~# startx

Once XWindows has started, open the terminal window by using the shortcut on the toolbar or by navigating to Applications | Accessories | Terminal. If you have not done so already, correct your display by navigating to Edit | Fit Guest Now in VMware Workstation.

We now want to check and verify that our network interfaces are correct; we do this by using our ifconfig command. Enter ifconfig in the terminal window. As we have removed the extra information that was in the 70-persistent-net.rules file, we should now see that our interface is eth0 and not something else; this is shown in the next screenshot. For some reason, when you copy virtual machines, there is a possibility that the programmer did an append to the file and did not overwrite the entries that are in the file; if you make three or four copies of the virtual machine, it will show eth5 or eth6. Again, we will have to correct it by deleting the entries that are in the 70-persistent-net.rules file. This is the same process for many of the Linux virtual machines when you copy them.

CONTINUE READING
83
Tech Concepts
36
Programming languages
73
Tech Tools
Icon Unlimited access to the largest independent learning library in tech of over 8,000 expert-authored tech books and videos.
Icon Innovative learning tools, including AI book assistants, code context explainers, and text-to-speech.
Icon 50+ new titles added per month and exclusive early access to books as they are being written.
BackTrack - Testing Wireless Network Security
notes
bookmark Notes and Bookmarks search Search in title playlist Add to playlist font-size Font size

Change the font size

margin-width Margin width

Change margin width

day-mode Day/Sepia/Night Modes

Change background colour

Close icon Search
Country selected

Close icon Your notes and bookmarks

Confirmation

Modal Close icon
claim successful

Buy this book with your credits?

Modal Close icon
Are you sure you want to buy this book with one of your credits?
Close
YES, BUY

Submit Your Feedback

Modal Close icon
Modal Close icon
Modal Close icon