

To automate tasks, we need to create and run PowerShell scripts. To run a script, we need to follow these steps:
- Configure PowerShell to run scripts: Running a malicious script can harm the computer/server; the default setting for PowerShell is not to run them. We need to change the execution policy of the computer/server to be less restrictive. These steps need to be implemented once.
- Store the script: We need to store the script files with the .ps1 extension on the file system.
- Edit the script: Add the business logic using commands, cmdlets, variables, and so on.
- Run the script: Run the PowerShell script within the PowerShell Command Prompt or ISE.
Let's create our first PowerShell script. We will be creating a script to read the information from a CSV file and then process the information using the for loops and then print it on the screen.
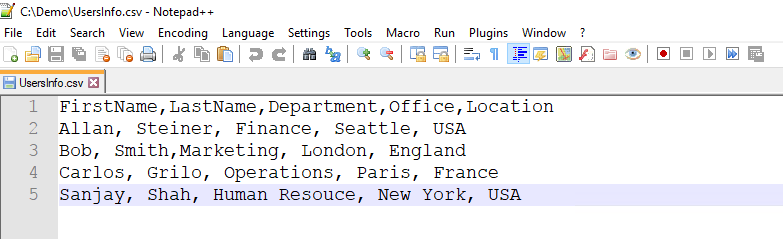
A comma-separated file has information in the form of tables, as shown in the following screenshot. The file has the user's information: their first name, last name, location, and department. We will use this information and create the login names for the users using the format $firstName + "." + $lastName.
The CSV file is as follows:
The script is as follows:
Function generateUserName($firstName, $lastName){
$userName = $firstName + "." + $lastName
Return $userName;
}
$userInformation = import-csv 'C:\Demo\UsersInfo.csv'
foreach($user in $userInformation){
$firstName = $user.FirstName
$lastName=$user.LastName
$department =$user.Department
$office=$user.Office
$Location=$user.Location
$userName = generateUserName $firstName $lastName
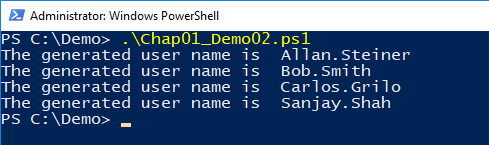
Write-Host "The generated user name is " $userName
}
The following screenshot shows the preceding script:

Now let's review this script line by line. As mentioned before, if you are using functions inside a script, it is recommended that you write them at the top of the script. The reason is that when the script is executed, the functions are already loaded.
On line 1 we have declared the function with the name generateUserName, and it accepts two parameters of type string. We can pass complex datatypes as parameters as well.
On line 2, we are creating the value for the username using the following logic:
$firstname + "." + $lastName
On line 3, we are returning that value.
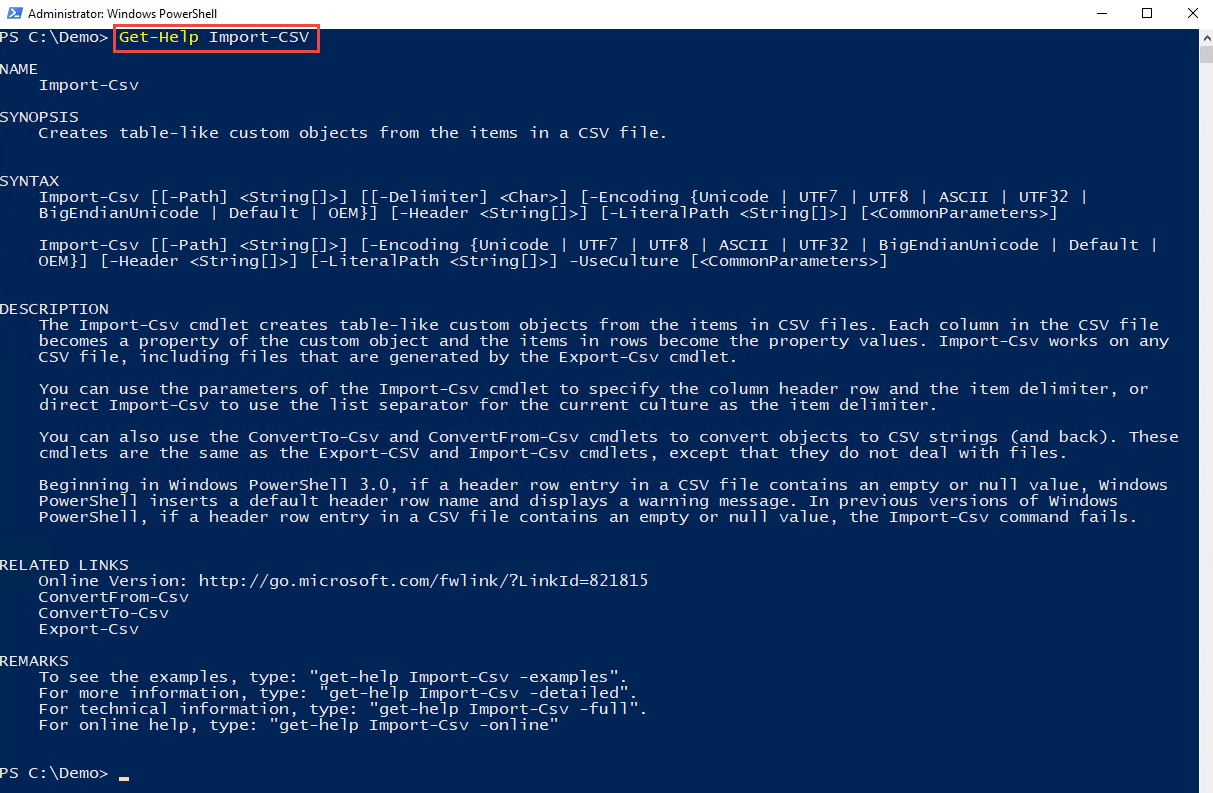
On line 6, we are reading the contents of the CSV file. The Import-CSV cmdlet is a cmdlet to read the contents of a file.
We will be covering this cmdlet in detail because to automate bulk user creation, we can use $userInformation stored in CSV files. We can also use information from other sources, such as plain text files or SharePoint lists. But as of now, CSV files are more common.
The Import-CSV cmdlet reads the information from the .csv file and stores them in the table-like custom objects. Each column header becomes the property and the subsequent rows become the values of the properties. You can find more information about this cmdlet here https://msdn.microsoft.com/en-us/powershell/reference/5.0/microsoft.powershell.utility/import-csv.
Here is the Import-CSV command:
This cmdlet accepts the following parameters.
-
[-Delimiter]: Specifies the delimiter that separates the property values in the CSV file. The default is a comma (,). Enter a character, such as a colon (:). To specify a semicolon (;), enclose it in quotation marks.
If you specify a character other than the actual string delimiter in the file, Import-CSV cannot create objects from the CSV strings. Instead, it returns the strings.
- [-Encoding]: Specifies the type of character encoding that was used in the CSV file. Acceptable values for this parameter are as follows:
- Unicode
- UTF7
- UTF8
- ASCII
- UTF32
- BigEndianUnicode
- Default
- OEM
The default is ASCII.
This parameter was introduced in Windows PowerShell 3.0.
- [ -Header]: Specifies an alternate column header row for the imported file. The column header determines the names of the properties of the object that Import-CSV creates.
Enter a comma-separated list of the column headers. Enclose each item in quotation marks (single or double). Do not enclose the header string in quotation marks. If you enter fewer column headers than there are columns, the remaining columns will have no header. If you enter more headers than there are columns, the extra headers are ignored.
When using the Header parameter, delete the original header row from the CSV file. Otherwise, Import-CSV creates an extra object from the items in the header row. - [-LiteralPath]: Specifies the path to the CSV file to import. Unlike Path, the value of the LiteralPath parameter is used exactly as it is typed. No characters are interpreted as wildcards. If the path includes escape characters, enclose it in single quotation marks. Single quotation marks tell Windows PowerShell not to interpret any characters as escape sequences.
- [-Path]: Specifies the path to the CSV file to import. You can also pipe a path to Import-CSV.
- [-UseCulture]: Indicates that this cmdlet uses the list separator for the current culture as the item delimiter. The default is a comma (,).
- [CommonParameters]: This cmdlet supports the common parameters: -Debug, -ErrorAction, -ErrorVariable, -InformationAction, -InformationVariable, -OutVariable, -OutBuffer, -PipelineVariable, -Verbose, -WarningAction, and -WarningVariable.
Inputs:
[System.String]: You can pipe a string that contains a path to Import-CSV.
Outputs:
[Object]: This cmdlet returns the objects described by the content in the CSV file.
Let's come back to the script. Once we get the contents of the CSV file in the $userInformation object, we process each row and assign the first name, last name, department, and office to the variables. On line 14, we call the generateUserName function and capture the return value in the variable and display the username on the script: