Book Image

JavaScript Cloud Native Development Cookbook

By : John Gilbert
Book Image

JavaScript Cloud Native Development Cookbook

By: John Gilbert

Overview of this book

Cloud-native development is a modern approach to building and running applications that leverages the merits of the cloud computing model. With cloud-native development, teams can deliver faster and in a more lean and agile manner as compared to traditional approaches. This recipe-based guide provides quick solutions for your cloud-native applications. Beginning with a brief introduction, JavaScript Cloud-Native Development Cookbook guides you in building and deploying serverless, event-driven, cloud-native microservices on AWS with Node.js. You'll then move on to the fundamental patterns of developing autonomous cloud-native services and understand the tools and techniques involved in creating globally scalable, highly available, and resilient cloud-native applications. The book also covers multi-regional deployments and leveraging the edge of the cloud to maximize responsiveness, resilience, and elasticity. In the latter chapters you'll explore techniques for building fully automated, continuous deployment pipelines and gain insights into polyglot cloud-native development on popular cloud platforms such as Azure and Google Cloud Platform (GCP). By the end of the book, you'll be able to apply these skills to build powerful cloud-native solutions.
Table of Contents (13 chapters)

Creating a stack

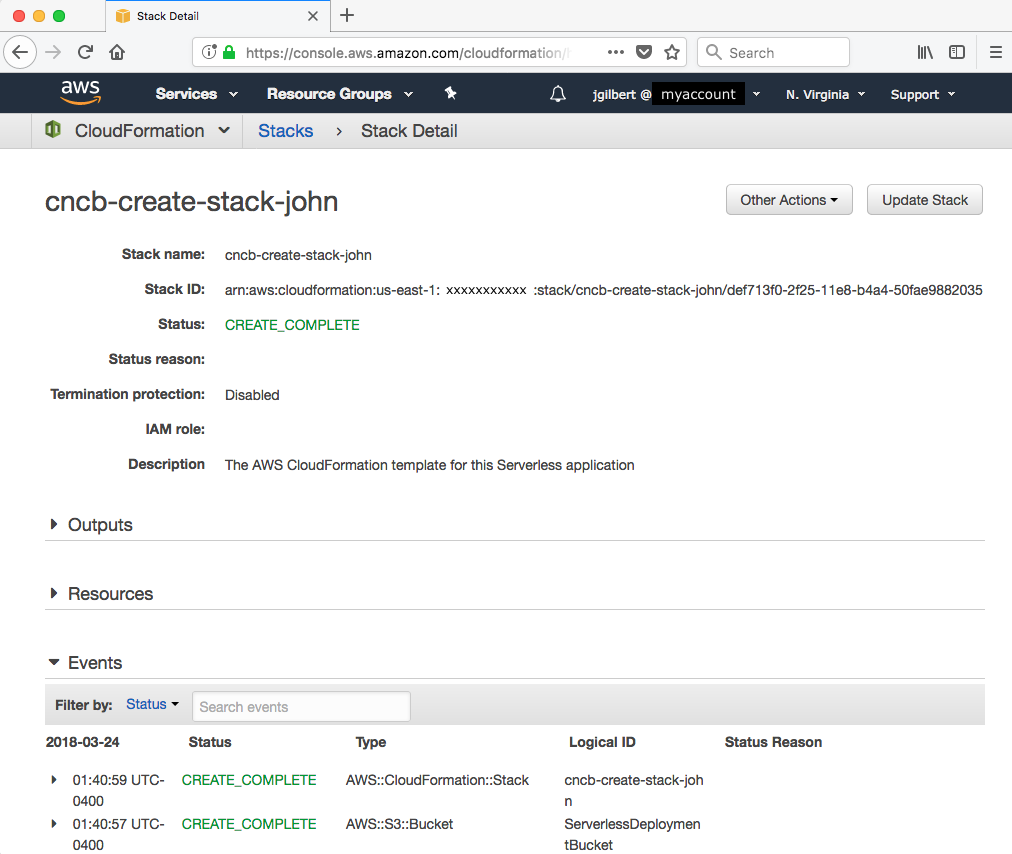
Each autonomous cloud-native service and all its resources are provisioned as a cohesive and self-contained group called a stack. On AWS, these are CloudFormation stacks. In this recipe, we will use the Serverless Framework to create and manage a bare-bones stack to highlight the steps involved in deploying a cloud-native service.

Getting ready

Before starting this recipe, you will need to follow the instructions in the Preface for configuring your development environment with Node.js, the Serverless Framework, and AWS account credentials.

How to do it...

  1. Create the project from the following template:
$ sls create --template-url https://github.com/danteinc/js-cloud-native-cookbook/tree/master/ch1/create-stack --path cncb-create-stack
  1. Navigate to the cncb-create-stack directory with cd cncb-create-stack.
  2. Review the file named serverless.yml with the following content:
service: cncb-create-stack

provider:
name: aws
  1. Review the file named package.json with the following content:
{
"name": "cncb-create-stack",
"version": "1.0.0",
"private": true,
"scripts": {
"test": "sls package -r us-east-1 -s test",
"dp:lcl": "sls deploy -r us-east-1",
"rm:lcl": "sls remove -r us-east-1"
},
"devDependencies": {
"serverless": "1.26.0"
}
}
  1. Install the dependencies with npm install.
  2. Run the tests with npm test.
  3. Review the contents generated in the .serverless directory.
  4. Deploy the stack:
$ npm run dp:lcl -- -s $MY_STAGE

> [email protected] dp:lcl <path-to-your-workspace>/cncb-create-stack
> sls deploy -r us-east-1 "-s" "john"

Serverless: Packaging service...
Serverless: Creating Stack...
Serverless: Checking Stack create progress...
.....
Serverless: Stack create finished...
Serverless: Uploading CloudFormation file to S3...
Serverless: Uploading artifacts...
Serverless: Validating template...
Serverless: Updating Stack...
Service Information
service: cncb-create-stack
stage: john
region: us-east-1
stack: cncb-create-stack-john
api keys:
None
endpoints:
None
functions:
None
  1. Review the stack in the AWS Console:
  1. Remove the stack once you have finished with npm run rm:lcl -- -s $MY_STAGE.

How it works...

The Serverless Framework (SLS) (https://serverless.com/framework/docs) is my tool of choice for deploying cloud resources, regardless of whether or not I am deploying serverless resources, such as functions. SLS is essentially an abstraction layer on top of infrastructure as code tools, such as AWS CloudFormation, with extensibility features such as plugins and dynamic variables. We will use SLS in all of our recipes. Each recipe starts by using the SLS feature to create a new project by cloning a template. You will ultimately want to create your own templates for jump-starting your own projects.

This first project is as bare bones as we can get. It essentially creates an empty CloudFormation stack. In the serverless.yml file, we define the service name and the provider. The service name will be combined with the stage, which we will discuss shortly, to create a unique stack name within your account and region. I have prefixed all the stacks in our recipes with cncb to make it easy to filter for these stacks in the AWS Console if you are using a shared account, such as your development or sandbox account at work.

Our next most important tool is Node Package Manager (NPM) (https://docs.npmjs.com/). We will not be packaging any Node modules (also known as libraries), but we will be leveraging NPM's dependency management and scripting features. In the package.json file, we declared a development dependency on the Serverless Framework and three custom scripts to test, deploy, and remove our stack. The first command we execute is npm install, which will install all the declared dependencies into the project's node_modules directory.

Next, we execute the npm test script. This is one of several standard scripts for which NPM provides a shortcut alias. We have defined the test script to invoke the sls package command to assert that everything is configured properly and help us see what is going on under the covers. This command processes the serverless.yml file and generates a CloudFormation template in the .serverless directory. One of the advantages of the Serverless Framework is that it embodies best practices and uses a configuration by exception approach to take a small amount of declaration in the serverless.yml files and expand it into a much more verbose CloudFormation template.

Now, we are ready to deploy the stack. As developers, we need to be able to deploy a stack and work on it in isolation from other developers and other environments, such as production. To support this requirement, SLS uses the concept of a stage. Stage (-s $MY_STAGE) and region (-r us-east-1) are two required command-line options when invoking an SLS command. A stack is deployed into a specific region and the stage is used as a prefix in the stack name to make it unique within an account and region. Using this feature, each developer can deploy (dp) what I refer to as a local (lcl) stack with their name as the stage with npm run dp:lcl -- -s $MY_STAGE. In the examples, I use my name for the stage. We declared the $MY_STAGE environment variable in the Getting ready section. The double dash (--) is NPM's way of letting us pass additional options to a custom script. In Chapter 6, Building a Continuous Deployment Pipeline, we will discuss deploying stacks to shared environments, such as staging and production.

CloudFormation has a limit regarding the template body size in a request to the API. Typical templates easily surpass this limit and must be uploaded to S3 instead. The Serverless Framework handles this complexity for us. In the .serverless directory, you will notice that there is a cloudformation-template-create-stack.json file that declares a ServerlessDeploymentBucket. In the sls deploy output, you can see that SLS uses this template first and then it uploads the cloudformation-template-update-stack.json file to the bucket and updates the stack. It's nice to have this problem already solved for us because it is typical to learn about this limit the hard way.

At first glance, creating an empty stack may seem like a silly idea, but in practice it is actually quite useful. In a sense, you can think of CloudFormation as a CRUD tool for cloud resources. CloudFormation keeps track of the state of all the resources in a stack. It knows when a resource is new to a stack and must be created, when a resource has been removed from a stack and must be deleted, and when a resource has changed and must be updated. It also manages the dependencies and ordering between resources. Furthermore, when an update to a stack fails, it rolls back all the changes.

Unfortunately, when deploying a large number of changes, these rollbacks can be very time-consuming and painful when the error is in one of the last resources to be changed. Therefore, it is best to make changes to a stack in small increments. In Chapter 6, Building a Continuous Deployment Pipeline, we will discuss the practices of small batch sizes, task branch workflow, and decoupling deployment from release. For now, if you are creating a new service from a proven template, then initialize the new project and deploy the stack with all the template defaults all the way to production with your first pull request. Then, create a new branch for each incremental change. However, if you are working on an experimental service with no proven starting point, then an empty stack is perfectly reasonable for your first deployment to production.

In your daily development routine, it is important to clean up your local stacks when you have completed work on a task or story. The cost of a development account can creep surprisingly high when orphaned stacks accumulate and are rarely removed. The npm run rm:lcl -- -s $MY_STAGE script serves this purpose.