Book Image

Nginx HTTP Server - Fourth Edition

By : Martin Bjerretoft Fjordvald, Clement Nedelcu
Book Image

Nginx HTTP Server - Fourth Edition

By: Martin Bjerretoft Fjordvald, Clement Nedelcu

Overview of this book

Nginx is a lightweight HTTP server designed for high-traffic websites, with network scalability as the primary objective. With the advent of high-speed internet access, short loading times and fast transfer rates have become a necessity. This book is a detailed guide to setting up Nginx in ways that correspond to actual production situations: as a standalone server, as a reverse proxy, interacting with applications via FastCGI, and more. In addition, this complete direct reference will be indispensable at all stages of the configuration and maintenance processes. This book mainly targets the most recent version of Nginx (1.13.2) and focuses on all the new additions and improvements, such as support for HTTP/2, improved dynamic modules, security enhancements, and support for multiple SSL certificates. This book is the perfect companion for both Nginx beginners and experienced administrators. For beginners, it will take you through the complete process of setting up this lightweight HTTP server on your system and configuring its various modules so that it does exactly what you need quickly and securely. For more experienced administrators, this book provides different approaches that can help you make the most of your current infrastructure. Nginx can be employed in many situations, whether you are looking to construct an entirely new web-serving architecture or simply want to integrate an efficient tool to optimize your site loading speeds.
Table of Contents (13 chapters)

Adding Nginx as a system service

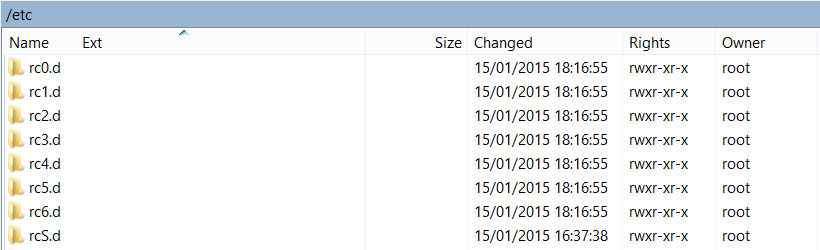
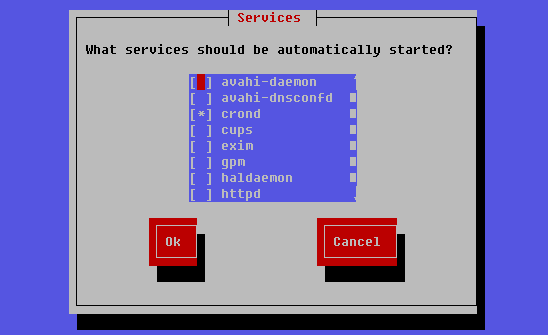
In this section, we will create a script that will transform the Nginx daemon into an actual system service. This will result in mainly two outcomes—the daemon will be controllable using standard commands, and more importantly, it will automatically be launched on system startup and stopped on system shutdown.

System V scripts

Most Linux-based operating systems to date use a System-V style init daemon. In other words, their start up process is managed by a daemon called init, which functions in a way that is inherited from the old System V Unix-based operating system.

This daemon functions on the principle of runlevels, which represent the state of the computer. Here is a table representing the various runlevels and their signification:

Runlevel

State

0

System is halted

1

Single-user mode (rescue mode)

2

Multiuser mode, without NFS support

3

Full multiuser mode

4

Not used

5

Graphical interface mode

6

System reboot


You can manually initiate a runlevel transition: use the telinit 0 command to shut down your computer or telinit 6 to reboot it.

For each runlevel transition, a set of services are executed. This is the key concept to understand here: when your computer is stopped, its runlevel is 0. When you turn it on, there will be a transition from runlevel 0 to the default computer start up runlevel. The default start up runlevel is defined by your own system configuration (in the /etc/inittab file) and the default value depends on the distribution you are using: Debian and Ubuntu use runlevel 2, Red Hat and Fedora use runlevel 3 or 5, CentOS and Gentoo use runlevel 3, and so on, as the list is long.

So let us summarize. When you start your computer running CentOS, it operates a transition from runlevel 0 to runlevel 3. That transition consists of starting all services that are scheduled for runlevel 3. The question is—how to schedule a service to be started at a specific runlevel?

For each runlevel, there is a directory containing scripts to be executed. If you enter these directories (rc0.d, rc1.d, to rc6.d) you will not find actual files, but rather symbolic links referring to scripts located in the init.d directory. Service startup scripts will indeed be placed in init.d, and links will be created by tools placing them in the proper directories.

About init scripts

An init script, also known as the service start up script or even SysV script, is a shell script respecting a certain standard. The script will control a daemon application by responding to commands such as start, stop, and others, which are triggered at two levels. Firstly, when the computer starts, if the service is scheduled to be started for the system runlevel, the init daemon will run the script with the start argument. The other possibility for you is to manually execute the script by calling it from the shell:

[[email protected] ~]# service httpd start

Or if your system does not come with the service command:

[[email protected] ~]# /etc/init.d/httpd start

The script must accept at least the start, stop, restart, force-reload, and status commands as they will be used by the system to respectively start up, shut down, restart, forcefully reload the service, or inquire its status. However, for enlarging your field of action as a system administrator, it is often interesting to provide further options, such as a reload argument to reload the service configuration or a try-restart argument to stop and start the service again.

Since service httpd start and /etc/init.d/httpd start essentially do the same thing, with the exception that the second command will work on all operating systems, we will make no further mention of the service command and will exclusively use the /etc/init.d/ method.

Init script for older Debian-based distributions

We will thus create a shell script for starting and stopping our Nginx daemon and also restarting and reloading it. The purpose here is not to discuss Linux shell script programming, so we will merely provide the source code of an existing init script, along with some comments to help you understand it.

Due to differences in the format of the init scripts from one distribution to another, we will here discover two separate scripts: this first one is meant for older Debian-based distributions before they were switched to Systemd.

First, create a file called nginx with the text editor of your choice, and save it in the /etc/init.d/ directory (on some systems, /etc/init.d/ is actually a symbolic link to /etc/rc.d/init.d/). In the file you just created, copy the following script carefully. Make sure that you change the paths to make them correspond to your actual setup.

You will need root permissions to save the script into the init.d directory.

The complete init script for Debian-based distributions can be found in the code bundle.

Init script for SystemD-based distributions

Due to the system tools, shell programming functions, and specific formatting that it requires, the previously described script is only compatible with older Debian-based distributions. If your server is operated by a SystemD-based distribution such as CentOS, Fedora, newer Debian-based and many more, you will need an entirely different script.

The complete init script for SystemD-based distributions can be found in the code bundle.

Installing the script

Placing the file in the init.d directory does not complete our work. There are additional steps that will be required for enabling the service. First of all, you need to make the script executable. So far, it is only a piece of text that the system refuses to run. Granting executable permissions on the script is done with the chmod command:

[[email protected] ~]# chmod +x /etc/init.d/nginx
If you created the file as the root user, you will need to be logged in as root to change the file permissions.

At this point, you should already be able to start the service using service nginx start or /etc/init.d/nginx start, as well as stopping, restarting, or reloading the service.

The last step here will be to make it so the script is automatically started at the proper runlevels. Unfortunately, doing this entirely depends on what operating system you are using. We will cover the two most popular families – Debian, Ubuntu, or other Debian-based distributions and Red Hat/Fedora/CentOS, or other Red Hat-derived systems.

Debian-based distributions

For the Debian based distribution, a simple command will enable the init script for the system runlevel:

[[email protected] ~]# update-rc.d -f nginx defaults

This command will create links in the default system runlevel folders. For the reboot and shutdown runlevels, the script will be executed with the stop argument; for all other runlevels, the script will be executed with start. You can now restart your system and see your Nginx service being launched during the boot sequence.

Red Hat-based distributions

For the Red Hat-based systems family, the command differs, but you get an additional tool for managing system startup. Adding the service can be done via the following command:

[[email protected] ~]# chkconfig nginx on

Once that is done, you can then verify the runlevels for the service:

[[email protected] ~]# chkconfig --list nginx
Nginx 0:off 1:off 2:on 3:off 4:on 5:on 6:off

Another tool will be useful to you for managing system services, namely, ntsysv. It lists all services scheduled to be executed on system startup and allows you to enable or disable them at will:

ntsysv requires root privileges to be executed. Prior to using ntsysv, you must first run the chkconfig nginx on command, otherwise nginx will not appear in the list of services.