Book Image

Azure Serverless Computing Cookbook - Second Edition

By : Praveen Kumar Sreeram, Jason Marston
Book Image

Azure Serverless Computing Cookbook - Second Edition

By: Praveen Kumar Sreeram, Jason Marston

Overview of this book

Microsoft provides a solution for easily running small segments of code in the cloud with Azure Functions. The second edition of Azure Serverless Computing Cookbook starts with intermediate-level recipes on serverless computing along with some use cases demonstrating the benefits and key features of Azure Functions. You’ll explore the core aspects of Azure Functions, such as the services it provides, how you can develop and write Azure Functions, and how to monitor and troubleshoot them. As you make your way through the chapters, you’ll get practical recipes on integrating DevOps with Azure Functions, and providing continuous integration and continuous deployment with Azure DevOps. This book also provides hands-on, step-by-step tutorials based on real-world serverless use cases to guide you through configuring and setting up your serverless environments with ease. You will also learn how to build solutions for complex, real-world, workflow-based scenarios quickly and with minimal code using Durable Functions. In the concluding chapters, you will ensure enterprise-level security within your serverless environment. The most common tips and tricks that you need to be aware of when working with Azure Functions on production environments will also be covered in this book. By the end of this book, you will have all the skills required for working with serverless code architecture, providing continuous delivery to your users.
Table of Contents (13 chapters)

Storing the image in Azure Blob Storage

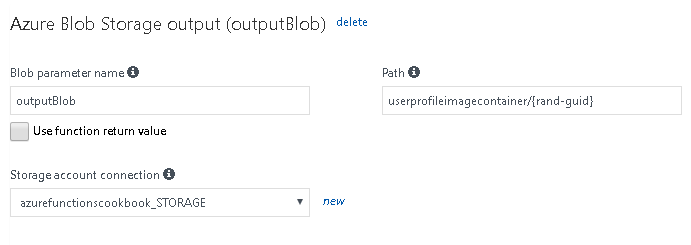
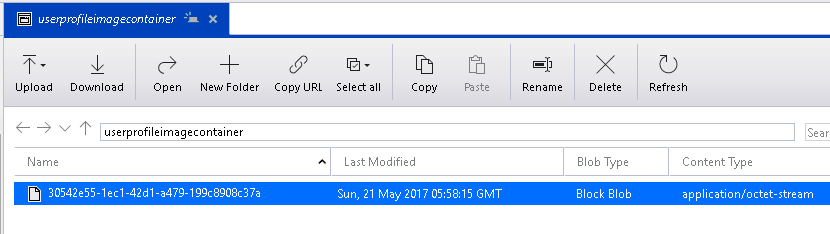
In the previous recipe, we stored the image URL in the queue message. Let's learn how to trigger an Azure Function (Queue Trigger) when a new queue item is added to the Azure Storage Queue service. Each message in the Queue is the URL of the profile picture of a user, which will be processed by the Azure Functions and stored as a Blob in the Azure Storage Blob service.

Getting ready

In the previous recipe, we learned how to create Queue output bindings. In this recipe, you will grab the URL from the Queue, create a byte array, and then write it to a Blob.

This recipe is a continuation of the previous recipes. Make sure that you have implemented them.

How to do it...

Perform the following steps:

  1. Create a new Azure Function by choosing Azure Queue Storage Trigger from the templates.
  1. Provide the following details after choosing the template:

    • Name your function: Provide a meaningful name, such as CreateProfilePictures.
    • Queue name: Name the Queue userprofileimagesqueue. This will be monitored by the Azure Function. Our previous recipe created a new item for each of the valid requests that came to the HTTP trigger (named RegisterUser) into the userprofileimagesqueue Queue. For each new entry of a queue message to this Queue storage, the CreateProfilePictures trigger will be executed automatically.
    • Storage account connection: The connection of the storage account where the Queues are located.
  2. Review all the details and click on Create to create the new function.
  3. Navigate to the Integrate tab, click on New Output, choose Azure Blob Storage, and then click on the Select button.
  4. In the Azure Blob Storage output section, provide the following:
    • Blob parameter name: Set it to outputBlob
    • Path: Set it to userprofileimagecontainer/{rand-guid}
    • Storage account connection: Choose the storage account where you would like to save the Blobs and click on the Save button:
  1. Click on the Save button to save all the changes.
  1. Replace the default code of the run.csx file of the CreateProfilePictures function with the following code. The following code grabs the URL from the Queue, creates a byte array, and then writes it to a Blob:
        using System;
public static void Run(Stream outputBlob,string myQueueItem,
TraceWriter log)
{
byte[] imageData = null;
using (var wc = new System.Net.WebClient())
{
imageData = wc.DownloadData(myQueueItem);
}
outputBlob.WriteAsync(imageData,0,imageData.Length);
}
  1. Click on the Save button to save changes. Make sure that there are no compilation errors in the Logs window:
  1. Let's go back to the RegisterUser function and test it by providing the firstname, lastname, and ProfilePicUrl fields, like we did in the Saving the profile images to Queues using Queue output bindings recipe.
  2. Navigate to the Azure Storage Explorer and look at the userprofileimagecontainer Blob container. You will find a new Blob:
  1. You can view the image in any tool (such as MS Paint or Internet Explorer).

How it works...

We have created a Queue trigger that gets executed as and when a new message arrives in the Queue. Once it finds a new Queue message, it reads the message, and as we know, the message is a URL of a profile picture. The function makes a web client request, downloads the image data in the form of a byte array, and then writes the data into the Blob, which is configured as an output Blob.

There's more...

The rand-guid parameter will generate a new GUID and is assigned to the Blob that gets created each time the trigger is fired.

It is mandatory to specify the Blob container name in the Path parameter of the Blob storage output binding while configuring the Blob storage output. Azure Functions creates one automatically if it doesn't exist.

You can only use Queue messages when you would like to store messages that are up to 64 KB in size. If you would like to store messages greater than 64 KB, you need to use the Azure Service Bus.