I tossed around a few different ideas on how to get this section started, and I finally realized that the easiest would be to simply set up a new organization that I could use for any examples related to this book. I headed over to a Domain Name System (DNS) registry service (I like https://www.namecheap.com/) and did a little unused domain name searching. I thought this had a nice ring to it:
Figure 2.1 – My new domain – gcp.how
Then, I signed up for Google Workspace (formerly G Suite). To be clear, having a Google Workspace is not a requirement for setting up Google Cloud. I’m using Google Workspace because it provides me with email, Google Drive, and so on, but it doesn’t automatically come with an account in Google Cloud.
Google workspaces can be self-served from the Workspace home page, https://workspace.google.com/, or a domain service such as Namecheap can also create the workspace account for you.
Now that I have my domain and email configured, let’s get back to our first major Google Cloud setup step – configuring identity management.
Cloud Identity is Google’s Identity as a Service (IDaaS) offering. IDaaS is a cool acronym for a system that can authenticate users. If you head into an office building to visit someone, you frequently have to show your ID before you can get access. That’s an analog version of an IDaaS system. Google’s Cloud Identity can handle identity services for you directly, as it both stores and validates credentials, or it can federate with other providers, such as Microsoft’s Active Directory (AD) and Azure AD, and let them be the source of truth when it comes to identity.
In the case of Google Cloud, Cloud Identity will be the access gateway that decides exactly how apps, people, and devices prove who they are in a secure and reliable way before they can access services. But Cloud Identity can be much more than just an IDaaS system; it can also help organizations manage employee computers, phones, and tablets, as well as integrating into systems requiring Lightweight Directory Access Protocol (LDAP).
In my office building example, after the person at reception checks your ID to make sure you are who you claim, they then have to decide on exactly what you can access. In Google Cloud, once identity is confirmed, Identity and Access Management (IAM) takes over and, based on the security roles your identity has been assigned, IAM can then decide exactly what you are authorized to do in terms of Google Cloud services. We will talk more in depth about IAM in a later chapter.
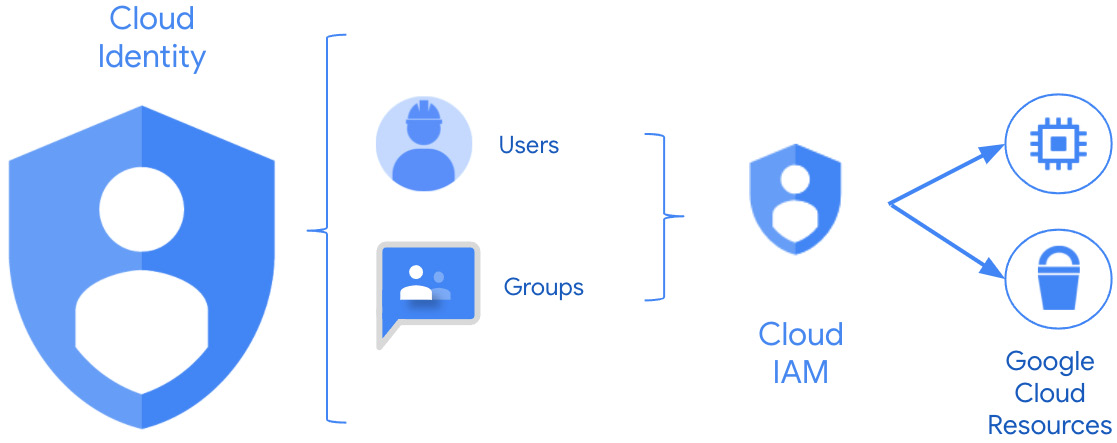
Together, Cloud Identity and Google Cloud IAM work like Figure 2.2. The user comes into Cloud Identity and proves who they are. Then, based on the roles directly assigned to them or to the group to which they belong, they are authorized to access some, all, or none of the resources that Google Cloud makes available:
Figure 2.2 – Cloud Identity working with Cloud IAM
Before setting up Cloud Identity, you need to decide which of the two editions you’ll need – free or premium. If you look at https://cloud.google.com/identity/docs/editions, you’ll see a good comparison. The editions aren’t mutually exclusive, so you can allocate some of your users to free and others to premium, based on need.
To briefly summarize the differences, the free version provides the authentication you’ll need for Google Cloud for up to 50* users, plus Chrome sync, most Cloud Identity reporting features, and core mobile device and computer management. The premium edition (currently $6 a month per user) provides everything from the free pile for as many users as you want to pay for, plus much more advanced mobile device and mobile app management, LDAP app integration support, more reporting, and 24 x 7 email, phone, and chat support, all with a 99.9% SLA.
For my demonstration site, where I’m mostly concerned with controlling access to Google Cloud, the free version will be just fine.
*Up to 50 Users
The default Cloud Identity free user count is officially 50 but, based on your organization’s reputation and what else you may be paying for, Google can automatically and/or manually raise that number. For example, I’m using Cloud Identity’s free version, but my default user count limit in Cloud Identity is showing 90 users. Why? Because I’m paying for Google Workspace, so I’m already paying something per user.
Cloud Identity setup
To set up Cloud Identity, you will need the following:
- The ability to get into your domain name registry settings so that you can verify domain ownership. If you have any domain aliases (perhaps you own
.com and .org), have the keys to them ready as well.
- A first Cloud Identity super admin username.
I have just set up my domain, so I know that I have access, but you’d be surprised how frequently this is a stumbling point for organizations. Everyone in the organization knows that there is a domain name, and you pay for it every 5 years or something, but who has the keys to it? Check with IT and, if they don’t know, send a message to your finance department and have them check for the bill. If no one has a clue, you can do an Internet Corporation for Assigned Names and Numbers (ICANN) lookup (https://lookup.icann.org/). I just did a search for my new domain name, and it provided me with a contact form that I can use to send a message to the owner. It also told me who the registrar was and how I could contact them. Going down that route may take a bit of time, but it’s a place to start.
Next, I need to decide on my first Cloud Identity super admin user. This will be the first user who has full control over Cloud Identity, and that’s a lot of power at the access control level. The best practices for Cloud Identity super admins are as follows:
- The account should be used for Cloud Identity administration (user and group life cycle and organizational security settings) only. It should not be a normal daily-use account.
- The account should not be used as a Google Cloud organizational administrator (Google Cloud’s version of a super admin, which we’ll discuss in more detail later).
- You should eventually have two to five Cloud Identity super admins. You need at least two in case one is on vacation. You don’t need many more than five because it’s just too much power to have floating around.
- This first account will be used for initial Cloud Identity or Google Workspace setup, Google Cloud setup, and then kept back for use as a final recovery option. If you are a super admin, we’ll create an account for that later, but not yet.
- As a best practice, come up with a descriptive but generic name, such as
gcp-superadmin@<your-domain>. I’m going to use [email protected].
- Protect all super admin accounts with some form of 2-Step Verification (2SV). The strongest option would be a physical key, such as Google’s own Titan key (https://cloud.google.com/titan-security-key), or one of the keys from Yubico (https://www.yubico.com/products/). Make sure that you also have backup configured, perhaps backup codes encrypted and stored securely.
You can find the steps to sign up for Cloud Identity here: https://cloud.google.com/identity/docs/setup.
If you aren’t going to be pairing Cloud Identity with Google Workspace, start with one of these:
If you are going to use Google Workspace, then set that up first and after it’s up and running, follow these steps:
- Log into your Google Workspace admin page: https://admin.google.com/.
- Go to Billing | Get more services | Cloud Identity.
- Select Cloud Identity Free (my choice) or Cloud Identity Premium.
The steps you run through to initially sign up for Google Workspace or to sign up for Cloud Identity are almost identical. There’s a setup wizard, and you’ll have a quick about you section where, besides your name, you’ll also have to provide a secondary email, something outside your current domain. There’s a section where you can enter basic business information, your domain information, and finally, you’ll finish and run through the initial user setup. Remember, this should be your first super admin user, as discussed previously, so it should be your equivalent to my [email protected].
The domain name verification section is where you’ll need to be able to access your domain name registrar configurations. In it, you’ll have to create a TXT or CNAME record, depending on preferences, or you may also be able to verify your domain by adding a tag or page to your organizational website itself. Since I also needed to tie my domain name mail configurations to my Google Workspace, I had to add a handful of Mail Exchanger (MX) records. It can take Google minutes to hours to complete its verification process once the registrar configurations are updated. You may have to check back on the verification pages multiple times. For me, it took about 10 minutes.
Once that part is complete, you’ll get your Cloud Identity/Google Workspace admin page: https://admin.google.com/.
Now that you have initial access to Cloud Identity or your Google Workspace, via the corresponding superuser, go ahead and log into Google Cloud with it for the first time by heading over to the getting started page for Google Cloud: https://console.cloud.google.com/getting-started. If you like, go ahead and start your trial, though you’ll need to be ready to provide a credit card if you do (make it a corporate card!).
If you can access the Cloud Identity or Google Workspace admin page (https://admin.google.com) with your superuser account, and you can access the Google Cloud Console page (https://console.cloud.google.com/), then you are ready to move on to the next major step.


 Free Chapter