Book Image

Identity with Windows Server 2016: Microsoft 70-742 MCSA Exam Guide

By : Vladimir Stefanovic, Sasha Kranjac
Book Image

Identity with Windows Server 2016: Microsoft 70-742 MCSA Exam Guide

By: Vladimir Stefanovic, Sasha Kranjac

Overview of this book

MCSA: Windows Server 2016 certification is one of the most sought-after certifications for IT professionals, which includes working with Windows Server and performing administrative tasks around it. This book is aimed at the 70-742 certification and is part of Packt's three-book series on MCSA Windows Server 2016 certification, which covers Exam 70-740, Exam 70-741, and Exam 70-742. This exam guide covers the exam objectives for the 70-742 Identity with Windows Server 2016 exam. It starts with installing and configuring Active Directory Domain Services (AD DS), managing and maintaining AD DS objects and advanced configurations, configuring Group Policy, Active Directory Certificate Services, and Active Directory Federation Services and Rights Management. At the end of each chapter, convenient test questions will help you in preparing for the certification in a practical manner. By the end of this book, you will be able to develop the knowledge and skills needed to complete MCSA Exam 70-742: Identity with Windows Server 2016 with confidence.
Table of Contents (7 chapters)

Active Directory users and computers

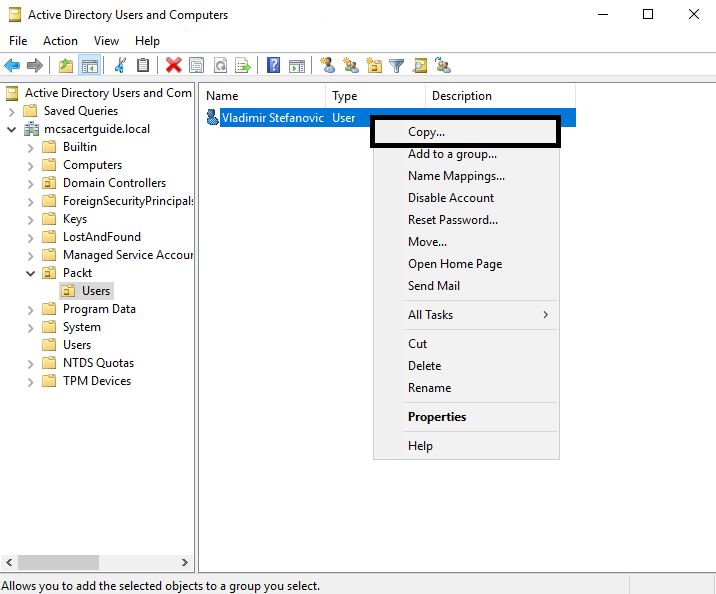
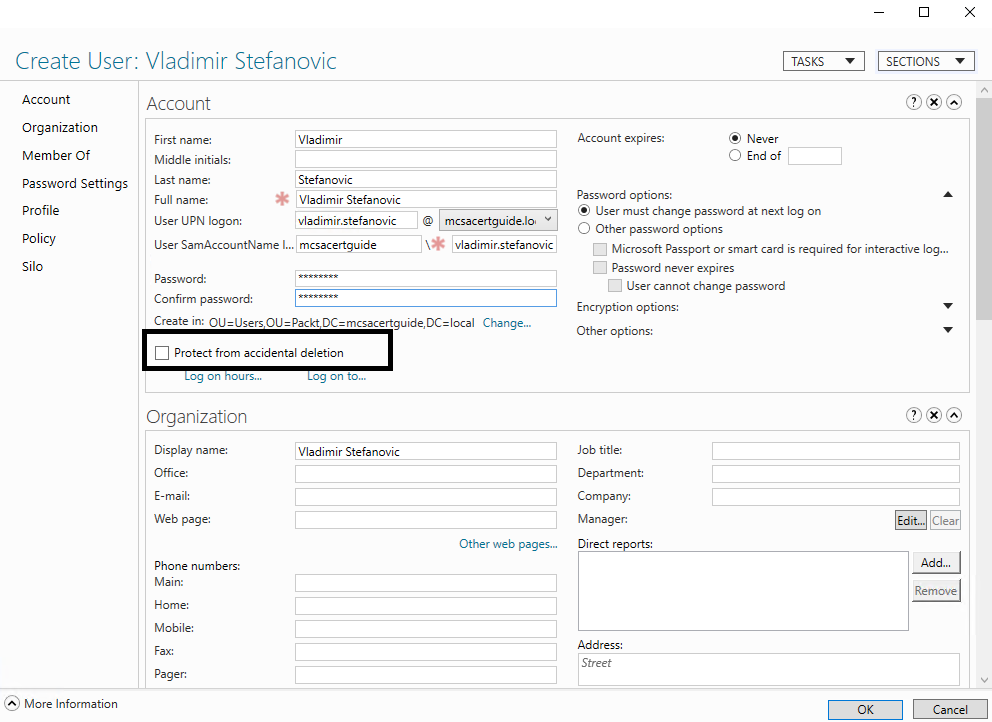
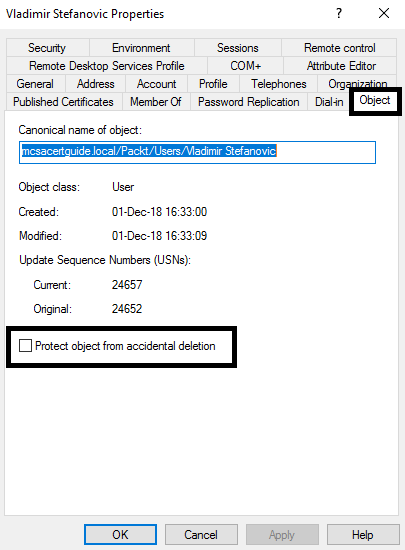
Although AD DS has a lot of object types, its users, groups, and computers are the most important. These accounts are directly related to users and their computers, and to the server infrastructure. In this section, we'll explain how you can create user and computer accounts. Group management will be covered in the next section of this chapter.

Creating and managing users accounts

Each user object in AD DS has more than a few attributes that can be configured. We can't cover all user object attributes here, but the most important attributes related to identity will be covered in this section.

All user accounts can be created using a few different GUI or command-line tools. For administrators who like to use GUI tools, there are two different MMC Snap-ins: Active Directory Administrative Center and Active Directory Users and Computers.

The Active Directory Administrative Center is important for this certification. It has a lot of improvements compared to Active Directory Users and Computers, and exam questions are focused on this MMC Snap-in.

For command-line-oriented administrators, the PowerShell and Dsadd command-line tools are valuable options.

To prepare for the exam, your focus needs to be on PowerShell, but some questions might be related to the Dsadd command-line tool. All examples in this section will present PowerShell commands.

Creating a user using GUI tools is a straightforward process, but it's different depending on which MMC Snap-in you decide to use. With Active Directory Users and Computers, creating a user requires only the most important attributes that need to be configured:

  • First name
  • Last name
  • User login name
  • Password

With this information in the user account, the user will be able to log in to the domain-joined machine. All other attributes, such as group membership, company name, and phone number, must be configured later if you use Active Directory Users and Computers. However, if you decide to use the Active Directory Administrative Center for user creation, the process will be a little bit different. You need to add all the attributes that were necessary when using Active Directory Users and Computers, but all other attributes can be added at the same time during the creation process.

The creation process using PowerShell can include several commands in a row. Depending on which switches are used in the PowerShell cmdlet, different attributes can be included. The following example shows you the command for user creation using PowerShell with the same parameters used in previous examples for GUI MMC Snap-ins:

New-ADUser -GivenName Vladimir -Surname Stefanovic -Name "Vladimir Stefanovic" -UserPrincipalName [email protected] -SamAccountName vladimir.stefanovic –AccountPassword (Read-Host –AsSecureString "Enter password") -Enabled $true

Once a user account is created with PowerShell, it will not be enabled unless you include the -Enabled with parameter $true switch. If you forget to add that switch to the command, you can enable the account later using the PowerShell Enable-ADAccount cmdlet.

If, for any reason, you want to copy a user account, only Active Directory Users and Computers can offer this; the Active Directory Administrative Center doesn't have this option. With PowerShell, you can do this by creating scripts or creating a user from a template:

Only the most commonly used attributes are copied to the new user account:

  • Group memberships
  • Home directories
  • Profile settings
  • Logon scripts
  • Logon hours
  • Password settings
  • Department name
  • Manager

Once you create a user account, using any of the provided methods, the account will be fully operational and other users will be able to use them. If you want to change some of the attributes, which is one of the most common tasks for user accounts, this can also be done using the same MMC Snap-ins or PowerShell. If you want to use the GUI MMC Snap-in, you just need to go to the properties for the selected account and change the value of the specific attributes. The Set-ADUser PowerShell cmdlet needs to be used if you want to change the attributes, and you can add more than one switch in a PowerShell command:

Set-ADUser -Identity vladimir.stefanovic -Company "Packt" -Department "IT"   

Deleting a user account can also be done using management tools, MMC Snap-ins, or PowerShell. In both MMC Snap-ins, you just need to right-click on the user account and select Delete. PowerShell for AD DS has the Remove-ADUser cmdlet. The following command will delete the user account without any additional questions:

Remove-ADUser -Identity vladimir.stefanovic -Confirm:$false

If you don't use -Confirm:$False, you'll be asked to confirm the deletion of the user account.

By default, the user account isn't protected from accidental deletion. That attribute is unchecked by design, and if you want to enable it, you need to make some changes to the user account. Protecting the user account from accidental deletion is very important, because once deleted account will prevent the user to log on to the system and access to corporate resources. The easiest way to do this using a GUI MMC Snap-in is to use the Active Directory Administrative Center. You just need to check the Protect from accidental deletion checkbox. Using this MMC Snap-in, you can configure this protection during the creation of your user account:

If you want to use the MMC Snap-in Active Directory Users and Computers, you need to edit the properties of the user account on the Object Tab, and check the Protect object from accidental deletion checkbox:

The PowerShell cmdlet for this task is Set-ADObject. This needs to be started once the user account is created:

Set-ADObject -Identity:"CN=Vladimir Stefanovic,OU=Users,OU=Packt,DC=mcsacertguide,DC=local"-ProtectedFromAccidentalDeletion:$true

In this cmdlet, the parameter for the -Identity switch is the object's Distinguished Name.

Creating and managing computer accounts

Computers, like users, are security principals in AD DS that have an account with a logon name and password. Unlike users, the password for computer accounts is managed by Windows Server and changes automatically on a periodic basis. Computer accounts also authenticate against the domain and belong to one or more groups in AD DS. The most common tasks for computer accounts are moving between OUs and configuring properties.

Although computer accounts are automatically created when joining a computer to a domain, the proper procedure for this task requires us to create a computer account manually in AD DS before joining the computer to the domain. The creation process is very similar to creating a user account, and like a user account, it can be done using either MMC Snap-ins or PowerShell. Using Active Directory Users and Computers, you just need to populate the Computer Name field, and all other attributes can be configured later. Using the Active Directory Administrative Center, you need to populate the Computer Name field, because that's mandatory, but you'll configure many other attributes as well. PowerShell lovers will use the following command to create a computer account:

New-ADComputer -Name Server03 -Path "OU=Computers,OU=Packt,DC=mcsacertguide,DC=local"

By default, all computer accounts that are created using the New-ADComputer PowerShell cmdlet and without the -Path switch will be stored in the Computers system container.

A computer account that's created while joining the computer to the domain will be stored in the Computers system container as well.

All management tasks on a computer account can be done using either MMC Snap-ins or PowerShell. If you want to use MMC Snap-ins, you just need to configure some properties of the computer account. If you want to make changes using PowerShell, however, you need to use the Set-ADComputer or Set-ADObject PowerShell cmdlets, depending on the attribute that needs to be changed. Like user accounts, computer accounts are not by default protected from accidental deletion. During the creation process, this can be done using the Active Directory Administrative Center MMC Snap-in by checking the Protect from accidental deletion checkbox. This parameter can also be changed using Active Directory Users and Computers or the Set-ADObject PowerShell cmdlet using the same command, as for a user account:

Set-ADObject -Identity "CN=Server03,OU=Computers,OU=Packt,DC=mcsacertguide,DC=local"-ProtectedFromAccidentalDeletion:$true

Configuring templates

As mentioned earlier, only the Active Directory Users and Computers MMC Snap-in gives you the ability to copy a user account. With the new Active Directory Administrative Center MMC Snap-in or PowerShell, it isn't possible to copy a user account. However, from Windows Server 2012, you can create a user account with the most common parameters for a specific job role or department configured and use that account as a template. As mentioned earlier, attributes that are copied to the new user account are as follows:

  • Group memberships
  • Home directories
  • Profile settings
  • Logon scripts
  • Logon hours
  • Password settings
  • Department name
  • Manager

The template user account can be created using PowerShell or either of the MMC Snap-ins. Creating a new user account from the template can be done with the Active Directory Users and Computers MMC Snap-in with the copy option, as mentioned earlier, or using the PowerShell command:

$Template = Get-ADUser -Identity vladimir.stefanovic -Properties Company

New-ADUser -GivenName John -Surname Doe -Name "John Doe" -UserPrincipalName [email protected] -SamAccountName john.doe –AccountPassword (Read-Host –AsSecureString "Enter password") -Enabled $true -Instance $Template

Performing bulk Active Directory operations

The definition of a bulk operation is a single action that changes multiple objects. Performing a bulk operation is much faster than changing many objects individually. With any type of bulk operation, you need to be more accurate, because any typographic mistake will affect more than one object. The most common bulk operations are as follows:

  • Creating new users from a CSV file
  • Managing user attributes based on where they belong (OU, Department, Company, and so on)
  • Disabling user accounts based on their activity

Although some bulk operations can be done using MMC Snap-ins, PowerShell is the most suitable tool to use. If you want to use PowerShell, you must understand the queries that will be used to list AD DS objects and how to work with .csv files. Then, you can create scripts that perform the bulk operations you need.

Using the Get-ADUser PowerShell cmdlet (for example), you can make a query to AD DS and list all user accounts. However, if you don't add a specific filter to your query, the result is likely to be useless. For this task, you need to understand the filtering parameters:

  • SearchBase: Defines the AD DS path to begin searching.
  • SearchScope: Defines at what level below the SearchBase the search should be performed.
  • ResultSetSize: Defines how many objects to return in response to a query.
  • Properties: Defines which object properties to return and display. To return all properties, type *.

All filtering of parameters, especially properties, can be made more precise using the following operators:

  • -eq: Equal to
  • -ne: Not equal to
  • -lt: Less than
  • -le: Less than or equal to
  • -gt: Greater than
  • -ge: Greater than or equal to
  • -like: Uses wildcards for pattern matching

Once you make a correct query, you can use pipe ( | ) to perform another command to selected objects. For example, the following PowerShell command will configure the City attribute on all accounts that have the configured Department attribute with a value of IT:

Get-ADUser -Filter {Department -eq "IT"} | Set-ADUser -City London

Another suitable task for performing bulk operations is importing data from a CSV file. CSV files can contain more information than just lists and are often formatted as a spreadsheet. This approach is ideal if you need to create more than one user account at a time and the information populated in the file can be configured as an attribute in the user account. For example, the following is an example of a CSV file and the PowerShell script that will use the attribute from the CSV file:

Name,FirstName,LastName,UPN,SAM,Company

Vladimir Stefanovic,Vladimir, Stefanovic,[email protected],vladimir.stefanovic,Packt

Sasha Kranjac,Sasha,Kranjac,[email protected],sasha.kranjac,Packt

Import-Csv C:\Users.txt | foreach {New-ADUser -Name $_.Name -GivenName $_.FirstName -Surname $_.LastName -UserPrincipalName $_.UPN -SamAccountName $_.SAM –AccountPassword (Read-Host –AsSecureString Enter password) -Enabled $true }

Implementing offline domain joins

Windows Server 2008 R2 introduced offline domain joins. This is a feature that allows you to join a computer to a domain without communicating directly with the domain controller. This works with client computers running Windows 7 or later or Windows Server 2008 R2 or later. To perform offline domain joins, you need to use the djoin command-line tool, which generates a domain-join file that will then be imported to the client computer. Offline domain join is useful, and mainly used, in scenarios where the machine that needs to be joined to the domain doesn't have network connectivity with domain controller or when you need to perform unattended installation of the Windows operating system.

To generate a djoin file, you need to run the following command and define parameters, such as a domain name, a computer name, and a location to save the offline domain join file to:

djoin.exe /provision /domain mcsacertguide.local /machine server01 /savefile c:\server01odj.txt

Once you create the offline domain join file, you need to copy the file to the desired computer and run the following command:

djoin.exe /requestODJ /loadfile c:\server01odj.txt /windowspath %systemroot% /localos

Like a standard join to a domain, the computer needs to be restarted to complete the joining operation.

Managing accounts

For many different reasons, a user account might become inactive. If a user leaves a company for a certain period of time or resigns, and you think that the user doesn't need access to the account or the resources, the best practice is to disable a user account until you're sure it's safe to delete it. If you want to disable an account, you can use either of the MMC Snap-ins. All you need to do is select the desired user account and disable it by right-clicking and selecting Disable or Disable Account, depending on which MMC Snap-in you used. If you enable a user account, the procedure is same, but the options are different: Enable or Enable Account.

The PowerShell cmdlets that need to be used for this task are Enable-ADAccount and Disable-ADAccount, and the command needs to be as follows:

Disable-ADAccount -Identity vladimir.stefanovic
Enable-ADAccount -Identity vladimir.stefanovic