Docker containers are the future of highly scalable software systems and make it easy to create, run, and deploy apps.
If you're looking to leverage them without getting overwhelmed by the technicalities, add The Docker Workshop to your reading list!
With this book, you'll be able to jumpstart your knowledge and work with containers and Docker using interactive activities.
The workshop starts with an overview of Docker containers, enabling you to understand how they work. You'll run third-party Docker images and also create your own images using Dockerfiles and multi-stage Dockerfiles. Next, you'll create environments for Docker images, and expedite your deployment process with continuous integration. Moving ahead, you'll tap into interesting topics and learn how to implement production-ready environments using Docker Swarm. To further secure Docker images and ensure that production environments are running at maximum capacity, you'll apply best practices. Later, you'll gain the skills to successfully move Docker containers from development to testing, and then into production. While doing so, you'll learn how to troubleshoot issues, clear up resource bottlenecks and optimize the performance of services.
By the end of this Docker book, you'll be well-versed with Docker fundamentals and be able to use Docker containers in real-world use cases.
Audience
If you're a developer or a Docker beginner who wants to gain a practical understanding of Docker containers, this book is the ideal guide. Experience in running command shells and knowledge of either the IntelliJ, Atom, or VSCode editor are required before you get started with this Docker containers book.
About the Chapters
Chapter 1, Running My First Docker Container, begins with a basic introduction to Docker, providing a discussion of the background architecture, ecosystem, and basic Docker commands.
Chapter 2, Getting Started with Dockerfiles, introduces you to the Dockerfile, its background, and how to use the Dockerfile to create and run your first Docker containers.
Chapter 3, Managing Your Docker Images, provides more details on Docker images, image repositories, and publishing your own images.
Chapter 4, Multi-Stage Dockerfiles, shows you how to extend your Dockerfile further, using a multi-stage Dockerfile in your project.
Chapter 5, Composing Environments with Docker Compose, introduces Docker Compose and how you can use docker-compose files to generate entire working environments.
Chapter 6, Introduction to Docker Networking, explains why networking needs to be approached differently in Docker and how you can implement communication between services and host systems.
Chapter 7, Docker Storage, details the utilization of storage in your Docker containers and environments.
Chapter 8, CI/CD Pipeline, describes the creation of a continuous integration/continuous deployment pipeline using Jenkins.
Chapter 9, Docker Swarm, covers the orchestration of your Docker services using Swarm.
Chapter 10, Kubernetes, takes your orchestration to the next level, introducing you to Kubernetes and how to deploy your container images across a basic cluster.
Chapter 11, Docker Security, walks you through ways to make your Docker images and containers as secure as possible, providing ways in which you can reduce risk while using containers.
Chapter 12, Best Practices, provides information on how you can ensure that your containers are running as efficiently as possible.
Chapter 13, Monitoring Docker Metrics, covers metrics collection for your running Docker containers and how to implement Prometheus to help monitor these metrics.
Chapter 14, Collecting Container Logs, teaches you how to use Splunk to collect logs from your running Docker containers, which will allow you to aggregate, search, and display your logging details.
Chapter 15, Extending Docker with Plugins, covers the ways in which you can extend Docker further by creating your own plugins to use with your Docker application.
Note
There is also a bonus chapter, What's Next for Docker available at: http://packt.live/3tR0iMY.
Conventions
Code words in text, database table names, folder names, filenames, file extensions, pathnames, dummy URLs, and user input are shown as follows:
"Create a file named docker-compose.yml in your current working directory."
A block of code, a terminal command, or text to create a YAML file is set as follows:
docker build -t test .
New important words are shown like this: "Docker provides an online repository to store your images called Docker Hub."
Words that you see on the screen (for example, in menus or dialog boxes) appear in the text like this: "On the left sidebar, click on Settings and then on Users."
Key parts of code snippets are highlighted as follows:
1 FROM alpine
2
3 RUN apk update
4 RUN apk add wget curl
5
6 RUN wget -O test.txt https://github.com/PacktWorkshops/   The-Docker-Workshop/raw/master/Chapter3/Exercise3.02/     100MB.bin
7
8 CMD mkdir /var/www/
9 CMD mkdir /var/www/html/
Long code snippets are truncated, and the corresponding names of the code files on GitHub are placed at the top of the truncated code. The permalinks to the entire code are placed below the code snippet. It should look as follows:
Dockerfile
7 # create root directory for our project in the container
7 RUN mkdir /service
9 RUN mkdir /service/static
10
11# Set the working directory to /service
12 WORKDIR /service
The complete code for this example can be found at https://packt.live/2E9OErr.
Setting Up Your Environment
Before we explore the book in detail, we need to set up specific software and tools. In the following section, we shall see how to do that.
Hardware Requirements
You need at least a dual-core CPU with virtualization support, 4 GB of memory, and 20 GB of free disk space.
Operating System Requirements
The recommended operating system is Ubuntu 20.04 LTS. If you are using Mac or Windows, you should be able to run the commands in this book, but it is not guaranteed that they will all work as expected. We suggest you install a virtualized environment on your system using an application such as VirtualBox or VMware. We have also provided the instructions at the end of this section on how you can set up dual boot on your Windows system to use Ubuntu.
Installation and Setup
This section lists installation instructions for Docker and Git as they are the main requirements for this workshop. Installation instructions for any other software that's used will be provided in the specific chapter that covers it. Since we are recommending Ubuntu, we will use the APT package manager to install most of the required software in Ubuntu.
Updating Your Package Lists
Before you use APT to install any packages in Ubuntu, make sure that your packages are up to date. Use the following command:
sudo apt update
Furthermore, you may choose to upgrade any upgradable packages on your machine by using the following command:
sudo apt upgrade
Installing Git
The code bundle for this workshop is available on our GitHub repository. You can use Git to clone the repository to get all the code files.
Use the following command to install Git on Ubuntu:
sudo apt install git-all
Docker
Docker is the default containerization engine used by this workshop. You will learn more about the application as you move through the chapters.
Use the following command to install Docker on Ubuntu:
sudo apt install docker.io -y
When the installation is complete, you will need to make sure that the Docker daemon is started and running on your system. Do this with the following command, making sure that you are running this as an elevated user with the sudo command:
sudo systemctl start docker
Ensure that the Docker daemon starts the next time you start your system. Run the following command to make sure that Docker starts each time you stop or restart the system you are installing it on:
sudo systemctl enable docker
Verify the version of Docker you have installed by using the docker command with the --version option. Run the following command:
docker –version
You should see a similar output to the following:
Docker version 19.03.8, build afacb8b7f0
There is a good chance that if you are not performing commands as the root user, you will not be able to run the majority of the commands needed. If you run the example following command, you may experience an access issue connecting to the Docker daemon:
docker ps
If you are running the command as a user that does not have elevated privileges, you may see the following error:
Got permission denied while trying to connect to the
Docker daemon socket at unix:///var/run/docker.sock: Get http://%2Fvar%2Frun%2Fdocker.sock/v1.40/containers/json:
dial unix /var/run/docker.sock: connect: permission denied
To resolve this issue, add the current user to the Docker group that was created when you installed the application. Use the following command to perform this on your system:
sudo usermod -aG docker ${USER}
To activate these changes, you will need to either log out of your system and then log back in, or perform the following command to create a new session for your current user:
sudo su ${USER}
Run the docker ps command again to ensure that your changes were successful:
docker ps
If everything has worked correctly, you should see an output similar to the following, showing that you have no Docker containers running on your system:
CONTAINER ID IMAGE COMMAND CREATED STATUS PORTS NAMES
Dual-Booting Ubuntu for Windows Users
In this section, you will find instructions on how to dual-boot Ubuntu if you are running Windows.
Note
Before installing any operating systems, it is highly recommended that you back up your system state and all of your data.
Resizing Partitions
If you have Windows set up on your machine, it is most likely that your hard disk is completely utilized—that is, all of the available space is partitioned and formatted. You will need to have some unallocated space on the hard disk, so resize a partition with plenty of free space to make space for your Ubuntu partitions:
- Open the
Computer Management utility. Press Win + R and type compmgmt.msc:Figure 0.1: The Computer Management utility on Windows
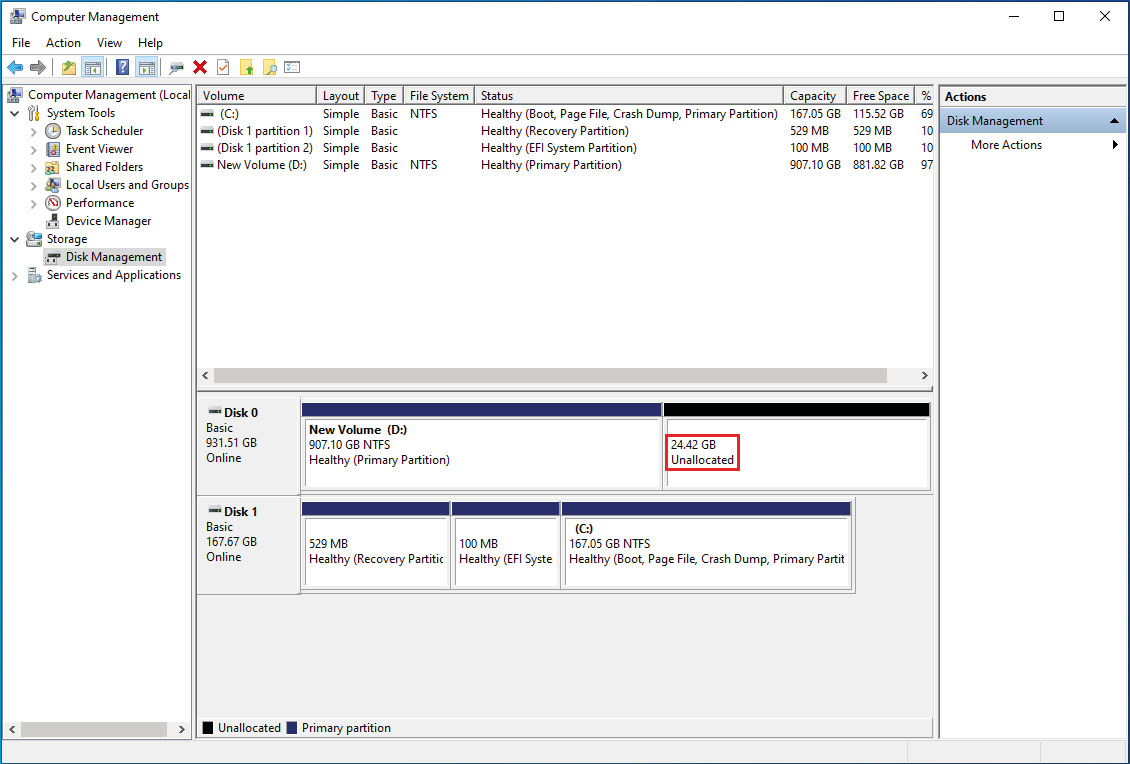
- On the left-hand pane, go to the
Storage > Disk Management option, as shown in the following screenshot:Figure 0.2: Disk Management
You will see a summary of all your partitions in the lower half of the screen. You can also see the drive letters associated with all the partitions and information about the Windows boot drive. If you have a partition that has plenty of free space (20 GB +) and is neither the boot drive (C:), nor the recovery partition, nor the Extensible Firmware Interface (EFI) system partition, this will be the ideal option to choose. If there is no such partition, then you can resize the C: drive.
- In this example, you will choose the
D: drive. Right-click on any partition and open Properties to check the free space available:Figure 0.3: Checking the properties of the D: drive
Now, before you resize the partition, you need to ensure that there are no errors on the filesystem or any hardware faults. Do this using the chkdsk utility on Windows.
- Open Command Prompt by pressing Win + R and typing
cmd.exe. Now, run the following command:chkdsk D: /f
Replace the drive letter with the one that you want to use. You should see a response similar to the following:
Figure 0.4: Scanning a drive for any filesystem errors
Note that in Figure 0.4, Windows reported that it had scanned the filesystem and found no problems. If any problems are encountered for your case, you should get them fixed first to prevent the loss of data.
- Now, return to the
Computer Management window, right-click on the desired drive, and then click on Shrink Volume, as shown in the following screenshot:Figure 0.5: Opening the Shrink Volume dialog box
- In the prompt window, enter the amount of space that you want to shrink. In this example, you are clearing approximately 25 GB of disk space by shrinking your
D: drive:
Figure 0.6: Clearing 25 GB by shrinking the existing volume
After you shrink your drive, you should be able to see unallocated space on your drive:
Figure 0.7: Unallocated space after shrinking the volume
Now you are ready to install Ubuntu. But first, you need to download it and create a bootable USB, which is one of the most convenient installation mediums.
Creating a Bootable USB Drive to Install Ubuntu
You will need a flash drive with a minimum capacity of 4 GB to create a bootable USB drive. Note that all the data on this will be erased:
- Download the ISO image for Ubuntu Desktop from https://releases.ubuntu.com/20.04/.
- Next, burn the ISO image to a USB flash disk and create a bootable USB drive. There are many tools available for this, and you can use any of them. In this example, you will use Rufus, which is free and open source. You can get it from https://www.fosshub.com/Rufus.html.
- Once you have installed Rufus, plug in your USB flash disk and open Rufus. Ensure that the proper
Device option is selected, as shown in Figure 0.8.
- Press the
SELECT button under Boot selection and then open the Ubuntu 20.04 image that you have downloaded.
- The choice for
Partition scheme will depend on how your BIOS and your disk drive are configured. GPT will be the best option for most modern systems, while MBR will be compatible with older systems:Figure 0.8: Configurations for Rufus
- You may leave all other options on their defaults, and then press
START. After completion, close Rufus. You now have a bootable USB drive ready to install Ubuntu.
Installing Ubuntu
Now, use the bootable USB drive to install Ubuntu:
- To install Ubuntu, boot using the bootable installation media that you just created. In most cases, you should be able to do that by simply having the USB drive plugged in while starting up your machine. If you don't automatically boot into the Ubuntu setup, go into your BIOS settings and ensure that your USB device is at the highest boot priority and that Secure Boot is turned off. The instructions for entering the BIOS setup are usually displayed on the splash screen (the screen with your PC manufacturer logo when you start up your computer) during POST checks. You may also have the option to enter a boot menu while starting up. Usually, you have to hold down Delete, F1, F2, F12, or some other key while your PC boots up. It depends on your motherboard's BIOS.
You should see a screen with a Try Ubuntu or Install Ubuntu option. If you don't see this screen, and instead you see a shell with a message that begins with Minimal BASH Like Line Editing is Supported..., then it is likely that there may have been some data corruption while downloading the ISO file or creating your bootable USB drive. Check the integrity of the downloaded ISO file by calculating the MD5, SHA1, or SHA256 hash of your downloaded file and comparing it to the ones you can find in the files named MD5SUMS, SHA1SUMS, or SHA256SUMS on the Ubuntu download page mentioned earlier. Then, repeat the steps in the previous section to reformat and recreate the bootable USB drive.
If you have set the highest boot priority to the correct USB device in the BIOS and you are still unable to boot using your USB device (your system may just ignore it and boot into Windows instead), then you are most likely dealing with one or both of the following issues:
- The USB drive was not properly configured to be recognized as a bootable device or the GRUB bootloader was not properly set up. Verifying the integrity of your downloaded image and recreating the bootable USB drive should fix this in most cases.
- You have chosen the wrong Partition scheme option for your system configuration. Try the other one and recreate the USB drive.
- Once you boot your machine using the USB drive, select
Install Ubuntu.
- Choose the language that you want and then press
Continue.
- On the next screen, choose the appropriate keyboard layout and continue to the next screen.
- On the next screen, select the
Normal installation option.Check the Download updates while installing Ubuntu and Install third-party software for graphics and Wi-Fi hardware and additional media formats options.
Then, continue to the next screen.
- On the next screen, select
Install Ubuntu alongside Windows Boot Manager, and then click Install now. You will see a prompt describing the changes that Ubuntu will make to your system, such as the new partitions that will be created. Confirm the changes and proceed to the next screen.
- On the next screen, choose your region and press
Continue.
- On the next screen, set your name (optional), username, computer name, and password, and then press
Continue.The installation should now begin. It will take a while, depending on your system configurations. Once the installation is complete, you will be prompted to restart your computer. Unplug your USB drive, and then click Restart Now.
If you forget to remove your USB drive, you may boot back into the Ubuntu installation. In that case, just exit the setup. If a live instance of Ubuntu has been started up, restart your machine. Remember to remove the USB drive this time.
If, after restarting, you boot directly into Windows with no option to choose the operating system, the likely issue is that the GRUB bootloader installed by Ubuntu has not taken precedence over the Windows bootloader. In some systems, the precedence/priority for bootloaders on your hard disk is set in the BIOS. You will need to explore your BIOS settings menu to find the appropriate setting. It may be named something similar to UEFI Hard Disk Drive Priorities. Ensure that GRUB/Ubuntu is set to the highest priority.
After installing any operating system, it is a good idea to ensure that all of your hardware components are working as expected.
Other Requirements
Docker Hub account: You can create a free Docker account at https://hub.docker.com/.
Accessing the Code Files
You can find the complete code files in our GitHub repository for this workshop, at https://packt.live/2RC99QI.
After installing Git, you can clone the repository using the following command:
git clone https://github.com/PacktWorkshops/The-Docker-Workshop
cd The-Docker-Workshop
If you have any issues with or questions about installation, please email us at [email protected].


 Free Chapter