Sign In Start Free Trial
Account

Add to playlist

Create a Playlist

Modal Close icon
You need to login to use this feature.
  • Book Overview & Buying Instant Migration from Windows Server 2008 and 2008 R2 to 2012 How-to
  • Table Of Contents Toc
Instant Migration from Windows Server 2008 and 2008 R2 to 2012 How-to

Instant Migration from Windows Server 2008 and 2008 R2 to 2012 How-to

By : Santhosh Sivarajan
4.4 (9)
close
close
Instant Migration from Windows Server 2008 and 2008 R2 to 2012 How-to

Instant Migration from Windows Server 2008 and 2008 R2 to 2012 How-to

4.4 (9)
By: Santhosh Sivarajan

Overview of this book

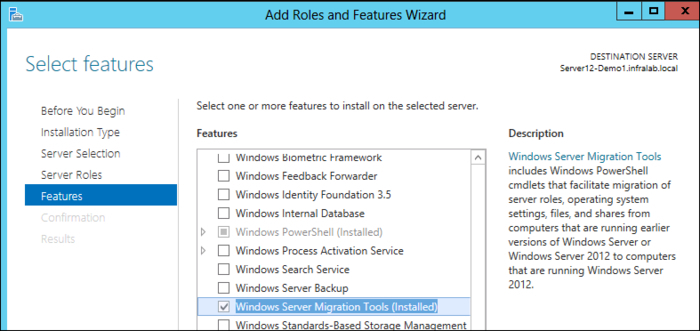
Migrating to a new server involves a lot of decision making and planning. Windows Server 2012 comes with exciting new features and ease of use. This book will help you migrate to your new server in no time. "Instant Migration from Windows Server 2008 and 2008 R2 to 2012 How-to" provides you with many practical and real world scenarios in a step-by-step guide. It is designed to lead you through the entire process of migration.Beginning with an introduction to Windows Server 2012, the author then takes you through the installation and configuration of the server, before continuing on to migrate the existing services to Windows Server and how to decommission old servers. The ‚Äúhow-to‚Äù migration scenarios described are based on the author's own field experiences, guaranteeing real-world solutions. The scenarios include Active Directory, enabling a Remote Desktop, Print Server, and Hyper-V migration details. From the planning to  theimplementation phase, "Instant Migration from Windows Server 2008 and 2008 R2 to 2012 How-to" is your comprehensive guide for completing migration solutions.
Table of Contents (2 chapters)
close
close

Windows Server Migration Tools (Must know)

Some of the migrations can be accomplished by using native and built-in tools. So far we were using the built-in tools to migrate these services. Microsoft has included the latest version of the Windows Server Migration Tools in Windows Server 2012. We will be using this tool in the rest of the migrations. These are PowerShell cmdlets and are part of the Windows Server Migration Tools PowerShell module. In Windows Server 2008 and Windows Server 2008 R2, the source and target server have to be in the same subnet to migrate data using this tool. However, the new version of the Server Migration tool supports cross-subnet migrations. The TCP and UDP ports 7000, 7001, and 7002 must be open between source and target servers to support this scenario.

Getting ready

The following key PowerShell cmdlets will be used for this migration effort:

  • Export-SmigServerSetting: Export role, feature, and so on from the source server to a target server
  • Import-SmigServerSetting: Import role, feature, and so on from an export file
  • Send-SmigServerData: Send/migrate data and its associated permissions, properties, and so on from the source server
  • Receive-SmigServerData: Receive/copy data and its associated permissions, properties, and so on to the target server

It is time to install Windows Server Migration Tools on the Windows Server 2012. It is a best practice to use the latest version of the tool even if the older versions are available on the source servers.

How to do it...

  1. Log on to a Windows Server 2012.
  2. Open Server Manager. From Server Manager, install the Windows Server Migration Tools feature. Refer to the Add and remove roles and features (Must know) recipe for role and feature installation details.
    How to do it...
  3. From the Start screen, right-click on Command Prompt and select the Run as administrator option.
    How to do it...
  4. Change the directory to C:\Windows\System32\ServerMigraitonTool. Run the SmigDeploy.exe /Package /Architecture amd64 /os WS08 /Path /C:\MigTools\ command. This will create a migration tool package for 64-bit servers in the C:\MigTools folder.

    Note

    You can change the /architecture value to create an application package for 32-bit servers.

    How to do it...

Note

The SmigDeploy.exe tool creates a migration tool installation package. This package can be directly copied over to the source Windows Server 2008 and Windows Server 2008 R2 servers. Copy the C:\MigTools folder to a network share. We will be using this migration package for the rest of the migrations.

How it works...

Copy the C:\MigTools folder to a network share. For this scenario, I will be copying the C:\MigTools folder to the \\HOU-MGR-01 server and this will be referenced in the migrations described in this book.

There′s more...

At this point the Windows Server Migration Tools for a 64-bit server is available on a network share. This package can be copied to the source and target servers for the migration. No other configuration is required. The necessary parameters will be configured based on the role or feature that we will migrate.

If you have a 32-bit server, you can generate a 32-bit installation package by modifying the /Architecture parameter in the preceding command.

Visually different images
CONTINUE READING
83
Tech Concepts
36
Programming languages
73
Tech Tools
Icon Unlimited access to the largest independent learning library in tech of over 8,000 expert-authored tech books and videos.
Icon Innovative learning tools, including AI book assistants, code context explainers, and text-to-speech.
Icon 50+ new titles added per month and exclusive early access to books as they are being written.
Instant Migration from Windows Server 2008 and 2008 R2 to 2012 How-to
notes
bookmark Notes and Bookmarks search Search in title playlist Add to playlist font-size Font size

Change the font size

margin-width Margin width

Change margin width

day-mode Day/Sepia/Night Modes

Change background colour

Close icon Search
Country selected

Close icon Your notes and bookmarks

Confirmation

Modal Close icon
claim successful

Buy this book with your credits?

Modal Close icon
Are you sure you want to buy this book with one of your credits?
Close
YES, BUY

Submit Your Feedback

Modal Close icon
Modal Close icon
Modal Close icon