-
Book Overview & Buying
-
Table Of Contents

Advanced Microsoft Content Management Server Development
Advanced Microsoft Content Management Server Development
Overview of this book
Microsoft Content Management Server 2002 is a dynamic web publishing system with which you can build websites quickly and cost-efficiently. MCMS provides the administration, authoring, and data management functionality, and you provide the website interface, logic, and workflow. Microsoft SharePoint Portal Server (SPS) also features in the book. SPS 2003 enables enterprises to deploy an intelligent portal that seamlessly connects users, teams, and knowledge so that people can take advantage of relevant information across business processes to help them work more efficiently.You've mastered the basics of MCMS, and setup your own MCMS installation. You've only scratched the surface. This book is your gateway to squeezing every penny from your investment in MCMS and SPS, and making these two applications work together to provide an outstanding richness of content delivery and easy maintainability. As a developer, the Publishing API (PAPI) is at the heart of your work with MCMS, and this book starts by taking you on the most detailed tour of the PAPI you will find anywhere. As a live example, a component that reveals the structure of your MCMS site is created, taking you through how to manage the common elements of MCMS programmatically. Getting SharePoint and MCMS to work together is the next stop in the book. You will see how to use SharePoint's search engine to search MCMS content, publish content between the two systems, and create SharePoint Web Parts to draw content from MCMS.To ease your everyday work with MCMS, there are chapters on placeholder validation, and some useful custom placeholders for common MCMS tasks, such as a date-time picker, a placeholder for multiple attachments, and a DataGrid placeholder among others. There are a number of ways to consume MCMS content from the outside world, and we look at two exciting ways here; RSS and InfoPath/Web Services. The InfoPath solution provides another interface to MCMS content that allows content authors to concentrate on content and not the presentation. The book is rounded off with a number of must-have MCMS tips and tricks.
Revert a posting to a previous version
Change a postingÔø???s template
Build a recycle bin
Deal with links to deleted resources
Update a postingÔø???s properties directly from a template file
Re-write ugly URLs to friendly URLs
Export resource gallery items using the site deployment API (SDAPI)
Configure the position and size of the Web Author Console Dialogs
Get frames and IFrames to work correctly in a template file
Table of Contents (21 chapters)
Advanced Microsoft Content Management Server Development

Credits
About the Authors
About the Reviewers
 Free Chapter
Building CMS Explorer
Managing Channels and Postings with the PAPI
Managing Templates, Template Galleries, and Resources
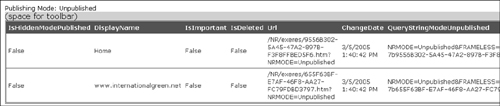
Preparing Postings for Search Indexing
Searching MCMS with SharePoint
Publishing Content Between MCMS and SharePoint
Building SharePoint Web Parts
Useful Placeholder Controls
Validating Placeholder Controls
Staging Static Pages
InfoPath with MCMS Web Services
MCMS and RSS
Essential How-Tos, Tips, and Tricks
Setting up MCMS and SPS on the Same Virtual Server
MCMS Connector for SharePoint Technologies
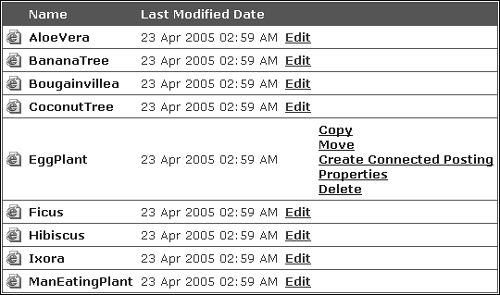
Installing the Tropical Green Website
Index