
There is one more thing we want to correct when it comes to our network, because there is a problem with the allocation of the interfaces at boot time when you make copies of a Linux virtual machine. If you enter ifconfig and your interface does not say eth0, you should correct the network.
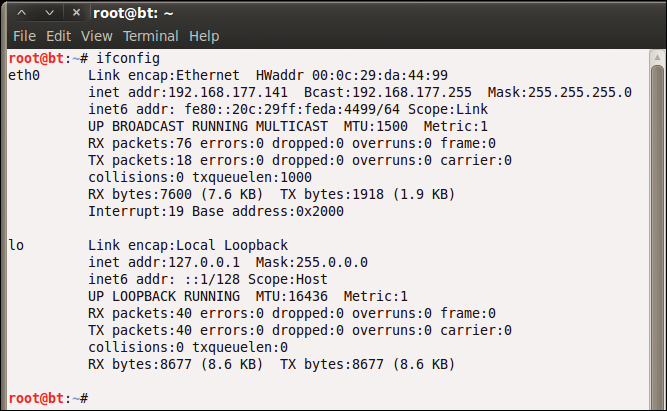
root@bt:~# ifconfig
We do this by opening the configuration file and removing all references to the network interfaces that are there. In your shell, enter gedit.
root@bt:~# gedit
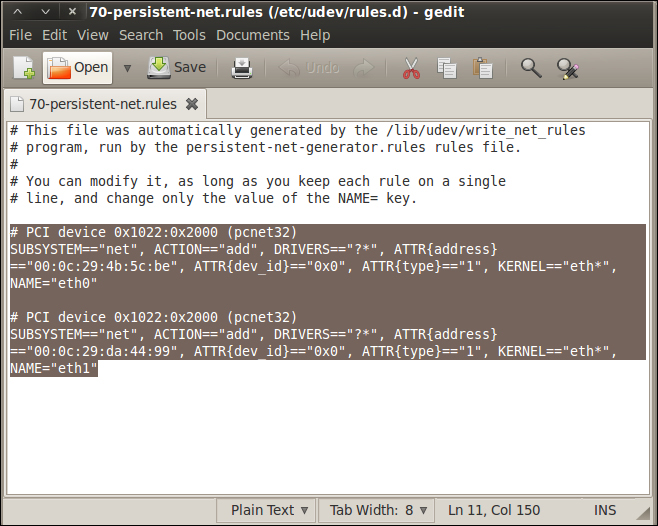
This will open the graphical editor that is contained within the Gnome distribution. In the editor, navigate to File | Open; when the window opens, navigate to the configuration file that is located at /etc/udev/rules.d/. To navigate to the folder, click on the File System folder in the window. This will put you in the root of the file system; then, it is only a matter of drilling down until you get into the rules.d folder. Select and open the 70-persistent-net.rules file. Once you are in the file, delete the old interfaces that are there; highlight the line that starts with # PCI Device and all the lines after that right up to the end of the file, and then delete them as shown in the next screenshot:
Once you have deleted the interface references, save the file, and quit the program. Click on Save and then Quit. This will return you to the terminal window and your shell. Now, enter reboot and let the machine reboot and regenerate your interfaces.
Once the machine reboots, log in to the machine with the username root and whatever password you set earlier (you do remember it, right?). Once you are logged in, start XWindows by entering the startx command.
root@bt:~# startx
Once XWindows has started, open the terminal window by using the shortcut on the toolbar or by navigating to Applications | Accessories | Terminal. If you have not done so already, correct your display by navigating to Edit | Fit Guest Now in VMware Workstation.
We now want to check and verify that our network interfaces are correct; we do this by using our ifconfig command. Enter ifconfig in the terminal window. As we have removed the extra information that was in the 70-persistent-net.rules file, we should now see that our interface is eth0 and not something else; this is shown in the next screenshot. For some reason, when you copy virtual machines, there is a possibility that the programmer did an append to the file and did not overwrite the entries that are in the file; if you make three or four copies of the virtual machine, it will show eth5 or eth6. Again, we will have to correct it by deleting the entries that are in the 70-persistent-net.rules file. This is the same process for many of the Linux virtual machines when you copy them.