
At this point, the astute among you are saying, "Wait a minute, we only put a default gateway on the External NIC, not on the Internal. My network is comprised of many internal subnets, and this server isn't going to be able to contact any of those subnets without a default gateway!" You are absolutely correct. Because we can only have one default gateway and it must go on the external interface, we have to define our internal network manually, through the use of the Windows routing table. Your server will automatically have access to resources that are in the same subnet that you are physically connected to, so if your IP address is 192.168.1.10 and your whole network is a flat 192.168.1.0/24, then there is nothing you have to do. The DirectAccess server will have access to everything in 192.168.1.x and you are all set. If, however, you have additional subnets, 192.168.2.0/24 for example, then at this point they are not contactable from this server and we need to make it so. You do this through the use of route commands, issued from either the Command Prompt or the PowerShell interface. I find that most folks are more familiar with Command Prompt, so let's use that to make our changes.
First we'll start with the example listed previously. Say my DirectAccess server is 192.168.1.10, but I have file servers that are sitting in 192.168.2.0/24, and those file servers must be contactable by the DirectAccess client computers. All we have to do is run a simple command on your DirectAccess server to make this happen. Here is an example of the syntax of that command:
Route add –p <subnet> mask <subnet mask> <gateway> IF <Interface ID>
The various components of this command are as follows:
-p: This makes the command persistent. Without –p, the next time the server restarts, the route would be lost.
<subnet>: This is the subnet ID you are adding, such as 192.168.2.0.
<subnet mask>: This is the mask for that subnet, such as 255.255.255.0.
<gateway>: This is the gateway of the subnet that you are currently plugged into, NOT the gateway of the subnet you are adding. Think of this as the "first hop" that you must cross in order to contact this new subnet. In our example, the gateway is 192.168.1.1.
<Interface ID>: This is an identifier for our Internal NIC that we will discuss in the next paragraph.
To be able to formulate that command correctly, we first need to identify the Interface ID number of your Internal NIC. Since we have dual network cards in this server, it is important that we are applying these route statements to the internal card. There is a flag that we will set at the end of our route commands that binds our route to a particular card, and most of the time Windows does a good job of assigning it to the correct one without validating this IF number, but I have seen a few cases where it didn't, so I always specify it as a best practice.
To discover your Interface ID number for the Internal NIC, open both the Network Connections screen, and a command prompt, and type route print. If you scroll up to the very top of your route print, you will see each network interface that is on the system listed, with an IF number listed to the left of the name. This typically two-digit number is the IF number for the NIC, and we just need to figure out which one is Internal. That is where the Network Connections screen comes in. If you take a look at the full name of the Internal NIC, match it up with the full name listed for one of the NICs in the route print; there you have it. Let's say, for example, that your Internal NIC is named Microsoft Hyper-V Network Adapter #2, and in your route print you see 13…00 15 5d fa 3e 32 ……Microsoft Hyper-V Network Adapter #2 listed, as shown in the following screenshot:
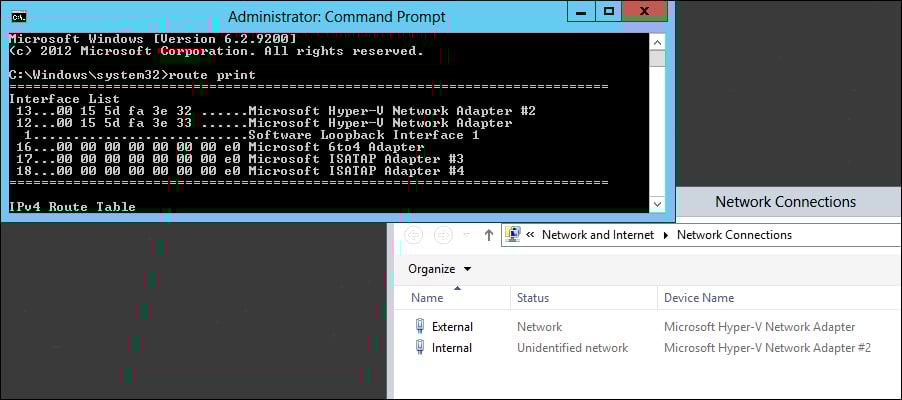
In this case, the IF number for your Internal NIC is 13, the number listed to the far left of that line. Taking that Interface ID number combined with the sample route statement above, let's go ahead and build the route statement that we would need to successfully grant access to the 192.168.2.0/24 subnet on your server by using the following command:
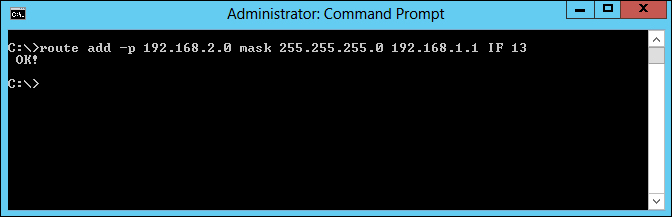
route add –p 192.168.2.0 mask 255.255.255.0 192.168.1.1 IF 13
If you have entered all of the information correctly, you should see the following OK! response:
Now, before you start dreading the huge script that you might be thinking about creating to include the potentially hundreds of route statements you may need in your network, read this first. Depending on the layout of your network, it may be possible to include a much broader route statement and cover all of your subnets in one fell swoop. Building on our previous example, what if your DirectAccess server was 192.168.1.10, and you had many subnets, all of them in the 192.168.x.x range? You could cover all of these subnets and tell them to all flow through the Internal NIC with the following single command:
route add –p 192.168.0.0 mask 255.255.0.0 192.168.1.1 IF 13
Or even broader. And by the way, this is of course not only limited to subnets starting with 192.168. Another example I can give which I have encountered numerous times in different customer networks is the following one:
route add –p 10.0.0.0 mask 255.0.0.0 10.1.1.1 IF 13
Note
Take care that you do not specify a route that is so broad that it encompasses the subnet of the External NIC. If you add a route to the Internal interface which includes the subnet for the External NIC, you will cause major confusion on the server and will almost certainly stop DirectAccess from working.
You should now have all the information you need to finalize your IP addressing and routing on your DirectAccess servers. These steps are necessary on each server. Just one more side note to add here; implementing DirectAccess in the single NIC configuration isn't something I see much in the wild, but in those cases you would not have to go through this process of adding routes. This is because in a single NIC configuration, you would be assigning a default gateway right on the single NIC that is in use, and that gateway is going to cover any routes that you may have to enter otherwise.