
The following is a walk-through of a routing sample in BizTalk. The sample is done by using the FILE Adapter only, and coding is not done. The next chapter will introduce us to how to create various BizTalk artifacts inside Visual Studio, but for now, let's look at an example showing how BizTalk routes messages.
The setup is as follows:
The first step is to create a Receive Port with two different Receive Locations. We should be able to pick up messages at two different file locations:
C:\BTS2013CertGuide\Chapter01\Example01-Messaging\FileDrop\PartnerA\InboxC:\BTS2013CertGuide\Chapter01\Example01-Messaging\FileDrop\PartnerB\Inbox
We should be able to send messages to two different systems (file locations):
C:\BTS2013CertGuide\Chapter01\Example01-Messaging\FileDrop\SystemI\OutboxC:\BTS2013CertGuide\Chapter01\Example01-Messaging\FileDrop\SystemII\Outbox
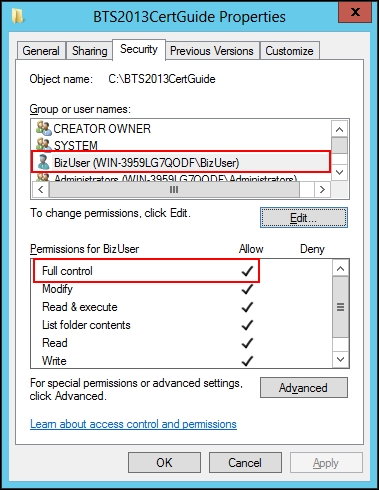
Make sure that the BizTalk Host user has sufficient permissions for the folders. Give the user Full control permissions on folder C:\BTS2013CertGuide\Chapter01\Example01-Messaging\FileDrop, as shown in the following screenshot:
Tip
The user and/or group doesn't need Full control. It is sufficient to grant the Delete subfolders and files permission found under advanced permissions, along with read and write permissions.
Next, we need to create an Application called BTS2013CertGuide-Ch01. To do this, we need to perform the following steps:
Now, we need to create a Receive Port inside our new Application and add two File Receive Locations, one for each Partner (A and B). In order to do this, carry out the following steps:
In Application BTS2013CertGuide-Ch01, right-click on Receive Ports and choose New | One-way Receive Port.
Name the Receive Port as CG0101_Receive and click on OK.
Right-click on Receive Locations and choose New | One-Way Receive Location.
Select Receive Port CG0101_Receive and click on OK.
Name the location CG0101_ReceiveFromPartnerA_FILE, choose FILE in Transport Type (Adapter), and click on Configure, as shown in the following screenshot:

Configure the FILE Adapter, as shown in the following screenshot, and click on OK (the Receive Folder path is
C:\BTS2013CertGuide\Chapter01\Example01-Messaging\FileDrop\PartnerA\Inbox):
Click on OK again.
Make another Receive Location from steps 3 to 7. Name it PartnerB instead of PartnerA and choose PartnerB file folder instead of PartnerA.
In the Administration Console, our Receive Locations should now look similar to the following screenshot:

Now, we need to see that everything is running as intended by testing the solution. In order to start testing, perform the following steps:
Create a small text file, fill it with a few characters, and copy the file into each inbox folder of both PartnerA and PartnerB. The files must consist of at least one character, since the FILE Adapter will throw away empty messages as they do not make sense in a BizTalk perspective. Do not give the files a name containing the word "Copy".
Verify that the BizTalk Host Instance executing the Receive Locations is running.
Right-click on each Receive Location and choose Enable.
Check the Event Viewer and verify that no BizTalk Server errors have been written to Windows Logs/Application when enabling the Receive Locations. If errors are present, examine them, since they are most likely caused by the BizTalk Host user not having sufficient permission in the folders (refer to the Creating folders and Applications section).
Go to FileDrop\PartnerA\Inbox. Copy and paste the file in the same folder so that a copy is inserted, and confirm that BizTalk deletes the file. It might be quick, so watch closely!
If the file is deleted by BizTalk, our PartnerA locations are working. Do the same test PartnerB.
Now, let's examine what happened to the messages we submitted to BizTalk.
Upon opening Event Viewer again, you should find four errors (two for each message submitted).
Open the last error submitted in Event Viewer, it should look something similar to the following screenshot:

What BizTalk is telling us here is that even though the receive processing of the messages was successful, the messages could not be routed because there were no subscribers. In other words, neither Send Ports nor Orchestrations were created with a subscription matching the Context of the messages.
Now, we will examine the Context of one of the messages that failed to be routed:
Go to Group Hub by clicking on the BizTalk Group folder in the Administration Console, then press F5 to refresh the dashboard showing in the right pane.
We should now see four suspended items:

Click on the Resumable link.

Tip
The Non-resumable instances are primarily there for debugging purposes. They show the Context as it appeared after Port processing, whereas the Resumable instances show the message and the Context as it appeared before Port processing.
In this example, the promoted properties are the same for both instances, and we can therefore use the Resumable instance. If properties had been added during Pipeline processing and/or mapping, we would need to examine the Non-resumable instance.
Also, note that the Non-resumable instance will disappear by itself if the Resumable instance is resumed successfully.
Double-click on one of the suspended items.

Choose the Messages tab, and double-click on the message.

Choose Context, and click on Type twice so that the promoted properties are shown on top.
Examine the five promoted properties. These are the only properties we can use for subscription for now. The best candidate for subscription might be the ReceivePortName with the value of CG0101_Receive.
Now, we will perform the following steps for creating a Send Port that subscribes to all messages where ReceivePortName has the value of CG0101_Receive in its Context:
Create a new Send Port by right-clicking on the Send Port folder and navigating to New | Static One-Way Send Port.
Fill in Name and Type. Click on Configure.
Fill in the Destination folder path (
C:\BTS2013CertGuide\Chapter01\Example01-Messaging\FileDrop\SystemI\Outbox) and the File name, as shown in the following screenshot, and click on OK:
Choose the Filters page. Select BTS.ReceivePortName in the Property drop-down list. Leave Operator as == and type the Receive Port name in the Value textbox.

Click on OK.
Start the Send Port by right-clicking on it and choosing Start.
Submit a message from either Partner A or Partner B.
Go back to Group Hub, choose the two resumable suspended items, and right-click and choose Resume Instances. Click on Yes, and then click on OK.
Verify that the two additional files are now in the
System Ifolder.
System II also needs a copy of all messages received by the Receive Port. So instead of making two Send Ports with identical filters, we will make a Send Port Group with the subscription for the Receive Port name, and then add both Send Ports to the group.
Create a new Send Port for System II following the same steps we did when creating the first Send Port, with SystemII in its name instead of SystemI. Also, use the
SystemII outboxfolder instead. Don't give the new Send Port any filter.Start the Send Port.
Create a new Send Port Group by right-clicking on the Send Port Group folder and choosing New | Send Port Group….

Give the group a name, as shown in the preceding screenshot, and add the two Send Ports to the group.
Give the group a filter with the Receive Port name, just as we did with the first Send Port.
Click on OK.
Right-click on the group and start it.
Submit a message from one of the partners.
Notice how System II got one message, but System I got two. This is because a Send Port inside a Send Port Group will have two subscriptions both its own subscription and the Group subscription. If both of them are met, the Port will receive the same message twice.
Go to the System I Send Port and remove the subscription inside the Filter page by pressing Delete. Click on OK.