

Understanding how Linux handles networking is an integral part of understanding how Docker handles networking. In this recipe, we'll focus on Linux networking basics by learning how to define and manipulate interfaces and IP addresses on a Linux host. To demonstrate the configuration, we'll start building a lab topology in this recipe and continue it through the other recipes in this chapter.
In order to view and manipulate networking settings, you'll want to ensure that you have the iproute2 toolset installed. If it's not present on the system, it can be installed using the following command:
sudo apt-get install iproute2
In order to make network changes to the host, you'll also need root-level access.
For the purpose of demonstration in this chapter, we'll be using a simple lab topology. The initial network layout of the host looks like this:
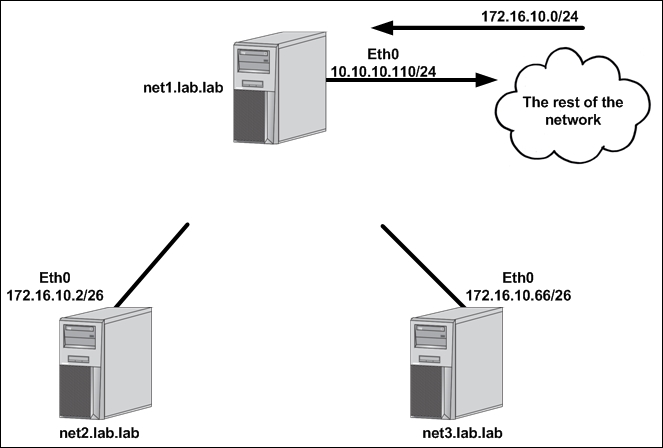
In this case, we have three hosts, each with a single eth0 interface already defined:
net1:10.10.10.110/24with a default gateway of10.10.10.1net2:172.16.10.2/26net3:172.16.10.66/26
The network configuration on most end hosts is generally limited to the IP address, the subnet mask, and the default gateway of a single interface. This is because most hosts are network endpoints offering a discrete set of services on a single IP interface. But what happens if we want to define more interfaces or manipulate the existing one? To answer that question, let's first look at simple single-homed server such as net2 or net3 in the preceding example.
On Ubuntu hosts, all of the interface configuration is done in the /etc/network/interfaces file. Let's examine that file on the host net2:
# The loopback network interface
auto lo
iface lo inet loopback

# The primary network interface
auto eth0
iface eth0 inet static
        address 172.16.10.2
        netmask 255.255.255.192
We can see that this file defines two interfaces—the local loopback interface and the interface eth0. The eth0 interface defines the following information:
address: The IP address of the hosts interfacenetmask: The subnet mask associated with the IP interface
The information in this file will be processed each time the interface attempts to come into the up or operational state. We can validate that this configuration file was processed at system boot by checking the current IP address of the interface eth0 with the ip addr show <interface name> command:
user@net2:~$ ip addr show eth0
2: eth0: <BROADCAST,MULTICAST,UP,LOWER_UP> mtu 1500 qdisc pfifo_fast state UP group default qlen 1000
    link/ether 00:0c:29:59:ca:ca brd ff:ff:ff:ff:ff:ff
    inet 172.16.10.2/26 brd 172.16.10.63 scope global eth0
       valid_lft forever preferred_lft forever
    inet6 fe80::20c:29ff:fe59:caca/64 scope link
       valid_lft forever preferred_lft forever
user@net2:~$
Now that we've reviewed a single-homed configuration, let's take a look and see what it would take to configure multiple interfaces on a single host. As things stand, the net1 host is the only host that has any sort of reachability off its local subnet. This is because it has a defined default gateway pointing back to the rest of the network. In order to make net2 and net3 reachable we need to find a way to connect them back to the rest of the network as well. To do this, let's assume that the host net1 has two additional network interfaces that we can connect directly to hosts net2 and net3:
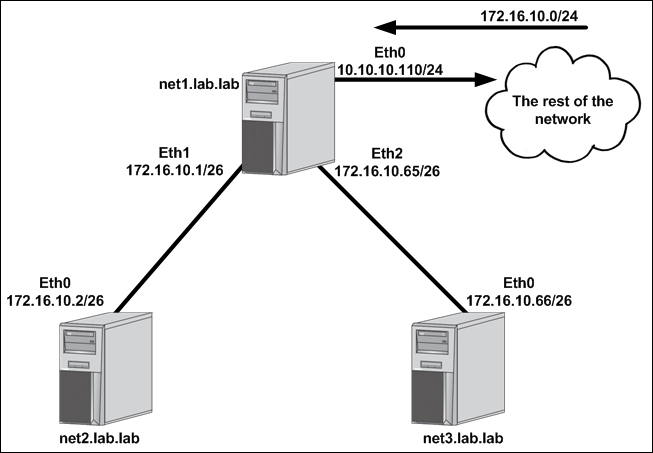
Let's walk through how to configure additional interfaces and IP addresses on the net1 to complete the topology.
The first thing we want to do is verify that we have additional interfaces available to work with on net1. To do this, we would use the ip link show command:
user@net1:~$ ip link show
1: lo: <LOOPBACK,UP,LOWER_UP> mtu 65536 qdisc noqueue state UNKNOWN mode DEFAULT group default
    link/loopback 00:00:00:00:00:00 brd 00:00:00:00:00:00
2: eth0: <BROADCAST,MULTICAST,UP,LOWER_UP> mtu 1500 qdisc pfifo_fast state UP mode DEFAULT group default qlen 1000
    link/ether 00:0c:29:2d:dd:79 brd ff:ff:ff:ff:ff:ff
3: eth1: <BROADCAST,MULTICAST> mtu 1500 qdisc noop state DOWN mode DEFAULT group default qlen 1000
    link/ether 00:0c:29:2d:dd:83 brd ff:ff:ff:ff:ff:ff
4: eth2: <BROADCAST,MULTICAST> mtu 1500 qdisc noop state DOWN mode DEFAULT group default qlen 1000
    link/ether 00:0c:29:2d:dd:8d brd ff:ff:ff:ff:ff:ff
user@net1:~$
We can see from the output that in addition to the eth0 interface, we also have interfaces eth1 and eth2 available to us. To see which interfaces have IP addresses associated with them, we can use the ip address show command:
user@net1:~$ ip address show
1: lo: <LOOPBACK,UP,LOWER_UP> mtu 65536 qdisc noqueue state UNKNOWN group default
    link/loopback 00:00:00:00:00:00 brd 00:00:00:00:00:00
    inet 127.0.0.1/8 scope host lo
       valid_lft forever preferred_lft forever
    inet6 ::1/128 scope host
       valid_lft forever preferred_lft forever
2: eth0: <BROADCAST,MULTICAST,UP,LOWER_UP> mtu 1500 qdisc pfifo_fast state UP group default qlen 1000
    link/ether 00:0c:29:2d:dd:79 brd ff:ff:ff:ff:ff:ff
    inet 10.10.10.110/24 brd 10.10.10.255 scope global eth0
       valid_lft forever preferred_lft forever
    inet6 fe80::20c:29ff:fe2d:dd79/64 scope link
       valid_lft forever preferred_lft forever
3: eth1: <BROADCAST,MULTICAST> mtu 1500 qdisc noop state DOWN group default qlen 1000
    link/ether 00:0c:29:2d:dd:83 brd ff:ff:ff:ff:ff:ff
4: eth2: <BROADCAST,MULTICAST> mtu 1500 qdisc noop state DOWN group default qlen 1000
    link/ether 00:0c:29:2d:dd:8d brd ff:ff:ff:ff:ff:ff
user@net1:~$
The preceding output proves that we currently only have a single IP address allocated on the interface eth0. This means that we can use the interface eth1 for connectivity to server net2 and eth2 for connectivity to the server net3.
There are two ways we can configure these new interfaces. The first is to update the network configuration file on net1 with the relevant IP address information. Let's do that for the link facing the host net2. To configure this connectivity, simply edit the file /etc/network/interfaces and add the relevant configuration for both interfaces. The finished configuration should look like this:
# The primary network interface
auto eth0
iface eth0 inet static
        address 10.10.10.110
        netmask 255.255.255.0
        gateway 10.10.10.1
auto eth1
iface eth1 inet static
        address 172.16.10.1
        netmask 255.255.255.192
Once the file is saved, you need to find a way to tell the system to reload the configuration file. One way to do this would be to reload the system. A simpler method would be to reload the interfaces. For instance, we could execute the following commands to reload interface eth1:
user@net1:~$ sudo ifdown eth1 && sudo ifup eth1
ifdown: interface eth1 not configured
user@net1:~$
Note
While not required in this case, bringing the interface down and up at the same time is a good habit to get into. This ensures that you don't cut yourself off if you take down the interface you're managing the host from.
In some cases, you may find that this method of updating the interface configuration doesn't work as expected. Depending on your version of Linux, you may experience a condition where the previous IP address is not removed from the interface causing the interface to have multiple IP addresses. To resolve this, you can manually delete the old IP address or alternatively reboot the host, which will prevent legacy configurations from persisting.
After the commands are executed, we should be able to see that the interface eth1 is now properly addressed:
user@net1:~$ ip addr show dev eth1
3: eth1: <BROADCAST,MULTICAST,UP,LOWER_UP> mtu 1500 qdisc pfifo_fast state UP group default qlen 1000
    link/ether 00:0c:29:2d:dd:83 brd ff:ff:ff:ff:ff:ff
    inet 172.16.10.1/26 brd 172.16.10.63 scope global eth1
       valid_lft forever preferred_lft forever
    inet6 fe80::20c:29ff:fe2d:dd83/64 scope link
       valid_lft forever preferred_lft forever
user@net1:~$
To configure the interface eth2 on host net1, we'll use a different approach. Rather than relying on configuration files, we'll use the iproute2 command-line to update the configuration of the interface. To do this, we simply execute the following commands:
user@net1:~$ sudo ip address add 172.16.10.65/26 dev eth2
user@net1:~$ sudo ip link set eth2 up
It should be noted here that this configuration is not persistent. That is, since it's not part of a configuration file that's loaded at system initialization, this configuration will be lost on reboot. This is the same case for any network-related configuration done manually with the iproute2 or other command-line toolsets.
Note
It is the best practice to configure interface information and addressing in the network configuration file. Altering interface configuration outside of the configuration file is done in these recipes for the purpose of example only.
Up to this point, we've only modified existing interfaces by adding IP information to them. We have not actually added a new interface to any of the systems. Adding interfaces is a fairly common task, and, as later recipes will show, there are a variety of interface types that can be added. For now, let's focus on adding what Linux refers to as dummy interfaces. Dummy interfaces act like loopback interfaces in networking and describe an interface type that is always up and online. Interfaces are defined or created by using the ip link add syntax. You then specify a name and define what type of interface it is you are defining. For instance, let's define a dummy interface on the hosts net2 and net3:
user@net2:~$ sudo ip link add dummy0 type dummy
user@net2:~$ sudo ip address add 172.16.10.129/26 dev dummy0
user@net2:~$ sudo ip link set dummy0 up

user@net3:~$ sudo ip link add dummy0 type dummy
user@net3:~$ sudo ip address add 172.16.10.193/26 dev dummy0
user@net3:~$ sudo ip link set dummy0 up
After defining the interface, each host should be able to ping their own dummy0 interface:
user@net2:~$ ping 172.16.10.129 -c 2
PING 172.16.10.129 (172.16.10.129) 56(84) bytes of data.
64 bytes from 172.16.10.129: icmp_seq=1 ttl=64 time=0.030 ms
64 bytes from 172.16.10.129: icmp_seq=2 ttl=64 time=0.031 ms
--- 172.16.10.129 ping statistics ---
2 packets transmitted, 2 received, 0% packet loss, time 999ms
rtt min/avg/max/mdev = 0.030/0.030/0.031/0.005 ms
user@net2:~$

user@net3:~$ ping 172.16.10.193 -c 2
PING 172.16.10.193 (172.16.10.193) 56(84) bytes of data.
64 bytes from 172.16.10.193: icmp_seq=1 ttl=64 time=0.035 ms
64 bytes from 172.16.10.193: icmp_seq=2 ttl=64 time=0.032 ms
--- 172.16.10.193 ping statistics ---
2 packets transmitted, 2 received, 0% packet loss, time 999ms
rtt min/avg/max/mdev = 0.032/0.033/0.035/0.006 ms
user@net3:~$
Note
You might be wondering why we had to turn up the dummy0 interface if they're considered to be always up. In reality, the interface is reachable without turning up the interface. However, the local route for the interface will not appear in the systems routing table without turning the interface up.