

OpenStack-Ansible is a set of official Ansible playbooks and roles that lay down OpenStack with minimal prerequisites. Like any orchestration tool, most effort is done up front with configuration, followed by a hands-free experience when the playbooks are running. The result is a tried and tested OpenStack installation suitable for any size environment, from testing to production environments.
When we use OpenStack-Ansible, we are basically downloading the playbooks from GitHub onto a nominated deployment server. A deployment server is the host that has access to all the machines in the environment via SSH (and for convenience, and for the most seamless experience without hiccups, via keys). This deployment server can be one of the machines you've nominated as a part of your OpenStack environment as Ansible isn't anything that takes up any ongoing resources once run.
Note
Tip: Remember to back up the relevant configuration directories related to OpenStack-Ansible before you rekick an install of Ubuntu on this server!
Ensure that you are root on the deployment host. In most cases, this is the first infrastructure controller node, infra01.
Let's assume that you're using the first infrastructure node, infra01, as the deployment server.
If you have not followed the preceding Installing Ansible, playbooks, and dependencies recipe review, then as root, carry out the following if necessary:
git clone -b 16.05 https://github.com/openstack/openstack-ansible.git /opt/openstack-ansible
This downloads the OpenStack-Ansible playbooks to the /opt/openstack-ansible directory.
To configure our OpenStack deployment, carry out the following steps:
We first copy the
etc/openstack_deployfolder out of the downloaded repository to/etc:cd /opt/openstack-ansible cp -R /etc/openstack_deploy /etc
We now have to tell Ansible which servers will do which OpenStack function, by editing the
/etc/openstack_deploy/openstack_user_config.ymlfile, as shown here:cp /etc/openstack_deploy/openstack_user_variables.yml.example /etc/openstack_deploy_openstack_user_variables.yml vi /etc/openstack_deploy/openstack_user_variables.yml
The first section,
cidr_networks, describes the subnets used by OpenStack in this installation. Here we describe the container network (each of the OpenStack services are run inside a container, and this has its own network so that each service can communicate with each other). We describe the tunnel network (when a user creates a tenant network in this installation of OpenStack, this will create a segregated VXLAN network over this physical network). Finally, we describe the storage network subnet. Edit this file so that it looks like the following:cidr_networks: container: 172.29.236.0/24 tunnel: 172.29.240.0/24 storage: 172.29.244.0/24
Continue editing the file to include any IP addresses that are already used by existing physical hosts in the environment where OpenStack will be deployed (and ensuring that you've included any reserved IP addresses for physical growth too). Include the addresses we have already configured leading up to this section. Single IP addresses or ranges (start and end placed either side of a ',') can be placed here. Edit this section to look like the following, adjust as per your environment and any reserved IPs:
used_ips: - "172.29.236.20" - "172.29.240.20" - "172.29.244.20" - "172.29.236.101,172.29.236.117" - "172.29.240.101,172.29.240.117" - "172.29.244.101,172.29.244.117" - "172.29.248.101,172.29.248.117"
The
global_overridessection describes the bridges and other specific details of the interfaces used environment—particularly pertaining to how the container network attaches to the physical network interfaces. For the example architecture used in this book, the following output can be used. In most cases, the content in this section doesn't need to be edited apart from the load balancer information at the start, so edit to suit:global_overrides: internal_lb_vip_address: 172.29.236.117 external_lb_vip_address: 192.168.100.117 lb_name: haproxy tunnel_bridge: "br-vxlan" management_bridge: "br-mgmt" provider_networks: - network: group_binds: - all_containers - hosts type: "raw" container_bridge: "br-mgmt" container_interface: "eth1" container_type: "veth" ip_from_q: "management" is_container_address: true is_ssh_address: true - network: group_binds: - neutron_linuxbridge_agent container_bridge: "br-vxlan" container_type: "veth" container_interface: "eth10" ip_from_q: "tunnel" type: "vxlan" range: "1:1000" net_name: "vxlan" - network: group_binds: - neutron_linuxbridge_agent container_bridge: "br-vlan" container_type: "veth" container_interface: "eth11" type: "vlan" range: "1:1" net_name: "vlan"The remaining section of this file describes which server each service runs from. Most of the sections repeat, differing only in the name of the service. This is fine as the intention here is to tell OpenStack-Ansible which server (we give it a name so that Ansible can refer to it by name, and reference the IP associated with it) runs the Nova API, RabbitMQ, or the Glance service, for example. As these particular example services run on our controller nodes, and in a production setting there are at least three controllers, you can quickly see why this information repeats. Other sections refer specifically to other services, such as OpenStack compute. For brevity, a couple of sections are shown here, but continue editing the file to match your networking:
# Shared infrastructure parts shared-infra_hosts: controller-01: ip: 172.29.236.110 controller-02: ip: 172.29.236.111 controller-03: ip: 172.29.236.112 # Compute Hosts compute_hosts: compute-01: ip: 172.29.236.113 compute-02: ip: 172.29.236.114Save and exit the file. We will now need to generate some random passphrases for the various services that run in OpenStack. In OpenStack, each service—such as Nova, Glance, and Neutron (which are described through the book)—themselves have to authenticate with Keystone, and be authorized to act as a service. To do so, their own user accounts need to have passphrases generated. Carry out the following command to generate the required passphrases, which would be later used when the OpenStack playbooks are executed:
cd /opt/openstack-ansible/scripts python pw-token-gen.py --file /etc/openstack_deploy/user_secrets.yml
Finally, there is another file that allows you to fine-tune the parameters of the OpenStack services, such as which backing store Glance (the OpenStack Image service) will be using, as well as configure proxy services ahead of the installation. This file is called
/etc/openstack_deploy/user_variables.yml. Let's view and edit this file:cd /etc/openstack_deploy vi user_variables.yml
In a typical, highly available deployment—one in which we have three controller nodes—we need to configure Glance to use a shared storage service so that each of the three controllers have the same view of a filesystem, and therefore the images used to spin up instances. A number of shared storage backend systems that Glance can use range from NFS to Swift. We can even allow a private cloud environment to connect out over a public network and connect to a public service like Rackspace Cloud Files. If you have Swift available, add the following lines to
user_variables.ymlto configure Glance to use Swift:glance_swift_store_auth_version: 3 glance_default_store: swift glance_swift_store_auth_address: http://172.29.236.117:5000/v3 glance_swift_store_container: glance_images glance_swift_store_endpoint_type: internalURL glance_swift_store_key: '{{ glance_service_password }}' glance_swift_store_region: RegionOne glance_swift_store_user: 'service:glance'View the other commented out details in the file to see if they need editing to suit your environment, then save and exit. You are now ready to start the installation of OpenStack!
Ansible is a very popular server configuration tool that is well-suited to the task of installing OpenStack. Ansible takes a set of configuration files that Playbooks (a defined set of steps that get executed on the servers) use to control how they executed. For OpenStack-Ansible, configuration is split into two areas: describing the physical environment and describing how OpenStack is configured.
The first configuration file, /etc/openstack_deploy/openstack_user_config.yml, describes the physical environment. Each section is described here:
  cidr_networks:
  container: 172.29.236.0/24
  tunnel: 172.29.240.0/24
  storage: 172.29.244.0/24
This section describes the networks required for an installation based on OpenStack-Ansible. Look at the following diagram to see the different networks and subnets.
Container: Each container that gets deployed gets an IP address from this subnet. The load balancer also takes an IP address from this range.
Tunnel: This is the subnet that forms the VXLAN tunnel mesh. Each container and compute host that participates in the VXLAN tunnel gets an IP from this range (the VXLAN tunnel is used when an operator creates a Neutron subnet that specifies the
vxlantype, which creates a virtual network over this underlying subnet). Refer to Chapter 4, Neutron – OpenStack Networking for more details on OpenStack networking.Storage: This is the subnet that was used when a client instance spun up in OpenStack request Cinder block storage:
used_ips:
  - "172.29.236.20"
  - "172.29.240.20"
  - "172.29.244.20"
  - "172.29.236.101,172.29.236.117"
  - "172.29.240.101,172.29.240.117"
  - "172.29.244.101,172.29.244.117"
  - "172.29.248.101,172.29.248.117"
The used_ips: section refers to IP addresses that are already in use on that subnet, or reserved for use by static devices. Such devices are load balancers or other hosts that are part of the subnets that OpenStack-Ansible would otherwise have randomly allocated to containers:
global_overrides:
  internal_lb_vip_address: 172.29.236.117
  external_lb_vip_address: 192.168.1.117
  tunnel_bridge: "br-vxlan"
  management_bridge: "br-mgmt"
  storage_bridge: "br-storage"
The global_overrides: section describes the details around how the containers and bridged networking are set up. OpenStack-Ansible's default documentation expects Linux Bridge to be used; however, Open vSwitch can also be used. Refer to Chapter 4, Neutron – OpenStack Networking, for more details.
The internal_lb_vip_address: and external_lb_vip_address: sections refer to the private and public sides of a typical load balancer. The private (internal_lb_vip_address) is used by the services within OpenStack (for example, Nova calls communicating with the Neutron API would use internal_lb_vip_address, whereas a user communicating with the OpenStack environment once it has been installed would use external_lb_vip_address). See the following diagram:
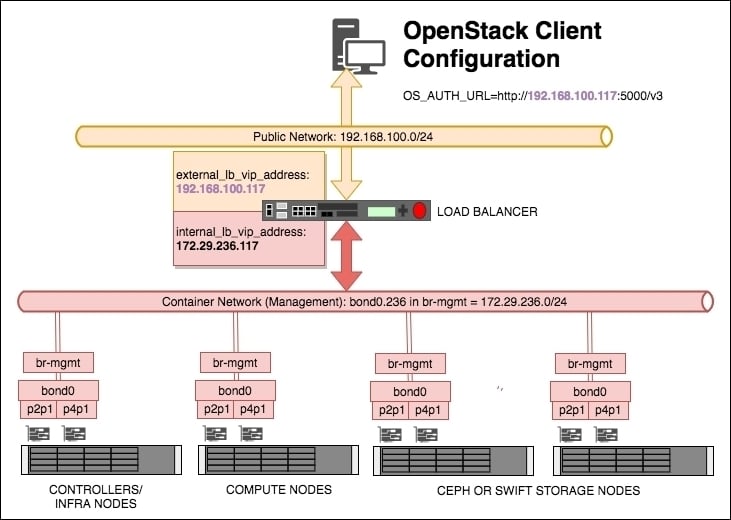
A number of load balance pools will be created for a given Virtual IP (VIP) address, describing the IP addresses and ports associated with a particular service, and for each pool—one will be created on the public/external network (in the example, a VIP address of 192.168.100.117 has been created for this purpose), and another VIP for use internally by OpenStack (in the preceding example, the VIP address 172.29.236.117 has been created for this purpose).
The tunnel_bridge: section is the name given to the bridge that is used for attaching the physical interface that participates in the VXLAN tunnel network.
The management_bridge: section is the name given to the bridge that is used for all of the OpenStack services that get installed on the container network shown in the diagram.
The storage_bridge: section is the name given to the bridge that is used for traffic associated with attaching storage to instances or where Swift proxied traffic would flow.
Each of the preceding bridges must match the names you have configured in the /etc/network/interfaces file on each of your servers.
The next section, provider_networks, remains relatively static and untouched as it describes the relationship between container networking and the physical environment. Do not adjust this section.
Following the provider_networks section are the sections describing which server or group of servers run a particular service. Each block has the following syntax:
service_name:
  ansible_inventory_name_for_server:
    IP_ADDRESS
  ansible_inventory_name_for_server:
    IP_ADDRESS
Note
Tip: Ensure the correct and consistent spelling of each server name (ansible_inventory_name_for_server) to ensure correct execution of your Ansible playbooks.
A number of sections and their use are listed here:
shared-infra_hosts: This supports the shared infrastructure software, which is MariaDB/Galera and RabbitMQrepo-infra_hosts: This is the specific repository containers version of OpenStack-Ansible requestedhaproxy_hosts: When using HAProxy for load balancing, this tells the playbooks where to install and configure this serviceos-infra_hosts: These include OpenStack API services such as Nova API and Glance APIlog_hosts: This is where the rsyslog server runs fromidentity_hosts: These are the servers that run the Keystone (OpenStack Identity) Servicestorage-infra_hosts: These are the servers that run the Cinder API servicestorage_hosts: This is the section that describes Cinder LVM nodesswift-proxy_hosts: These are the hosts that would house the Swift Proxy serviceswift_hosts: These are the Swift storage nodescompute_hosts: This is the list of servers that make up your hypervisorsimage_hosts: These are the servers that run the Glance (OpenStack Image) Serviceorchestration_hosts: These are the servers that run the Heat API (OpenStack Orchestration) servicesdashboard_hosts: These are the servers that run the Horizon (OpenStack Dashboard) servicenetwork_hosts: These are the servers that run the Neutron (OpenStack Networking) agents and servicesmetering-infra_hosts: These are the servers that run the Ceilometer (OpenStack Telemetry) servicemetering-alarm_hosts: These are the servers that run the Ceilometer (OpenStack Telemetry) service associated with alarmsmetrics_hosts: The servers that run the Gnocchi component of Ceilometermetering-compute_hosts: When using Ceilometer, these are the list of compute hosts that need the metering agent installed