

Now that you are familiar with the pfSense interface, let's see how to configure the various pfSense services, starting with the DHCP server:
- Let's open the WebGUI administration console for the pfSense server. Now, click on the Services menu located on the top toolbar and then click on the DHCP Server.
The DHCP Server in pfSense will hand out addresses to DHCP clients, and automatically configure them for network access.
By default, the DHCP server is enabled on the LAN interface. In case you can see that the DHCP server is not enabled in your instance of pfSense, you can check the box to enable it, as shown in the previous screenshot.
Using the Deny unknown clients option, DHCP access can be prevented for any client which is not included in the list at the bottom of the page. Similarly, static ARP may also be enabled to further restrict access, so that only the clients who are listed can talk to the pfSense router. There are other options such as Subnet and Subnet mask. These will be assigned to the clients when they get a unique dynamic IP address from the DHCP server. Currently, the Subnet is set to 192.168.1.0 and the Subnet mask is set to 255.255.255.0. By default, the DHCP server automatically sets the DHCP address range. The DHCP address range is the range of IP addresses that the DHCP server can assign to network devices. IP addresses outside of the DHCP address range are reserved for statically addressed computers. You can see the available range of IP addresses, which is 192.168.1.1 to 192.168.1.254. So, that is 255 IP addresses that you can have in your internal network. In most cases, this is more than enough; however, if you have more devices in a larger network, you can change the Subnet mask to get a larger range.
- You can also configure the actual range to be different than the entire available IP address range. That way, you can exclude some IP addresses from the dynamic pool, and use them for static IP allocations:
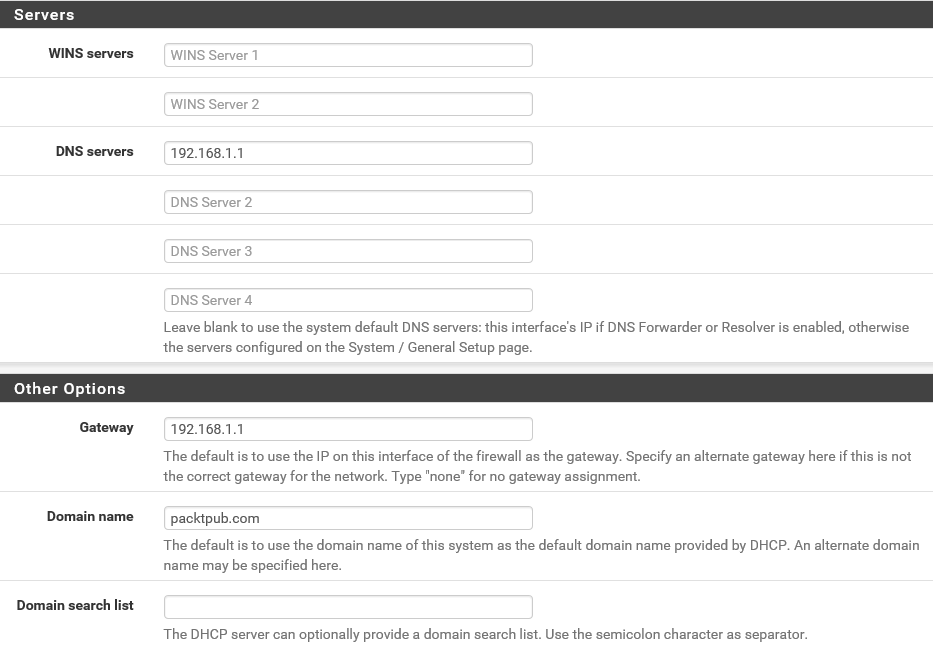
You can also set some more options. DHCP servers can be configured to provide optional data that fully configures TCP/IP on a client. Some of the most common DHCP option types configured and distributed by the DHCP server during leases include the default gateway, router, and DNS parameters. Even though pfSense is smart enough to assign the correct values based on the usual configuration, you can specify specific options here. For instance, let's set the first DNS server field to 192.168.1.1, which is basically pointing the DNS to this pfSense server.
- In the Gateway field, let's also enter 192.168.1.1, which once again will assign this pfSense server as the default gateway to the DHCP clients. In the Domain name field, enter packtpub.com. Then, click on Save. Here, you will get the confirmation message.
The DHCP server is now configured. Great!
Now, let's play around with the networking settings for this Windows Server client system and observe what effect these pfSense DHCP changes had on the clients:
- Open the Network and Sharing Center in the Windows 2012 Server client.
- Click on the Change adapter settings link.
- Double-click on Ethernet0 and then click on Properties. Here, double-click on IPv4 settings. Originally, we'd assigned the static IP address of 192.168.1.2 to the server. Along with that, we also specified the other settings for the DNS and Default gateway explicitly, but now, we can get these settings from the DHCP server.
- Select the Obtain an IP address automatically option and also select the Obtain DNS server address automatically option:
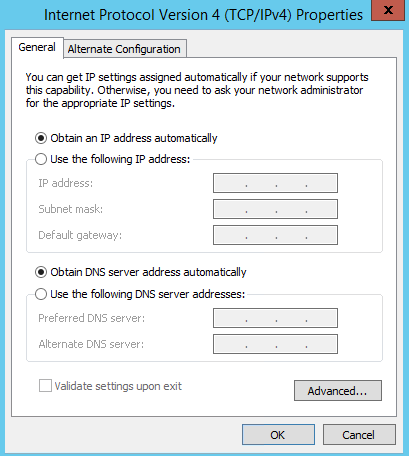
Since the DHCP server has been configured to pass on all these options directly to the clients, we do not need to specify them here individually for any device on the network. That is the true benefit of a DHCP server.
- Click on OK and close the windows.
- Now, let's check the IP address of the client machine. It should receive a new IP address from the DHCP server. Open the Command Prompt and execute the following command:
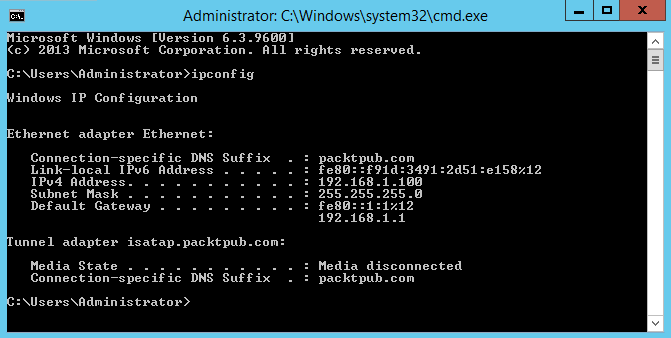
As you can see, the new IP address assigned to this system is 192.168.1.100.
The rest of the settings have also been assigned correctly to this client machine. This is exactly what we expected. So, excellent! You have now finished configuring the DHCP server.
Next, let's add another client to the same LAN network. Here, we have another virtual machine running Windows 7:
- Let's open Network Connections. This system belongs to the same network, but, as you can see, the LAN network adapter is disabled. Let's enable it.
- Right-click on the icon and select Enable. This adapter has already been set up to get a dynamic IP address for the DHCP server. This adapter is connected and it should have received a new IP address. Let's check it.
- So, open the Command Prompt and execute the ipconfig command again:

The IP address is 192.168.1.101 and all other networking settings are also as per expectations. If you check the range from the web browser, the IP address is within the specified range for this DHCP server.
- Now, let's check how you can control the DHCP server. For that, click on Status on the top toolbar and then on Services. Here, you can see all the services running on this pfSense system:
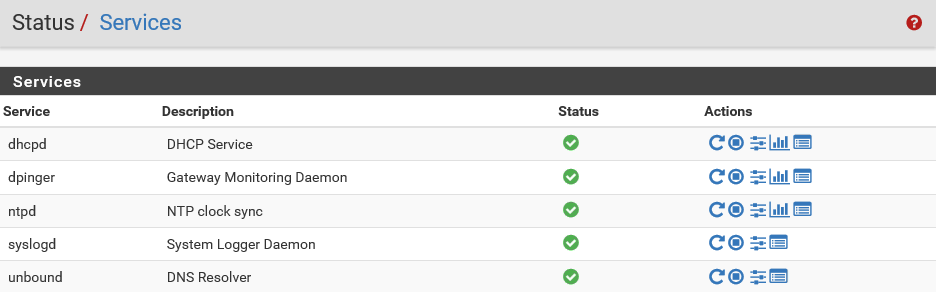
The first one is DHCP. You can see that the DHCP service is currently running.
- Let's stop the service from the actions panel. Click on the Stop icon:
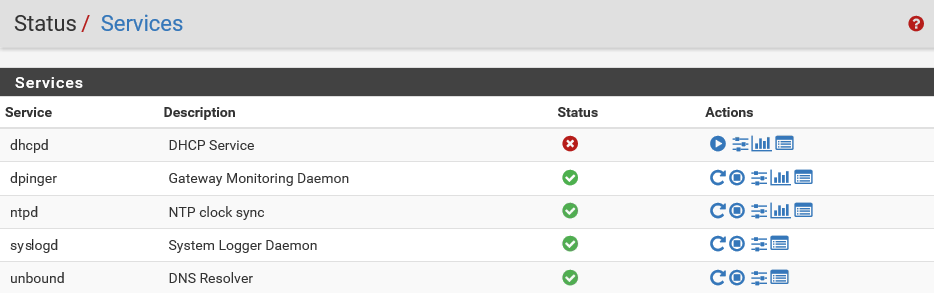
The DHCP service has been stopped. There are other options in the panel such as Related settings and Related status.
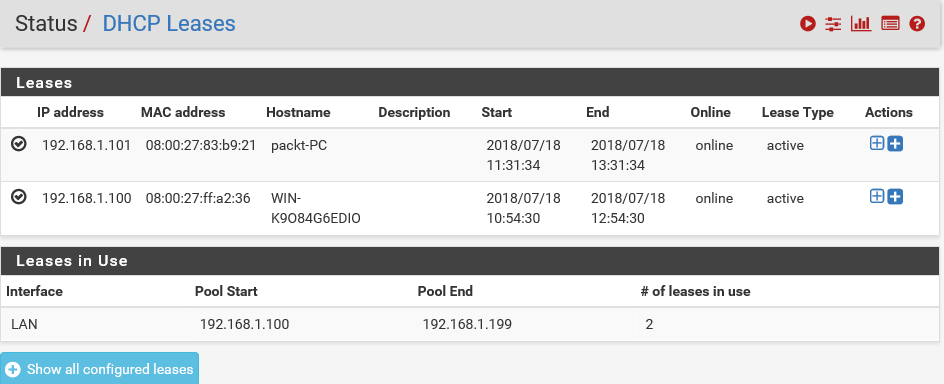
- If you click on status, you can see that the DHCP Pool range is between IP addresses 192.168.1.100 and 192.168.1.199:
- Let's go back and restart the DHCP server. The service is now running. Now, go to the client system and try to renew the IP address.
- Right-click on the LAN connection and select Disable and then again click Enable to enable it. This will reset the adapter and also force it to renew its IP address. Okay, now, the adapter has changed the state and it is trying to identify its network.
- Once it's done identifying, let's switch to the Command Prompt and execute ipconfig again:
You can see that the system has the same IP address. Note that since we reset the adapter, this new IP address was fetched again from the DHCP server. The IP address now matches. The Services section shows that the DHCP server is running.
- From the actions panel, click on Related settings:
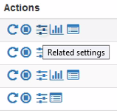
This will lead you to the same DHCP server settings page you visited earlier. You can modify many settings here such as Default lease time, Dynamic DNS, and NTP, TFTP, LDAP, and Network Booting.
- Let's go back to the Status page. Click on Status and then on DHCP Leases. Here, you can see the IP address lease assigned to the Windows 7 client system:
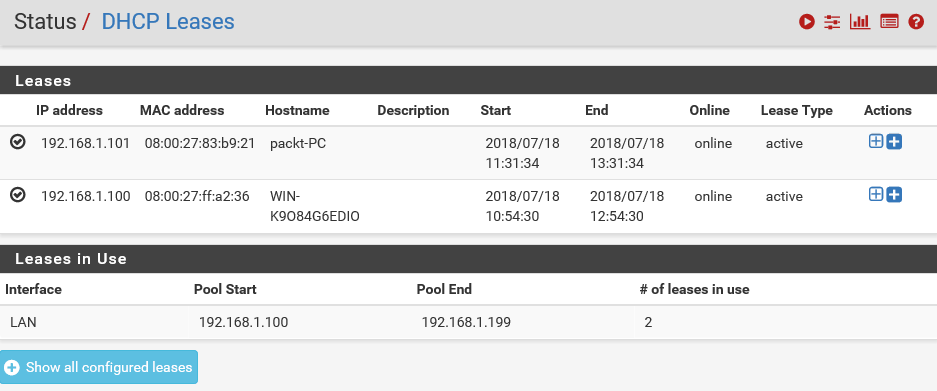
The MAC address for that system is also listed here. You can always verify this information.
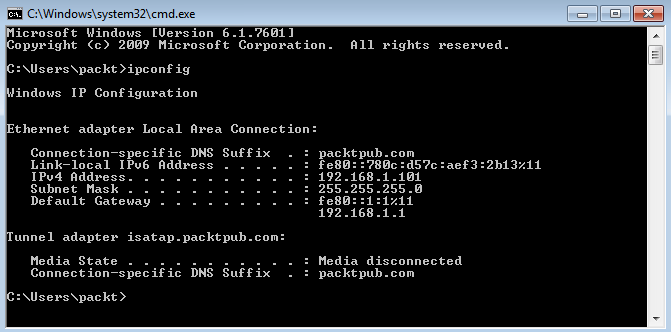
- Let's get back to the Command Prompt and execute the ipconfig command. This will list all the details about the networking setup on the system:
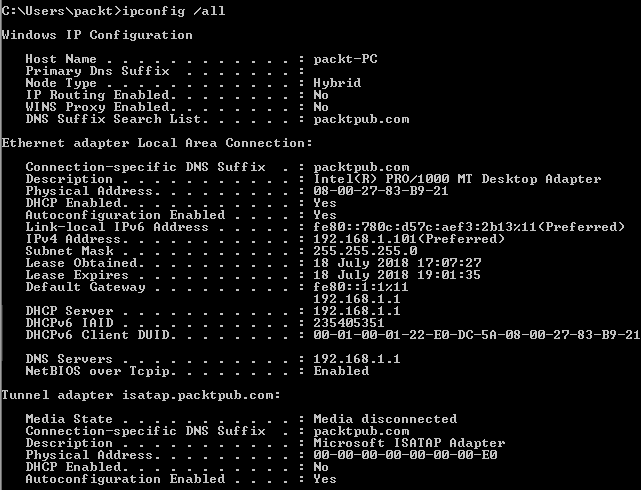
All the details of the IP and MAC addresses are listed here. A MAC address is given to a network adapter when it is manufactured. It is hardwired or hard-coded onto your computer's network interface card and it's unique to it. Let's take a note of this MAC address. It starts with 80 and ends with 21. These are all hexadecimal numbers. Now, let's compare that MAC address to the one listed on the IP address Lease Status page and verify it. This MAC address is the same as the client machine. The Host Name is packt-PC.
- You can verify this by going to Start, right-clicking on Computer, and selecting Properties:
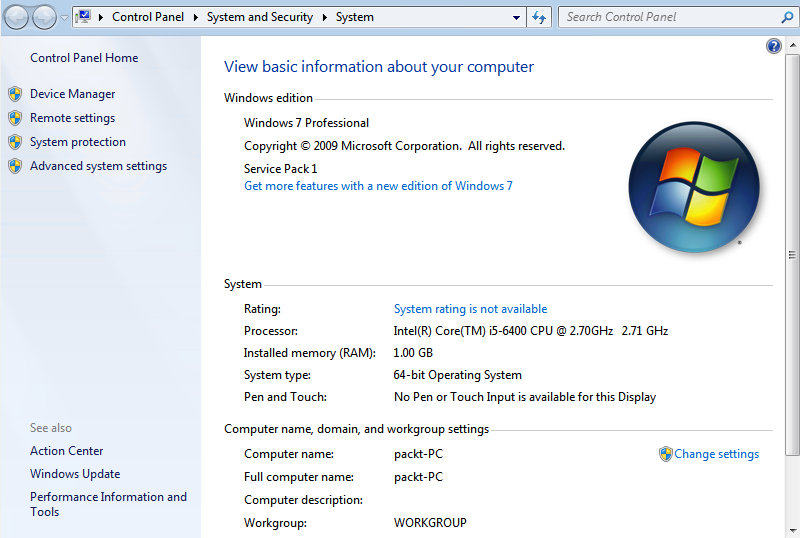
As you can see here, the Computer name is also packt-PC.
In the previous DHCP Lease tab, you can also see the Start time and the End time. This is the start and end date of the IP address lease.
When this lease expires, the DHCP server is responsible for assigning a new IP address from the available pool to the clients. You have many other features available here.
- You can click on this Log icon at the top right corner, where you can view all the log entries:
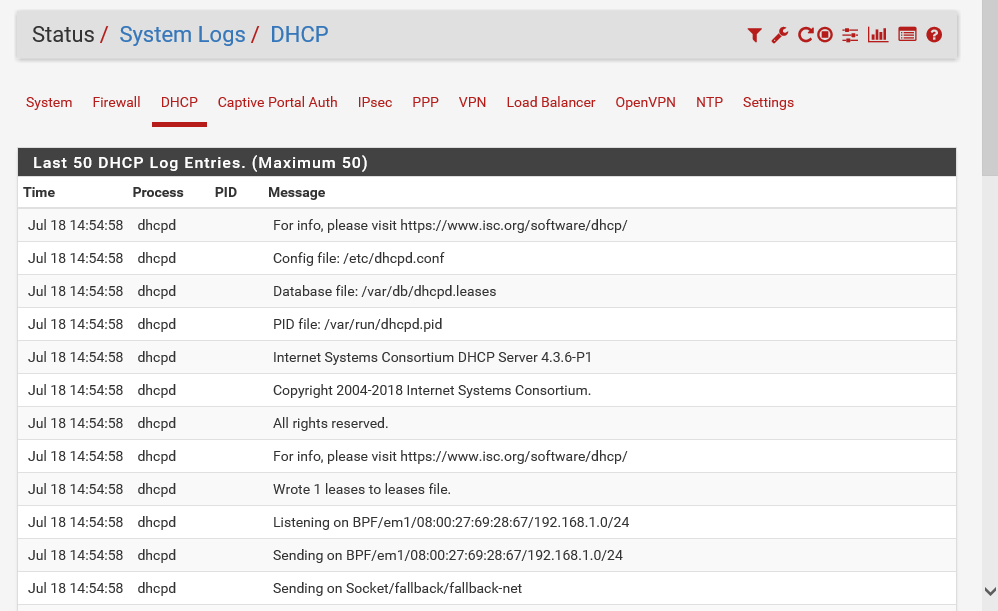
The preceding screenshot shows detailed log entries for the DHCP server. You can see the inner workings of the DHCP server from here.
Here, the client machine discovered the DHCP server:

The DHCP server offers a lease to the client. Finally, the selected DHCP server acknowledges the client DHCP request for the IP address by sending a DHCPACK packet:

This time, the server also forwards any optional configuration parameters. Upon receipt of the DHCPACK, the client can participate in the TCP/IP network, and complete its system startup.
So, we just saw a very detailed walkthrough of setting up a DHCP server on pfSense.