
The gradle command is used to execute a build. This command accepts several command-line options. We know the option --quiet (or -q) to reduce the output of a build. If we use the option --help (or -h or -?), we see the complete list of options:
hello-world $ gradle --help

USAGE: gradle [option...] [task...]

-?, -h, --help          Shows this help message.
-a, --no-rebuild        Do not rebuild project dependencies.
-b, --build-file        Specifies the build file.
-C, --cache             Specifies how compiled build scripts should be cached. Possible values are: 'rebuild' and 'on'. Default value is 'on' [deprecated - Use '--rerun-tasks' or '--recompile-scripts' instead]
-c, --settings-file     Specifies the settings file.
--continue              Continues task execution after a task failure. [experimental]
-D, --system-prop       Set system property of the JVM (e.g. -Dmyprop=myvalue).
-d, --debug             Log in debug mode (includes normal stacktrace).
--daemon                Uses the Gradle daemon to run the build. Starts the daemon if not running.
--foreground            Starts the Gradle daemon in the foreground. [experimental]
-g, --gradle-user-home  Specifies the gradle user home directory.
--gui                   Launches the Gradle GUI.
-I, --init-script       Specifies an initialization script.
-i, --info              Set log level to info.
-m, --dry-run           Runs the builds with all task actions disabled.
--no-color              Do not use color in the console output.
--no-daemon             Do not use the Gradle daemon to run the build.
--no-opt                Ignore any task optimization. [deprecated - Use '--rerun-tasks' instead]
--offline               The build should operate without accessing network resources.
-P, --project-prop      Set project property for the build script (e.g. -Pmyprop=myvalue).
-p, --project-dir       Specifies the start directory for Gradle. Defaults to current directory.
--profile               Profiles build execution time and generates a report in the <build_dir>/reports/profile directory.
--project-cache-dir     Specifies the project-specific cache directory. Defaults to .gradle in the root project directory.
-q, --quiet             Log errors only.
--recompile-scripts     Force build script recompiling.
--refresh               Refresh the state of resources of the type(s) specified. Currently only 'dependencies' is supported. [deprecated - Use '--refresh-dependencies' instead.]
--refresh-dependencies  Refresh the state of dependencies.
--rerun-tasks           Ignore previously cached task results.
-S, --full-stacktrace   Print out the full (very verbose) stacktrace for all exceptions.
-s, --stacktrace        Print out the stacktrace for all exceptions.
--stop                  Stops the Gradle daemon if it is running.
-u, --no-search-upward  Don't search in parent folders for a settings.gradle file.
-v, --version           Print version info.
-x, --exclude-task      Specify a task to be excluded from execution.
Let's look at some of the options in more detail. The options --quiet (or -q), --debug (or -d), --info (or -i), --stacktrace (or -s), and --full-stacktrace (or -S) control the amount of output we see when we execute tasks. To get the most detailed output we use the option --debug (or -d). This option provides a lot of output with information about the steps and
classes used to run the build. The output is very verbose, therefore we will not use it much.
To get a better insight into the steps that are executed for our task, we can use the --info (or -i) option. The output is not as verbose as with --debug, but it can give a better understanding of the build steps:
hello-world $ gradle --info helloWorld
Starting Build
Settings evaluated using empty settings file.
Projects loaded. Root project using build file '/Users/gradle/hello-world/build.gradle'.
Included projects: [root project 'hello-world']
Evaluating root project 'hello-world' using build file '/Users/gradle/hello-world/build.gradle'.
All projects evaluated.
Selected primary task 'helloWorld'
Tasks to be executed: [task ':helloWorld']
:helloWorld
Task ':helloWorld' has not declared any outputs, assuming that it is out-of-date.
Hello world.

BUILD SUCCESSFUL

Total time: 1.535 secs
If our build throws exceptions, we can see the stack trace information with the options --stacktrace (or -s) and --full-stacktrace (or -S). The latter option will output the most information and is the most verbose. The options
--stacktrace and --full-stracktrace
can be combined with the other logging options.
We created our build file with the name build.gradle. This is the default name for a build file. Gradle will
look for a file with this name in the current directory, to execute the build. But we can change this with the command-line options --build-file (or -b) and --project-dir (or -p).
Let's run the Gradle command from the parent directory of our current directory:
hello-world $ cd ..
$ gradle --project-dir hello-world -q helloWorld
Hello world.
And we can also rename build.gradle to, for example, hello.build and still execute our build:
hello-world $ mv build.gradle hello.build
hello-world $ gradle --build-file -q helloWorld
Hello world.
With the option --dry-run (or -m), we can run all the tasks without really executing them. When we use the dry run option, we can see which tasks are executed, so we get an insight into which tasks are involved in a certain build scenario. And we don't have to worry if the tasks are actually executed. Gradle builds up a Directed Acyclic Graph
(DAG) with all the tasks before any task is executed. The DAG is built so that tasks will be executed in order of dependencies and so that a task is executed only once.
hello-world $ gradle --dry-run helloWorld
:helloWorld SKIPPED

BUILD SUCCESSFUL

Total time: 1.437 secs
We already learned that Gradle is executed in a Java Virtual Machine, and each time we invoke the gradle command, a new Java Virtual Machine is started, the Gradle classes and libraries are loaded, and the build is executed. We can reduce the build execution time if we don't have to load a JVM, Gradle classes, and libraries, each time we execute a build. The command-line option, --daemon, starts a new Java process that will have all Gradle classes and libraries already loaded, and then we execute the build. The next time when we run Gradle with the --daemon option, only the build is executed, because the JVM, with the required Gradle classes and libraries, is already running.
The first time we execute gradle with the --daemon option, the execution speed will not improve, because the Java background process has not started as yet. But the next time around, we will see a major improvement:
hello-world $ gradle --daemon helloWorld
:helloWorld
Hello world.

BUILD SUCCESSFUL

Total time: 0.59 secs
Even though the daemon process has started, we can still run Gradle tasks without using the daemon. We use the command-line option --no-daemon to run a Gradle build without utilizing the daemon:
hello-world $ gradle --no-daemon helloWorld
:helloWorld
Hello world.

BUILD SUCCESSFUL

Total time: 1.496 secs
To stop the daemon process, we use the command-line option --stop:
$ gradle --stop
Stopping daemon.
Gradle daemon stopped.
This will stop the Java background process completely.
To always use the --daemon command-line option, without typing it every time we run the gradle command, we can create an alias—if our operating system supports aliases. For example, on a Unix-based system we can create an alias and then use the alias to run the Gradle build:
hello-world $ alias gradled='gradle --daemon'
hello-world $ gradled helloWorld
:helloWorld
Hello world.

BUILD SUCCESSFUL

Total time: 0.59 secs Instead
Instead of using the --daemon command-line option, we can use the Java system property org.gradle.daemon to enable the daemon. We can add this property to environment variable GRADLE_OPTS, so that it is always used when we run a Gradle build.
hello-world $ export GRADLE_OPTS="-Dorg.gradle.daemon=true"
hello-world $ gradle helloWorld
:helloWorld
Hello world.

BUILD SUCCESSFUL

Total time: 0.707 secs
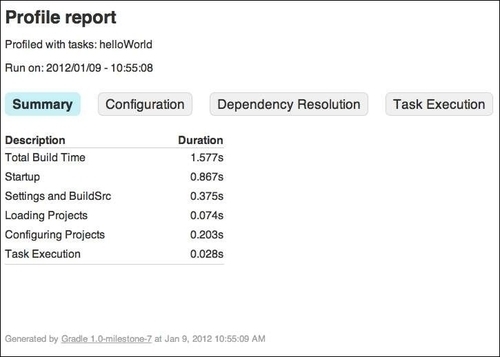
Gradle also provides the command-line option --profile
. This option records the time that certain tasks take to complete. The data is saved in an HTML file in the directory build/reports/profile. We can open this file in a web browser and see the time taken for several phases in the build process. The following image shows the HTML contents of the profile report: