

The logo is the image displayed, usually in the upper-left corner, on each page in a SharePoint site. Clicking on the logo returns the user to the root home page of the SharePoint site, as shown in the following screenshot:
To complete this recipe you will need an image uploaded or available to upload to the SharePoint site.
Follow these steps to change the site logo:
Navigate to the site in your preferred web browser.
Select Site settings from the Settings menu.
Select Title, description, and logo from the Look and Feel section.

Under Insert Logo, select the logo by clicking on FROM COMPUTER to upload a new image or by clicking on FROM SHAREPOINT to use an image already existing in the SharePoint site.
Add a simple and short description for the logo in the Enter a description textbox as shown in the following screenshot:

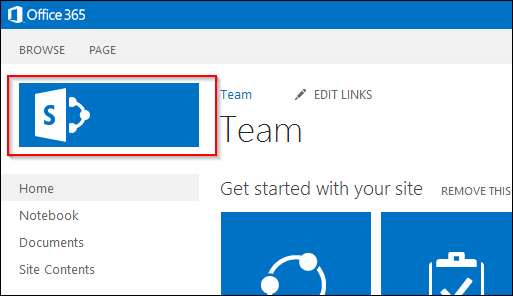
Click on OK to save the changes. The logo should appear as shown in the following screenshot:

The site relative URL for the logo image is assigned to the SiteLogoUrl property of the SPWeb object representing the site, and the logo description is set to the SiteLogoDescription property. The SPWeb object is then saved to the SharePoint database. The logo description will be used as the alternative text for the logo that will be displayed when hovering over the image with a mouse, as well as used by non-standard browsers such as screen readers.
The site logo and description may also be applied with PowerShell or code using the server-side object model.
Follow these steps to change the site logo using PowerShell:
Get the SharePoint site using the
Get-SPWebCmdlet:$web = Get-SPWeb http://sharepoint/siteSet the
SiteLogoUrlproperty to specify the URL of the image logo and theSiteLogoDescriptionproperty to specify the alternative text for the logo:$web.SiteLogoUrl = "/SiteAssets/logo.png" $web.SiteLogoDescription = "My PowerShell Site"
Use the
Updatemethod to apply the changes:$web.Update()Use the
Disposemethod to discard theSPWebobject:$web.Dispose()
Follow these steps to change the site logo with code using the server-side object model:
Open the site collection containing the site in a
usingstatement:using (var site = new SPSite("http://sharepoint/site"))Open the site in a
usingstatement:using (var web = site.OpenWeb())
Set the
SiteLogoUrlproperty to specify the URL of the image logo and theSiteLogoDescriptionproperty to specify the alternative text for the logo:web.SiteLogoUrl = "/SiteAssets/logo.png"; web.SiteLogoDescription = "My PowerShell Site";
Use the
Updatemethod to apply the changes:web.Update();
The SPWeb class topic on MSDN at http://msdn.microsoft.com/en-us/library/Microsoft.SharePoint.SPWeb.aspx
The SPSite class topic on MSDN at http://msdn.microsoft.com/en-us/library/microsoft.sharepoint.spsite.aspx
The Get-SPWeb topic on TechNet at http://technet.microsoft.com/en-us/library/ff607807.aspx