

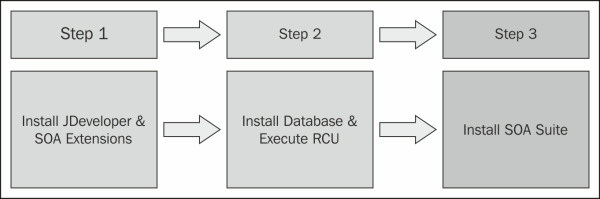
This section focuses on setting up the development environment to design and develop business process services using BPEL. The following figure shows the typical environment system components for designing and developing a BPEL service:
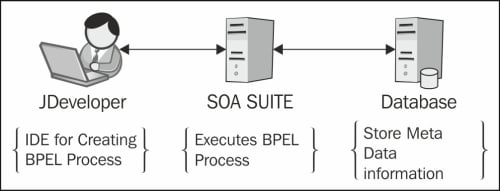
BPEL Process Manager is part of SOA Suite for Version 11.1.1.6. The development environment for creating and updating BPEL Process Manager requires the JDeveloper IDE with SOA Suite extension, a database with SOA Suite Schemas, and an SOA Suite.
The following are the steps to be followed:
Install Oracle JDeveloper
Install JDeveloper
Install SOA Extensions
Install SOA Suite Database Schemas
Install Oracle SOA Suite
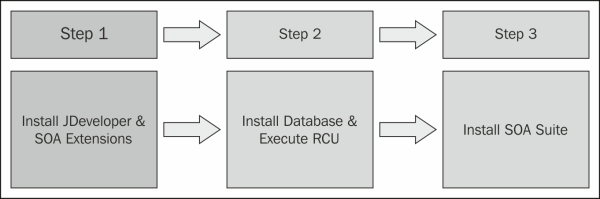
Setting up the development environment involves three major steps. As shown in the following figure, the first step is to install JDeveloper and SOA Extensions:
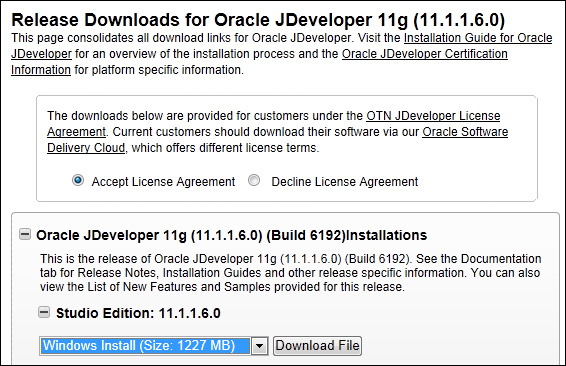
As shown in the following screenshot, download JDeveloper from the Oracle's website:
Tip
Install JDeveloper 11.1.1.6.0 or a newer version. Please note that installing JDeveloper Version 11.1.1.6 installs the following products preconfigured and ready to use with JDeveloper:
WebLogic Server Version 10.3.6
JDK
Install JDeveloper by executing
jdevstudio11116install.exe. One of the major steps for the installation process is configuring a new, or using an existing, middleware home directory. This will install WebLogic along with JDeveloper, as shown in the following screenshot:
You'll see the Middleware Home Directory screen (if needed, update the install directory), click on Next. Then select Complete and again click on Next.
The next screen will list the Middleware Home and Product Installation directories. Click on Next. We recommend keeping the default selection of All Users, as shown in the following screenshot and click on Next:

On the next screen you will find the installation summary. Click on Next on the Installation Summary window that will start installing the Oracle JDeveloper. On completion of the installation, you will see the congratulations window, as shown in the following screenshot. Please check the Run Quickstart option and click on Done:

On next window, click on Launch Oracle JDeveloper 11g and select the Default Role option and leave Always prompt for role selection on startup selected, as shown in the following screenshot and click on OK. On the next window, make sure to associate the file types of JDeveloper Application, JDeveloper Project, Java Source File, and Java Server Page with JDeveloper:

The SOA extension for JDeveloper contains SOA Composite Assembly, BPEL PM, Mediator, Human Task, Business Rules, and Adapters. These components are deployed and configured as part of SOA Suite installs. The JDeveloper extensions are only for design.
Perform the following steps to install SOA extensions. An alternative approach is to download the SOA Composite Editor – JDeveloper extensions from Oracle Fusion Middleware Products Update Center from Oracle's website.
Select Check for Updates from the Help tab, as shown in the following screenshot and then click on Next on the Welcome window:

Select Oracle Fusion Middleware Products and Official Oracle Extensions and Updates. Make sure you are connected to the Internet. Another alternative is to download the SOA extensions in the hard disk and manually configure it in JDeveloper:

Select the SOA composite editor. This will install the SOA extensions required for creating and updating BPEL services. Click on Next:

On the next window, it will display that it is downloading and installing the SOA extension for the JDeveloper. On a successful install, you will see the Installation Summary window, as shown in the following screenshot. Click on Finish to complete the SOA extension install and restart the JDeveloper. This completes the installation of JDeveloper with SOA Suite extensions:

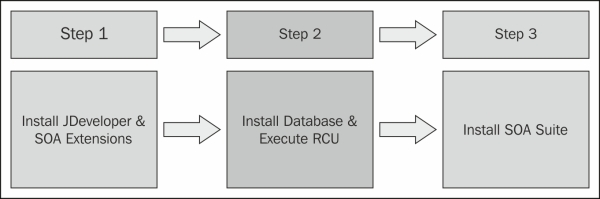
As shown in the following screenshot, the second step is to install a database and execute an RCU script for creating SOA schemas:
This step assumes that you have got an Oracle database server installed and you have database admin privileges to run Repository Creation Utility (RCU). In the case of personal Oracle Express Database, start the database service if it is not running. One can use the Start Database option from the Start menu options.
Open a Windows shell command prompt and run sqlplus system/{password}@XE as sysdba to log in to Oracle Express Database.
The default limit of processes is not sufficient for creating the SOA Suite schema. Set the processes to 600 for all the SIDs, as given in the following lines of command:
SQL> alter system reset sessions scope=spfile sid='*';
SQL> alter system set processes=600 scope=spfile;
Make the changes effective immediately with the following command:
SQL> shutdown immediate
Using system Start menu's Start Database menu options start the Oracle Database service.
Validate the system settings with the following steps:
Connect to the database using a Windows shell command prompt and run
sqlplus system/{password}@XE as sysdba.SQL> show parameter session SQL> show parameter processes
Set the
RCU_JDBC_TRIM_BLOCKSvariable asTRUEbefore creating the schemas using RCU if your database is Oracle XE.In Windows, you need to navigate to Control Panel | Advanced system settings | Advanced. From under System Properties, click on Environment Variables. An Environment Variables dialog appears. From under the System variables section, click on New. A New System Variable dialog appears. Set the Variable Name as
RCU_JDBC_TRIM_BLOCKSand Variable Value asTRUE, as shown in the following screenshot:
For creating RCU schemas, execute
rcu.batfrom thebinfolder located at{FullPath}\rcuHome\BIN. Please note, thatrcu.batwon't work with the files and folders names having a space in them. It will display the repository creation utility (RCU). Click on Next on the Welcome window that will take you to the Create Repository step, as shown in the following screenshot:
Click on Next and enter the database information. Look in the
tnsnames.oraorlistener.orafiles located in the Oracle Database install directory for the database information. As shown in the following screenshot, ensure that you use the exact information from thetnsnames.orafile as the database information. For example, enter the value for Host Name as the database server hostname. If you are running the Repository Creation Utility on the database server itself, you may use Host Name aslocalhost, as shown in the following screenshot:
You can ignore the database support warnings. It will initiate the installation step of Checking Prerequisites with all the green ticks, as shown in the following screenshot. Click on OK:

The next screen allows you to add a prefix with database schemas. Usually the prefix
DEVis used for development environments,PRODfor production, and so on. Select the SOA and BPM Infrastructure components on the next window that will allow you to select Metadata Services, as shown in the following screenshot. Dependent schemas are selected automatically. If you choose to select other components, these install instructions may not match your experience. Also, you may have to increase processes in XE (you will get a message telling you what is required):
The preceding step creates the following database schemas:
Click on OK on the next window and choose a password for the database schemas, as shown in the following screenshot. It is recommended to keep the same passwords for all schemas for a development environment:

On the next window it will create tablespaces for the all the schemas created earlier:

Click on OK to create tablespaces in the database:

Click on Create. This will create all schemas in the database, as shown in the following screenshot. On the next window, click on Close. That completes the creation of database schemas for the SOA Suite:

As shown in the following figure, the final step is to install the SOA Suite.
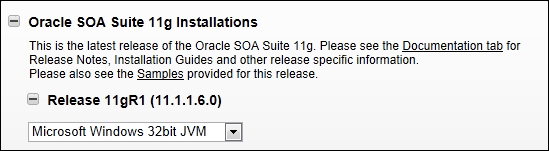
The Oracle SOA Suite Version 11.1.1.6 can be downloaded from Oracle's website.
Perform the following steps to complete the installation:
Extract all the disks from the ZIP archive into one folder and run
setup.exefromdisk1.To avoid the install error message, provide the location of JDK/JRE while running the
setup.exefile from the command line. You will need to passjreLocas a parameter tosetup.exe, as shown in the following command line:setup.exe -jreLoc C:\Oracle\Middleware\jdk160_24It will launch the install window, as shown in the following screenshot. Click on Next. On the next window click on Skip Software Updates and then click on Next:

It will start the SOA Suite installation and that will perform the Prerequisite Checks. On successful checks, we will get all the status as green, as shown in the following screenshot. Click on Next:

Please make sure that you have already installed WebLogic as a standalone install or as part of the JDeveloper install. On the next window, as shown in the following screenshot, enter the location of Oracle Middleware Home and click on Next:

On the next window, if you get the warning message that an existing Oracle SOA Suite 11g home has been detected, click on Yes to upgrade the existing Oracle SOA Suite 11g and then click on Next:

On the next window, we will get the installation summary, as shown in the following screenshot. Click on Install to start the SOA Suite installation:

On the next window, you will get the installation progress window that may take a few minutes to finish the install. On completion of the install, click on Next and that will take you to the Installation Complete window, as shown in the following screenshot. Click on Finish to complete the Oracle SOA Suite installation:
