Book Image

Mastering Windows Group Policy

By : Jordan Krause
5 (1)
Book Image

Mastering Windows Group Policy

5 (1)
By: Jordan Krause

Overview of this book

This book begins with a discussion of the core material any administrator needs to know in order to start working with Group Policy. Moving on, we will also walk through the process of building a lab environment to start testing Group Policy today. Next we will explore the Group Policy Management Console (GPMC) and start using the powerful features available for us within that interface. Once you are well versed with using GPMC, you will learn to perform and manage the traditional core tasks inside Group Policy. Included in the book are many examples and walk-throughs of the different filtering options available for the application of Group Policy settings, as this is the real power that Group Policy holds within your network. You will also learn how you can use Group Policy to secure your Active Directory environment, and also understand how Group Policy preferences are different than policies, with the help of real-world examples. Finally we will spend some time on maintenance and troubleshooting common Group Policy-related issues so that you, as a directory administrator, will understand the diagnosing process for policy settings. By the end of the book, you will be able to jump right in and use Group Policy to its full potential.
Table of Contents (12 chapters)

Building a lab to test Group Policy today

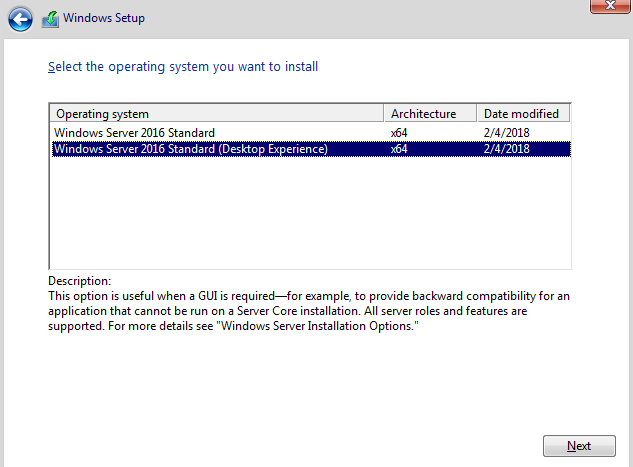
Words are great, but getting your hands dirty and jumping into something is the best way to learn. If you don't have an Active Directory environment available to you right now, and if you have never configured a DC before, there is only one place to start—the beginning. Let's walk through a quick and simple lab build-out that will give you everything you need to start testing and working with Group Policy. We will utilize this lab environment throughout the book to showcase the features and settings that we are going to discuss.

For this exercise, we will be building two systems, and I will preface this with the expectation that you have either two pieces of hardware, or a virtualized environment of some sort upon which you will build these two systems. The virtualized environment could be a Windows Server running Hyper-V or VMware, or it could even be a Windows 10 Professional or Enterprise laptop. These specific versions of the operating systems include the ability to add the Hyper-V role to Windows 10, which will give you a fully-capable hypervisor platform that runs right on your laptop, with the ability to spin up two virtual machines that we can use for our lab, as long as your laptop has enough CPU and memory resources to run two VMs at a time.

Domain Controller

As you already know, we need a Domain Controller server to be the host for everything that is stored inside our domain, including the Group Policy settings. For this purpose, I have installed Windows Server 2016 Standard. I won't walk through the installation of the operating system itself, but when we start the process it will be on a very fresh installation that has not yet been configured in any way.

Windows 10 Client

Having a DC fulfills our requirements for being able to use Group Policy, but for practical purposes, we also need a system that we can throw settings at to make sure that our policies are doing what we want them to do. For this, I am installing Windows 10 Enterprise onto a client computer that will be plugged into the same network as our Windows Server 2016 Domain Controller.

If you have the resources available, you could also spin up some additional DCs and join them together to increase the resiliency of your domain, and you could also create some additional testing devices. Perhaps you want to test some settings on Windows 10, but you also have some Windows 7 and Windows 8 clients in your network. Or maybe you have a bunch of Windows Server 2012 R2 servers and you want to test applying settings to those servers from Group Policy. Create as many client or server systems as you want to test with, plug them into the same network, and take the same procedures on those devices that we will be taking on our Windows 10 client in order to increase your testing capabilities.

Configuring the Windows Server 2016 Domain Controller

These are step-by-step instructions to create the first DC in a lab environment, or even an environment which you intend to turn into a production network:

  1. Install the Windows Server 2016 operating system onto your server, whether virtual or physical. You can run a DC as a Server Core, but if this is your first Windows Server into an environment, I strongly recommend you choose the option for Desktop Experience. Only this option will give you a full point-and-click graphical interface for interacting with your server. The default Windows Server 2016 Standard option is for implementing Server Core, which would generally only be used by more experienced administrators:
  1. Once inside the operating system, configure a static IP address. While it is possible to change the IP address of a DC if you really need to, it is common practice to consider an IP address on a DC to be a permanent fixture, because changing it down the road could result in problems. So, choose your IP wisely. Since basically everyone installs both the Active Directory Domain Services and the DNS roles at the same time on all of their DCs, we will assume that should be the case for you as well and as such, you want to also insert this DC's own IP address as the primary DNS address inside the NIC properties, as shown. Alternatively, you could input 127.0.0.1 as the Preferred DNS server, that would work just as well:
  1. Give this server a permanent hostname. You can accomplish this by right-clicking on the Start flag, then choosing to open System properties. Then click Change settings under the Computer name section, and press the Change... button:
  1. Input the name of your DC. This name will not be able to be changed later, so make sure you pick a good one. DC1 always works well for a test lab:
  1. After changing the hostname, you will be asked to Restart the server. Go ahead and do that now. Once it reboots, you should now be sitting on the desktop, looking at the Server Manager tool (it opens automatically).
  2. Near the middle of Server Manager, click on Add roles and features.
  3. Click Next three times. You should now be at the Select server roles screen. This screen is a list of all the Roles that are available to install on to your Windows Server.
  1. Check the box for Active Directory Domain Services. When you select this box, you will be asked whether you want to Add features that are required for Active Directory Domain Services? Make sure to press the Add Features button to agree to add these features:
  1. Back at the Select server roles screen, make sure to also check the box next to DNS Server, to make sure those components are installed as well. DCs are almost always DNS servers.
  1. Click Next and you'll find yourself on the Select features screen. You don't have to do anything here, but you'll notice that there is already a checkbox next to Group Policy Management. This is your indication that when this role finishes installing, you will have the Group Policy toolset available to you on this new server:
  1. Click Next three more times, and then click the Install button. This will kick off the installation process for Active Directory services on this server:
  1. When the role installation is complete, you will notice a yellow exclamation mark near the top of Server Manager. Go ahead and click on that, and it will tell you that additional configuration is required for Active Directory Domain Services. Click on the link that says Promote this server to a domain controller.
  1. Since this is the first DC in our environment, choose the option for Add a new forest and then type a name for your domain:
  1. This name is even more important than the hostname of your DC, because the name of your domain will be integrated into everything and will be around for a very long time!
  2. On the Domain Controller Options screen, specify a Directory Services Restore Mode password and click Next. When setting up a brand-new domain, the rest of the settings that default on this page are generally the ones that you want to stick with:

  1. Unless you have a specific need to change one of the remaining settings, you can simply click Next through all the remaining screens of this wizard.
If you are building this to be a production DC, you may want to make some adjustments on the Paths screen. Generally, the file locations for these items should be stored on a volume other than the operating system volume (Drive D instead of drive C, as an example), and if this DC is a virtual server, you should make that new volume an SCSI-based disk rather than an IDE. For the purposes of a test lab, ignore all of this and simply click Next.
  1. There will be a few expected warnings on the Prerequisites Check screen, and these are normal. Go ahead and click Install. When finished, the server will reboot automatically. You now have a fully functional domain hosted on this new DC, and you are ready to start playing around with Group Policy!

Configuring the Windows 10 client

Now that we have a DC up and running, we need a device upon which we will apply settings to start testing Group Policy. For this lab, I am going to start with a Windows 10 client computer. You could implement additional devices for testing by following these instructions, whether working with Windows 10 or just about any other Windows operating system, the procedure is going to be the same:

  1. Install Windows 10 Enterprise on to a computer. In my case, this is another virtual machine that I am plugging into the same network so that it can communicate with DC1.
  2. Assign an IP address to this client. As of this moment, my lab does not contain a DHCP server, and so my client computer will not automatically receive an IP address. Instead of building a DHCP, I am going to simply assign another static IP address to my Windows 10 computer's NIC, as we did with DC1. Since DC1 is hosting DNS for my new domain, I will specify DC1's IP address as the Preferred DNS server on my client computer:
  1. Define a hostname for this new device. The process has changed a little bit in the newest versions of Windows 10. As we did on the DC1 server, start by right-clicking on the Start flag, and choosing System. Once inside the System properties, scroll down until you see the button that says Rename this PC, and click on that button.
  1. Enter the new name; I am going to call this machine LAPTOP1:
  1. Restart when prompted.
In the latest builds of Windows 10, there are now many different ways that you could rename a computer and join it to a domain, as we are about to do. One option that we will not cover here is via PowerShell.
  1. We need to join LAPTOP1 to our domain for it to really communicate with DC1 and be able to pull its Group Policy information (as well as everything else from Active Directory). Microsoft has done some revamping of the settings screens in the newest versions of Windows 10, as they migrate settings from the old Control Panel over to the new Settings interface. This makes the domain-join task a little bit more confusing than it used to be. You will find that you cannot join a Windows 10 computer to the domain from the Rename this PC screen inside the Settings menu. Thankfully, the fix for this is quite simple. If you open the old Control Panel-based System properties, you can still rename and join the domain, just as you have been able to do in the past. Let's walk through that together, because getting into the old Control Panel is not very straightforward.
  2. Click on the Start button, and type Control Panel. You will see it appear in the search results. Then simply press Enter.
  3. Inside the legacy Control Panel, click on System and Security, and then click on System. This will get you into the old System properties screen, where you can then click on the Change settings link to change the name of the computer, or to join it to a domain, which is what we are going to do:
  1. Click the Change... button.
  1. Select the radio button for Domain, and then type the name of your domain. If you remember from a few pages ago, I called mine mydomain.local:
  1. You will be prompted to enter a username and password of a domain user account that has permissions to join this computer to the domain. Enter those credentials, and press OK. You will now be asked to restart the computer again, and LAPTOP1 is now fully joined to my domain:

We now have a Domain Controller server and a Windows 10 workstation that are fully prepared to communicate with each other. Very soon, we will begin using DC1 to create some Group Policy settings, and then jump over to LAPTOP1 to take a look and see whether our settings were applied without even having to touch that workstation.