Book Image

Network Security with pfSense

By : Manuj Aggarwal
Book Image

Network Security with pfSense

By: Manuj Aggarwal

Overview of this book

While connected to the internet, you’re a potential target for an array of cyber threats, such as hackers, keyloggers, and Trojans that attack through unpatched security holes. A firewall works as a barrier (or ‘shield’) between your computer and cyberspace. pfSense is highly versatile firewall software. With thousands of enterprises using pfSense, it is fast becoming the world's most trusted open source network security solution. Network Security with pfSense begins with an introduction to pfSense, where you will gain an understanding of what pfSense is, its key features, and advantages. Next, you will learn how to configure pfSense as a firewall and create and manage firewall rules. As you make your way through the chapters, you will test pfSense for failover and load balancing across multiple wide area network (WAN) connections. You will then configure pfSense with OpenVPN for secure remote connectivity and implement IPsec VPN tunnels with pfSense. In the concluding chapters, you’ll understand how to configure and integrate pfSense as a Squid proxy server. By the end of this book, you will be able to leverage the power of pfSense to build a secure network.
Table of Contents (7 chapters)

Launching the virtual machine

We will use VirtualBox for hosting the virtual machine, but you are free to use any other virtualization platform, such as VMware Workstation and Hyper-V:

  1. After launching VirtualBox, we have to create a new virtual machine for pfSense by clicking on the Machines menu and then New:
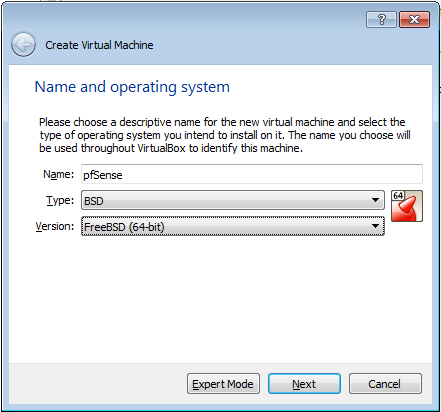
  1. The Create Virtual Machine wizard will launch, which will walk you through the process of creating and launching a new virtual machine. The creation is rather straightforward, with default choices.
  2. Enter the desired Name of the VM, select BSD from the Type drop-down menu, and select FreeBSD(64-bit) from the Version drop-down menu.
  3. Select the desired RAM for your VM. The recommended size is 512 MB but it will run smoothly at 256 MB if you are running low on RAM.
  4. Also further into the steps you can select the size of the virtual hard disk. We recommend at least 4 GB in size but the minimum requirement is 1 GB if you are running low on disk space. The click Create.

This will successfully create a virtual machine for you. Now, we are left with configuring and completing the installation.