A SQL managed instance is a set of services hosted on one or more isolated virtual machines inside a virtual network subnet.
When we provision a managed instance, a virtual cluster is created. A virtual cluster can have one or more managed instances.
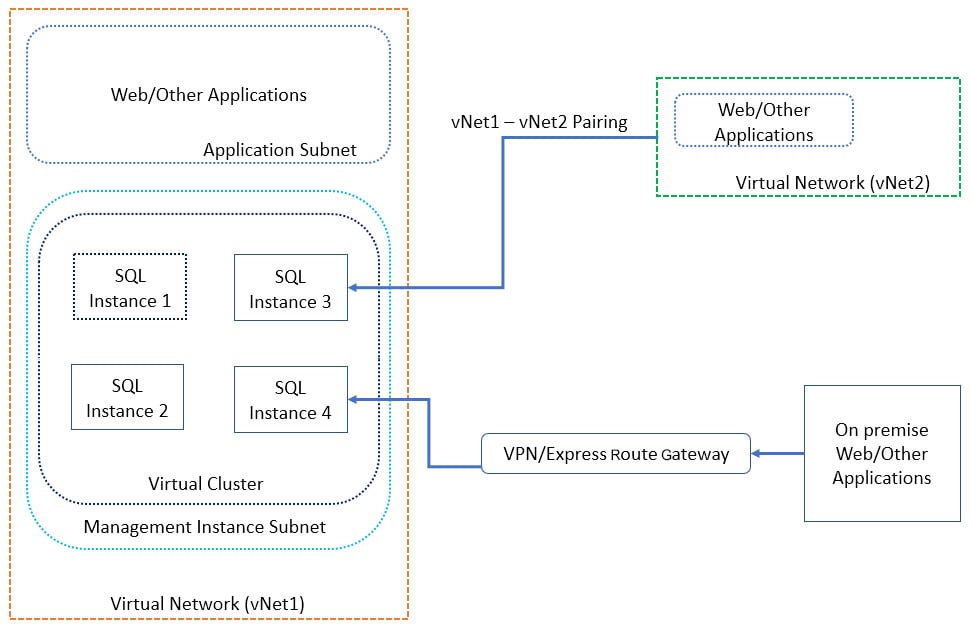
The preceding diagram shows a high-level connectivity architecture for SQL managed instances. Let's go through it:
In this exercise, we'll provision and connect to a managed instance. We'll also learn about VNet support in SQL-managed instances.
- Log in to https://portal.azure.com using your Azure credentials.
- In the top search box, type SQL Managed Instance and select SQL managed instances from the dropdown:
Figure 1.31: Searching for SQL Managed Instance.
- In the SQL managed instances window, select Add:
Figure 1.32: The SQL managed instances pane
- In the SQL managed instance window, provide the information shown in the following screenshot:
Figure 1.33: Information required to add the SQL managed instance
Note
Figure 1.31, Figure 1.32, and Figure 1.33 are all a part of one SQL managed instance window. The window is split into three images for clarity.
In the Subscription box, provide your Azure subscription type. SQL managed instances currently support the following subscription types: Enterprise Agreement (EA), Pay-As-You-Go, Cloud Service Provider (CSP), Enterprise Dev/Test, and Pay-As-You-Go Dev/test.
If you have a different subscription, you won't be able to create a SQL managed instance.
The Managed instance name box is for the name of the managed instance you plan to create. It can be any valid name, in accordance with the naming rules at https://docs.microsoft.com/en-us/azure/architecture/best-practices/naming-conventions.
The Managed instance admin login box is for any valid login name, as long as it fits the naming conventions at https://docs.microsoft.com/en-us/azure/architecture/best-practices/naming-conventions.
The password can be any valid password that follows these rules:
Figure 1.34: Password requirements
The Time zone box denotes the time zone of the managed instance. The preferred time zone is UTC; however, this will differ from business to business.
Collation is the SQL Server collation that the managed instance will be in.
Figure 1.35: Server collation information
In the Location box, enter the Azure location the managed instance will be created in.
The Virtual network box is for setting the virtual network that the managed instance will be a part of. If no network is provided, a new virtual network is created.
Note
A detailed explanation of the networking requirements is beyond the scope of the book. For more details, please visit https://docs.microsoft.com/en-us/azure/sql-database/sql-database-managed-instance-connectivity-architecture.
For the Connection type box, SQL managed instances support two connection types, Redirect and Proxy. Redirect is the recommended connection type because the client directly connects to the node hosting the database, and therefore it offers low latency and high throughput.
In Proxy connection type, requests to the database are proxied through the Azure SQL Database gateways.
Resource group sets the resource group the SQL managed instance will be part of. It can be a new or existing one.
To use this managed instance as a secondary instance in a failover group, check I want to use this managed instance as an Instance Failover Group secondary and specify the managed instance to share an instance failover group within DnsZonePartner managed instance.
The DnsZonePartner managed instance box is left blank because we don't have any other managed instances.
Figure 1.36: SQL managed instance pricing information
For Pricing tier, select the optimal pricing tier that suits your business needs. However, for demo purposes, select General Purpose: 32 GB, 8 vCore for a lower price.
The first managed instance in a subnet may take up 6 hours to complete and a warning pops up to inform you of this.
- Click Create to validate and provision the SQL-managed instance.
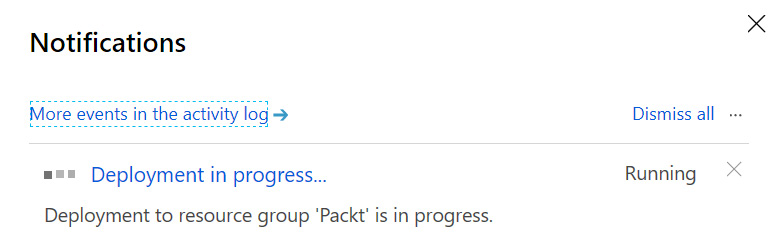
To monitor the progress, click the Notifications (bell) icon in the top-left corner:
After the deployment is complete, a deployment complete notification will come up in the notification window.
This section discusses provisioning an Azure SQL server and SQL database using PowerShell. To understand the process, let's take the example of Mike, who is the newest member of the Data Administration team at ToyStore Ltd., a company that manufactures toys for children. ToyStore has an e-commerce web portal that allows customers to purchase toys online. ToyStore has migrated the online e-commerce portal to Microsoft Azure and is therefore moving to Azure SQL Database from the on-premises SQL Server. Mike is asked to provision the Azure SQL database and other required resources as his initial assignment. This can be achieved by following these steps:
- Save the Azure profile details into a file for future reference. Press Windows + R to open the Run command window.
- In the Run command window, type powershell and then press Enter. This will open a new PowerShell console window:
Figure 1.39: Opening up PowerShell
- In the PowerShell console, run the following command:
Add-AzureRmAccount
You'll have to enter your Azure credentials into the pop-up dialog box. After a successful login, the control will return to the PowerShell window.
- Run the following command to save the profile details to a file:
Save-AzureRmProfile -Path C:\code\MyAzureProfile.json
The Azure subscription details will be saved in the MyAzureProfile.json file in JSON format. If you wish to explore the JSON file, you can open it in any editor to review its content:
Figure 1.40: The PowerShell command window
Note
Saving the profile in a file allows you to use the file to log in to your Azure account from PowerShell instead of providing your credentials every time in the Azure authentication window.
- Press Window + R to open the Run command window. Type PowerShell_ISE.exe in the Run command window and press Enter. This will open a new PowerShell ISE editor window. This is where you'll write the PowerShell commands:
Figure 1.41: Run command window
- In the PowerShell ISE, select File from the top menu, and then click Save. Alternatively, you can press Ctrl + S to save the file. In the Save As dialog box, browse to the C:\Code\Lesson01\ directory. In the File name textbox, type Provision-AzureSQLDatabase.ps1, and then click Save to save the file:
Figure 1.42: Saving the PowerShell ISE file
- Copy and paste the following lines in the Provision-AzureSQLDatabase.ps1 file one after another. The code explanation, wherever required, is given in the comments within the code snippet.
- Copy and paste the following code to define the parameters:
param (
[parameter(Mandatory=$true)] [String] $ResourceGroup, [parameter(Mandatory=$true)] [String] $Location, [parameter(Mandatory=$true)] [String] $SQLServer, [parameter(Mandatory=$true)] [String] $UserName, [parameter(Mandatory=$true)] [String] $Password,
[parameter(Mandatory=$true)] [String] $SQLDatabase, [parameter(Mandatory=$true)] [String] $Edition="Basic", [parameter(Mandatory=$false)] [String] $AzureProfileFilePath
)
The preceding code defines the parameters required by the scripts:
ResourceGroup: The resource group that will host the logical Azure SQL server and Azure SQL database.
Location: The resource group location. The default is East US 2.
SQLServer: The logical Azure SQL server name that will host the Azure SQL database.
UserName: The Azure SQL Server admin username. The default username is sqladmin. Don't change the username; keep it as the default.
Password: The Azure SQL Server admin password. The default password is Packt@pub2. Don't change the password; keep it as the default.
SQLDatabase: The Azure SQL database to create.
Edition: The Azure SQL Database edition. This is discussed in detail in Lesson 2, Migrating a SQL Server Database to an Azure SQL Database.
AzureProfileFilePath: The full path of the file that contains your Azure profile details. You created this earlier under the Saving Azure Profile Details to a File section.
- Copy and paste the following code to log in to your Azure account from PowerShell:
Start-Transcript -Path .\log\ProvisionAzureSQLDatabase.txt -Append if([string]::IsNullOrEmpty($AzureProfileFilePath))
{
$AzureProfileFilePath="..\..\MyAzureProfile.json"
}
if((Test-Path -Path $AzureProfileFilePath))
{
$profile = Import-AzureRmContext-Path $AzureProfileFilePath
$SubscriptionID = $profile.Context.Subscription.SubscriptionId
}
else
{
Write-Host "File Not Found $AzureProfileFilePath"
-ForegroundColor Red
$profile = Login-AzureRmAccount
$SubscriptionID = $profile.Context.Subscription.
SubscriptionId
}
Set-AzureRmContext -SubscriptionId $SubscriptionID | Out-Null
The preceding code first checks for the profile details in the Azure profile file. If found, it retrieves the subscription ID of the profile; otherwise, it uses the Login-AzureRmAccount command to pop up the Azure login dialog box. You have to provide your Azure credentials in the login dialog box. After a successful login, it retrieves and stores the subscription ID of the profile in the $SubscriptionID variable.
It then sets the current Azure subscription to yours for the PowerShell cmdlets to use in the current session.
- Copy and paste the following code to create the resource group if it doesn't already exist:
# Check if resource group exists
# An error is returned and stored in the notexists variable if the resource group exists
Get-AzureRmResourceGroup -Name $ResourceGroup -Location $Location -ErrorVariable notexists -ErrorAction SilentlyContinue
#Provision Azure Resource Group
if($notexists)
{
Write-Host "Provisioning Azure Resource Group $ResourceGroup" -ForegroundColor Green
$_ResourceGroup = @{
Name = $ResourceGroup;
Location = $Location;
}
New-AzureRmResourceGroup @_ResourceGroup;
}
else
{
Write-Host $notexists -ForegroundColor Yellow
}
The Get-AzureRmResourceGroup cmdlet fetches the given resource group. If the given resource group doesn't exist, an error is returned. The error returned is stored in the notexists variable.
The New-AzureRmResourceGroup cmdlet provisions the new resource group if the notexists variable isn't empty.
- Copy and paste the following code to create a new Azure SQL server if one doesn't exist:
Get-AzureRmSqlServer -ServerName $SQLServer -ResourceGroupName
$ResourceGroup -ErrorVariable notexists -ErrorAction SilentlyContinue
if($notexists)
{
Write-Host "Provisioning Azure SQL Server $SQLServer"
-ForegroundColor Green
$credentials = New-Object -TypeName System.Management.Automation. PSCredential -ArgumentList $UserName, $(ConvertTo-SecureString
-String $Password -AsPlainText -Force)
$_SqlServer = @{
ResourceGroupName = $ResourceGroup; ServerName = $SQLServer;
Location = $Location; SqlAdministratorCredentials = $credentials; ServerVersion = '12.0';
}
New-AzureRmSqlServer @_SqlServer;
}
else
{
Write-Host $notexists -ForegroundColor Yellow
}
The Get-AzureRmSqlServer cmdlet gets the given Azure SQL server. If the given Azure SQL server doesn't exist, an error is returned. The error returned is stored in the notexists variable.
The New-AzureRmSqlServer cmdlet provisions the new Azure SQL server if the notexists variable isn't empty.
- Copy and paste the following code to create the Azure SQL database if it doesn't already exist:
# Check if Azure SQL Database Exists
# An error is returned and stored in the notexists variable if the resource group exists
Get-AzureRmSqlDatabase -DatabaseName $SQLDatabase -ServerName
$SQLServer -ResourceGroupName $ResourceGroup -ErrorVariable notexits -ErrorAction SilentlyContinue
if($notexists)
{
# Provision Azure SQL Database
Write-Host "Provisioning Azure SQL Database $SQLDatabase"
-ForegroundColor Green
$_SqlDatabase = @{
ResourceGroupName = $ResourceGroup; ServerName = $SQLServer; DatabaseName = $SQLDatabase; Edition = $Edition;
};
New-AzureRmSqlDatabase @_SqlDatabase;
}
else
{
Write-Host $notexists -ForegroundColor Yellow
}
Get-AzureRmSqlDatabase gets the given Azure SQL database. If the given Azure SQL database doesn't exist, an error is returned. The error returned is stored in the notexists variable.
New-AzureRmSqlDatabase provisions the new Azure SQL database if the notexists variable isn't empty.
- Copy and paste the following code to add the system's public IP address to the Azure SQL Server firewall rule:
$startip = (Invoke-WebRequest http://myexternalip.com/ raw --UseBasicParsing -ErrorVariable err -ErrorAction SilentlyContinue).Content.trim()
$endip=$startip
Write-host "Creating firewall rule for $azuresqlservername with StartIP: $startip and EndIP: $endip " -ForegroundColor Green
$NewFirewallRule = @{ ResourceGroupName = $ResourceGroup; ServerName = $SQLServer; FirewallRuleName = 'PacktPub'; StartIpAddress = $startip; EndIpAddress=$endip;
};
New-AzureRmSqlServerFirewallRule @NewFirewallRule;
The preceding code first gets the public IP of the system (running this PowerShell script) by calling the http://myexternalip.com/raw website using the Invoke-WebRequest command. The link returns the public IP in text format, which is stored in the $startip variable.
The IP is then used to create the firewall rule by the name of PacktPub using the New-AzureRmSqlServerFirewallRule cmdlet.
- To run the PowerShell script, perform the following steps: Press Window + R to open the Run command window. Type PowerShell and hit Enter to open a new PowerShell console window.
- Change the directory to the folder that has the shard-toystore.ps1 script. For example, if the script is in the C:\Code\Lesson01\ directory, then run the following command to switch to this directory:
cd C:\Code\Lesson01
- In the following command, change the parameter values. Copy the command to the PowerShell console and hit Enter:
.\ProvisionAzureSQLDatabase.ps1 -ResourceGroup toystore -SQLServer toyfactory -UserName sqladmin -Password Packt@pub2 -SQLDatabase toystore -AzureProfileFilePath C:\Code\MyAzureProfile.json
The preceding command will create the toystore resource group, the toyfactory Azure SQL server, and the toystore Azure SQL database. It'll also create a firewall rule by the name of PacktPub with the machine's public IP address.
To provision a managed instance using a PowerShell script, perform the following steps:
- Create a file called ProvisionSQLMI.ps1 and add the following code:
<#
Managed Instance is not supported in Visual Studio Enterprise subscription.
If you are using Pay-as-you-go subscription, do check the managed instance cost
#>
param(
[string]$ResourceGroup="Packt-1",
[string]$Location="centralus",
[string]$vNet="PackvNet-$(Get-Random)",
[string]$misubnet="PackSubnet-$(Get-Random)",
[string]$miname="Packt-$(Get-Random)",
[string]$miadmin="miadmin",
[string]$miadminpassword,
[string]$miedition="General Purpose",
[string]$mivcores=8,
[string]$mistorage=32,
[string]$migeneration = "Gen4",
[string]$milicense="LicenseIncluded",
[string]$subscriptionid="f0193880-5aca-4fbd-adf4-953954e4fdd7"
)
- Add the following code to log in to Azure:
# login to azure
$Account = Connect-AzAccount
if([string]::IsNullOrEmpty($subscriptionid))
{
$subscriptionid=$Account.Context.Subscription.Id
}
Set-AzContext $subscriptionid
- Add the following code snippet to verify that the resource group exists:
# Check if resource group exists
# An error is returned and stored in notexists variable if resource group exists
Get-AzResourceGroup -Name $ResourceGroup -Location $location -ErrorVariable notexists -ErrorAction SilentlyContinue
- Provision a resource group:
#Provision Azure Resource Group
if(![string]::IsNullOrEmpty($notexists))
{
Write-Host "Provisioning Azure Resource Group $ResourceGroup" -ForegroundColor Green
$_ResourceGroup = @{
Name = $ResourceGroup;
Location = $Location;
}
New-AzResourceGroup @_ResourceGroup;
}
else
{
Write-Host $notexists -ForegroundColor Yellow
}
Write-Host "Provisioning Azure Virtual Network $vNet" -ForegroundColor Green
$obvnet = New-AzVirtualNetwork -Name $vNet -ResourceGroupName $ResourceGroup -Location $Location -AddressPrefix "10.0.0.0/16"
Write-Host "Provisioning Managed instance subnet $misubnet" -ForegroundColor Green
$obmisubnet = Add-AzVirtualNetworkSubnetConfig -Name $misubnet -VirtualNetwork $obvnet -AddressPrefix "10.0.0.0/24"
$misubnetid = $obmisubnet.Id
$_nsg = "mi-nsg"
$_rt = "mi-rt"
Write-Host "Provisioning Network Security Group" -ForegroundColor Green
$nsg = New-AzNetworkSecurityGroup -Name $_nsg -ResourceGroupName $ResourceGroup -Location $Location -Force
<#
Routing table is required for a managed instance to connect with
Azure Management Service.
#>
Write-Host "Provisioning Routing table" -ForegroundColor Green
$routetable = New-AzRouteTable -Name $_rt -ResourceGroupName $ResourceGroup -Location $Location -Force
- Assign a network security group to the managed instance subnet:
#Assign network security group to managed instance subnet
Set-AzVirtualNetworkSubnetConfig '
-VirtualNetwork $obvnet -Name $misubnet '
-AddressPrefix "10.0.0.0/24" -NetworkSecurityGroup $nsg '
-RouteTable $routetable | Set-AzVirtualNetwork
- Configure the network rules in the network security group by adding the following code:
#Configure network rules in network security group
Get-AzNetworkSecurityGroup -ResourceGroupName $ResourceGroup -Name $_nsg '
| Add-AzNetworkSecurityRuleConfig '
-Priority 100 '
-Name "allow_management_inbound" '
-Access Allow '
-Protocol Tcp '
-Direction Inbound '
-SourcePortRange * '
-SourceAddressPrefix * '
-DestinationPortRange 9000,9003,1438,1440,1452 '
-DestinationAddressPrefix * '
| Add-AzNetworkSecurityRuleConfig '
-Priority 200 '
-Name "allow_misubnet_inbound" '
-Access Allow '
-Protocol * '
-Direction Inbound '
-SourcePortRange * '
-SourceAddressPrefix "10.0.0.0/24" '
-DestinationPortRange * '
-DestinationAddressPrefix * '
| Add-AzNetworkSecurityRuleConfig '
-Priority 300 '
-Name "allow_health_probe_inbound" '
-Access Allow '
-Protocol * '
-Direction Inbound '
-SourcePortRange * '
-SourceAddressPrefix AzureLoadBalancer '
-DestinationPortRange * '
-DestinationAddressPrefix * '
| Add-AzNetworkSecurityRuleConfig '
-Priority 1000 '
-Name "allow_tds_inbound" '
-Access Allow '
-Protocol Tcp '
-Direction Inbound '
-SourcePortRange * '
-SourceAddressPrefix VirtualNetwork '
-DestinationPortRange 1433 '
-DestinationAddressPrefix * '
| Add-AzNetworkSecurityRuleConfig '
-Priority 1100 '
-Name "allow_redirect_inbound" '
-Access Allow '
-Protocol Tcp '
-Direction Inbound '
-SourcePortRange * '
-SourceAddressPrefix VirtualNetwork '
-DestinationPortRange 11000-11999 '
-DestinationAddressPrefix * '
| Add-AzNetworkSecurityRuleConfig '
-Priority 4096 '
-Name "deny_all_inbound" '
-Access Deny '
-Protocol * '
-Direction Inbound '
-SourcePortRange * '
-SourceAddressPrefix * '
-DestinationPortRange * '
-DestinationAddressPrefix * '
| Add-AzNetworkSecurityRuleConfig '
-Priority 100 '
-Name "allow_management_outbound" '
-Access Allow '
-Protocol Tcp '
-Direction Outbound '
-SourcePortRange * '
-SourceAddressPrefix * '
-DestinationPortRange 80,443,12000 '
-DestinationAddressPrefix * '
| Add-AzNetworkSecurityRuleConfig '
-Priority 200 '
-Name "allow_misubnet_outbound" '
-Access Allow '
-Protocol * '
-Direction Outbound '
-SourcePortRange * '
-SourceAddressPrefix * '
-DestinationPortRange * '
-DestinationAddressPrefix "10.0.0.0/24" '
| Add-AzNetworkSecurityRuleConfig '
-Priority 4096 '
-Name "deny_all_outbound" '
-Access Deny '
-Protocol * '
-Direction Outbound '
-SourcePortRange * '
-SourceAddressPrefix * '
-DestinationPortRange * '
-DestinationAddressPrefix * '
| Set-AzNetworkSecurityGroup
- Update the routing table configuration:
#update the routing table configuration.
Get-AzRouteTable '
-ResourceGroupName $ResourceGroup '
-Name $_rt '
| Add-AzRouteConfig '
-Name "ToManagedInstanceManagementService" '
-AddressPrefix 0.0.0.0/0 '
-NextHopType Internet '
| Add-AzRouteConfig '
-Name "ToLocalClusterNode" '
-AddressPrefix "10.0.0.0/24" '
-NextHopType VnetLocal '
| Set-AzRouteTable
- Add the following code to provision a managed instance:
# Provision managed instance
$creds = New-Object -TypeName System.Management.Automation.PSCredential -ArgumentList $miadmin, (ConvertTo-SecureString -String $miadminpassword -AsPlainText -Force)
New-AzSqlInstance -Name $miname -ResourceGroupName $ResourceGroup -Location $Location -SubnetId $misubnetid '
-AdministratorCredential $creds '
-StorageSizeInGB $mistorage -VCore $mivcores -Edition $miedition '
-ComputeGeneration $migeneration -LicenseType $milicense
<#
Clean-Up : Remove managed instance
Remove-AzSqlInstance -Name $miadmin -ResourceGroupName $ResourceGroup -Force
#>
Note
The PowerShell script is self-explanatory. Review the comments in the script to understand what each command is used for.
- Open a new PowerShell console window. Set the directory to the one containing the ProvisionSQLMI.ps1 file.
- Copy and paste the following command in the PowerShell window:
.\ProvisionSQLMI.ps1 -ResourceGroup Packt1 -Location westus2 -vNet mi-vnet -misubnet mi-subnet -miname packtmi -miadmin miadmin -miadminpassword Thisismypassword$12345 -miedition "General Purpose" -mivcores 8 -mistorage 32 -migeneration Gen4 -milicense LicenseIncluded
You may change the parameter values if you wish to.
Note
If you have more than one subscription, specify the subscription ID in the preceding command for the parameter subscription ID.
This will create a new SQL managed instance with all the required network specifications.
Note
It may take more than 3 hours to provision the first SQL managed instance.
- Once you are done with the managed instance, execute the following command to delete it:
Remove-AzSqlInstance -Name $miadmin -ResourceGroupName $ResourceGroup -Force
This command expects the managed instance name and the resource group to delete that managed instance.


![Professional Azure SQL Database Administration [Instructor Edition]](https://content.packt.com/C09760/cover_image.png)


 Free Chapter