Book Image

Mastering Windows Server 2019 - Second Edition

By : Jordan Krause
Book Image

Mastering Windows Server 2019 - Second Edition

By: Jordan Krause

Overview of this book

Mastering Windows Server 2019 – Second Edition covers all of the essential information needed to implement and utilize this latest-and-greatest platform as the core of your data center computing needs. You will begin by installing and managing Windows Server 2019, and by clearing up common points of confusion surrounding the versions and licensing of this new product. Centralized management, monitoring, and configuration of servers is key to an efficient IT department, and you will discover multiple methods for quickly managing all of your servers from a single pane of glass. To this end, you will spend time inside Server Manager, PowerShell, and even the new Windows Admin Center, formerly known as Project Honolulu. Even though this book is focused on Windows Server 2019 LTSC, we will still discuss containers and Nano Server, which are more commonly related to the SAC channel of the server platform, for a well-rounded exposition of all aspects of using Windows Server in your environment. We also discuss the various remote access technologies available in this operating system, as well as guidelines for virtualizing your data center with Hyper-V. By the end of this book, you will have all the ammunition required to start planning for, implementing, and managing Windows.
Table of Contents (15 chapters)

Implementing a new virtual server

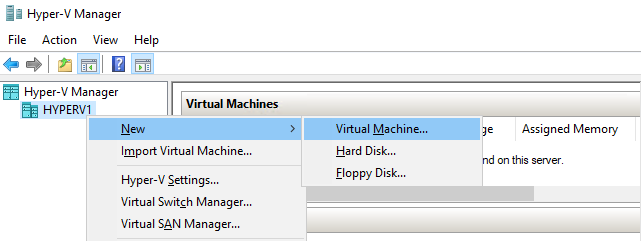
Now we are ready to spin up our first virtual server! Similar to creating new virtual switches, the process for creating a new VM is fairly straightforward, but there are some steps along the way that might need some explanation if you haven't been through this process before. We start in the same management interface from which we do everything in the Hyper-V world. Open up Hyper-V Manager and right-click on the name of your Hyper-V Server. Navigate to New | Virtual Machine... to launch the wizard:

The first screen where we need to make some decisions is Specify Name and Location. Create a name for your new VM, that is easy enough. But then you also have the chance to store your VM in a new location. If you set a good default location for your virtual machines during Hyper-V role installation, chances are that you won't have to modify...