Book Image

Mastering Ansible. - Third Edition

By : James Freeman, Jesse Keating
Book Image

Mastering Ansible. - Third Edition

By: James Freeman, Jesse Keating

Overview of this book

Automation is essential for success in the modern world of DevOps. Ansible provides a simple, yet powerful, automation engine for tackling complex automation challenges. This book will take you on a journey that will help you exploit the latest version's advanced features to help you increase efficiency and accomplish complex orchestrations. This book will help you understand how Ansible 2.7 works at a fundamental level and will also teach you to leverage its advanced capabilities. Throughout this book, you will learn how to encrypt Ansible content at rest and decrypt data at runtime. Next, this book will act as an ideal resource to help you master the advanced features and capabilities required to tackle complex automation challenges. Later, it will walk you through workflows, use cases, orchestrations, troubleshooting, and Ansible extensions. Lastly, you will examine and debug Ansible operations, helping you to understand and resolve issues. By the end of the book, you will be able to unlock the true power of the Ansible automation engine and tackle complex, real- world actions with ease.
Table of Contents (17 chapters)
Free Chapter
1
Section 1: Ansible Overview and Fundamentals
6
Section 2: Writing and Troubleshooting Ansible Playbooks
12
Section 3: Orchestration with Ansible

Inventory parsing and data sources

In Ansible, nothing happens without an inventory. Even ad hoc actions performed on the localhost require an inventory, though that inventory may just consist of the localhost. The inventory is the most basic building block of Ansible architecture. When executing ansible or ansible-playbook, an inventory must be referenced. Inventories are either files or directories that exist on the same system that runs ansible or ansible-playbook. The location of the inventory can be referenced at runtime with the --inventory-file (-i) argument, or by defining the path in an Ansible config file.

Inventories can be static or dynamic, or even a combination of both, and Ansible is not limited to a single inventory. The standard practice is to split inventories across logical boundaries, such as staging and production, allowing an engineer to run a set of plays against their staging environment for validation, and then follow with the same exact plays run against the production inventory set.

Variable data, such as specific details on how to connect to a particular host in your inventory, can be included, along with an inventory in a variety of ways, and we'll explore the options available to you.

Static inventory

The static inventory is the most basic of all the inventory options. Typically, a static inventory will consist of a single file in the ini format. Here is an example of a static inventory file describing a single host, mastery.example.name:

mastery.example.name 

That is all there is to it. Simply list the names of the systems in your inventory. Of course, this does not take full advantage of all that an inventory has to offer. If every name were listed like this, all plays would have to reference specific hostnames, or the special built-in all group (which, as it suggests, contains all hosts in the inventory). This can be quite tedious when developing a playbook that operates across different environments within your infrastructure. At the very least, hosts should be arranged into groups.

A design pattern that works well is to arrange your systems into groups based on expected functionality. At first, this may seem difficult if you have an environment where single systems can play many different roles, but that is perfectly fine. Systems in an inventory can exist in more than one group, and groups can even consist of other groups! Additionally, when listing groups and hosts, it's possible to list hosts without a group. These would have to be listed first before any other group is defined. Let's build on our previous example and expand our inventory with a few more hosts and groupings as follows:

[web] 
mastery.example.name 
 
[dns] 
backend.example.name 
 
[database] 
backend.example.name 
 
[frontend:children] 
web 
 
[backend:children] 
dns 
database 

What we have created here is a set of three groups with one system in each, and then two more groups, which logically group all three together. Yes, that's right; you can have groups of groups. The syntax used here is [groupname:children], which indicates to Ansible's inventory parser that this group, going by the name of groupname, is nothing more than a grouping of other groups.

The children, in this case, are the names of the other groups. This inventory now allows writing plays against specific hosts, low-level, role-specific groups, or high-level logical groupings, or any combination thereof.

By utilizing generic group names, such as dns and database, Ansible plays can reference these generic groups rather than the explicit hosts within. An engineer can create one inventory file that fills in these groups with hosts from a pre-production staging environment, and another inventory file with the production versions of these groupings. The playbook content does not need to change when executing on either a staging or production environment because it refers to the generic group names that exist in both inventories. Simply refer to the correct inventory to execute it in the desired environment.

Inventory ordering

A new play-level keyword, order, was added to Ansible in version 2.4. Prior to this, Ansible processed the hosts in the order specified in the inventory file, and continues to do so by default, even in newer versions. However, the following values can be set for the order keyword for a given play, resulting in the processing order of hosts described as follows:

  • inventory: This is the default option, and simply means Ansible proceeds as it always has, processing the hosts in the order specified in the inventory file
  • reverse_inventory: This results in the hosts being processed in the reverse of the order specified in the inventory
  • sorted: The hosts are processed in alphabetically sorted order by name
  • reverse_sorted: The hosts are processed in reverse alphabetically sorted order
  • shuffle: The hosts are processed in a random order, with the order being randomized on each run
In Ansible, the alphabetical sorting used is otherwise known as lexicographical. In short this means that values are sorted as strings, with the strings being processed from left to right. Thus, say we have three hosts—mastery1, mastery11, and mastery2. In this list, mastery1 comes first as the character as position 8 is a 1. Then comes mastery11, as the character at position 8 is still a 1, but now there is an additional character at position 9. Finally comes mastery2, as character 8 is a 2 and 2 comes after 1. This is important as numerically we know that 11 is greater than 2, but in this list mastery11 comes before mastery2.

Inventory variable data

Inventories provide more than just system names and groupings. Data pertaining to the systems can be passed along as well. This data may include the following:

  • Host-specific data to use in templates
  • Group-specific data to use in task arguments or conditionals
  • Behavioral parameters to tune how Ansible interacts with a system

Variables are a powerful construct within Ansible and can be used in a variety of ways, not just those described here. Nearly every single thing done in Ansible can include a variable reference. While Ansible can discover data about a system during the setup phase, not all data can be discovered. Defining data with the inventory expands this. Note that variable data can come from many different sources, and one source may override another. Variable precedence order is covered later in this chapter.

Let's improve upon our existing example inventory and add to it some variable data. We will add some host-specific data, as well as group-specific data:

[web] 
mastery.example.name ansible_host=192.168.10.25 
 
[dns] 
backend.example.name 
 
[database] 
backend.example.name 
 
[frontend:children] 
web 
 
[backend:children] 
dns 
database 
 
[web:vars] 
http_port=88 
proxy_timeout=5 
 
[backend:vars] 
ansible_port=314 
 
[all:vars] 
ansible_ssh_user=otto 

In this example, we defined ansible_host for mastery.example.name to be the IP address of 192.168.10.25. The ansible_host variable is a behavioral inventory variable, which is intended to alter the way Ansible behaves when operating with this host. In this case, the variable instructs Ansible to connect to the system using the IP address provided, rather than performing a DNS lookup on the name using mastery.example.name. There are a number of other behavioral inventory variables that are listed at the end of this section, along with their intended use.

Our new inventory data also provides group-level variables for the web and backend groups. The web group defines http_port, which may be used in an NGINX configuration file, and proxy_timeout, which might be used to determine HAProxy behavior. The backend group makes use of another behavioral inventory parameter to instruct Ansible to connect to the hosts in this group using port 314 for SSH, rather than the default of 22.

Finally, a construct is introduced that provides variable data across all the hosts in the inventory by utilizing a built-in all group. Variables defined within this group will apply to every host in the inventory. In this particular example, we instruct Ansible to log in as the otto user when connecting to the systems. This is also a behavioral change, as the Ansible default behavior is to log in as a user with the same name as the user executing ansible or ansible-playbook on the control host.

Here is a table of behavior inventory variables and the behaviors they intend to modify:

Inventory parameters Behavior
ansible_host This is the DNS name or or the Docker container name which Ansible will initiate a connection to.
ansible_port Specifies the port number that Ansible will use to connect to the inventory host, if not the default value of 22.
ansible_user Specifies the username that Ansible will connect to the inventory host with, regardless of the connection type.
ansible_ssh_pass Used to provide Ansible with the password for authentication to the inventory host in conjunction with ansible_user.
ansible_ssh_private_key_file Used to specify which SSH private key file will be used to connect to the inventory host, if not using the default one or ssh-agent.
ansible_ssh_common_args This defines SSH arguments to append to the default arguments for ssh, sftp, and scp.
ansible_sftp_extra_args Used to specify additional arguments that will be passed to the sftp binary when called by Ansible.
ansible_scp_extra_args Used to specify additional arguments that will be passed to the scp binary when called by Ansible.
ansible_ssh_extra_args Used to specify additional arguments that will be passed to the ssh binary when called by Ansible.
ansible_ssh_pipelining This setting uses a Boolean to define whether SSH pipelining should be used for this host.
ansible_ssh_executable This setting overrides the path to the SSH executable for this host.
ansible_become This defines whether privilege escalation (sudo or otherwise) should be used with this host.
ansible_become_method This is the method to use for privilege escalation, and can be one of sudo, su, pbrun, pfexec, doas, dzdo, or ksu.
ansible_become_user This is the user to become through privilege escalation.
ansible_become_pass This is the password to use for privilege escalation.
ansible_sudo_pass This is the sudo password to use (this is insecure; we strongly recommend using --ask-sudo-pass).
ansible_connection This is the connection type of the host. Candidates are local, smart, ssh, paramiko, docker, or winrm (more on this later in the book). The default is smart in any modern Ansible distribution (this detects whether the SSH feature ControlPersist is supported and, if so, uses ssh as the connection type, falling back to paramiko otherwise).
ansible_docker_extra_args Used to specify the extra argument that will be passed to a remote Docker daemon on a given inventory host.
ansible_shell_type Used to determine the shell type on the inventory host(s) in question. Defaults to sh-style syntax, but can be set to csh or fish to work with systems that use these shells.
ansible_shell_executable Used to determine the shell type on the inventory host(s) in question. Defaults to sh-style syntax, but can be set to csh or fish to work with systems that use these shells.
ansible_python_interpreter This is used to manually set the path to Python on a given host in the inventory. For example some distributions of Linux have more than one Python version installed, and it is important that the correct one is set. For example, a host might have both /usr/bin/python27 and /usr/bin/python3, and this is used to define which one will be used.
ansible_*_interpreter Used for any other interpreted language that Ansible might depend upon (e.g. Perl or Ruby). Replaces the interpreter binary with the one specified.

Dynamic inventories

A static inventory is great, and enough for many situations. But there are times when a statically written set of hosts is just too unwieldy to manage. Consider situations where inventory data already exists in a different system, such as LDAP, a cloud computing provider, or an in-house configuration management database (CMDB) (inventory, asset tracking, and data warehousing) system. It would be a waste of time and energy to duplicate that data and, in the modern world of on-demand infrastructure, that data would quickly grow stale or disastrously incorrect.

Another example of when a dynamic inventory source might be desired is when your site grows beyond a single set of playbooks. Multiple playbook repositories can fall into the trap of holding multiple copies of the same inventory data, or complicated processes have to be created to reference a single copy of the data. An external inventory can easily be leveraged to access the common inventory data stored outside of the playbook repository to simplify the setup. Thankfully, Ansible is not limited to static inventory files.

A dynamic inventory source (or plugin) is an executable that Ansible will call at runtime to discover real-time inventory data. This executable may reach out into external data sources and return data, or it can just parse local data that already exists but may not be in the Ansible inventory ini format. While it is possible, and easy, to develop your own dynamic inventory source, which we will cover in a later chapter, Ansible provides a number of example inventory plugins, including, but not limited to, the following:

  • OpenStack Nova
  • Rackspace Public Cloud
  • DigitalOcean
  • Linode
  • Amazon EC2
  • Google Compute Engine
  • Microsoft Azure
  • Docker
  • Vagrant

Many of these plugins require some level of configuration, such as user credentials for EC2 or authentication endpoint for OpenStack Nova. Since it is not possible to configure additional arguments for Ansible to pass along to the inventory script, the configuration for the script must either be managed via an ini config file read from a known location, or environment variables read from the shell environment used to execute ansible or ansible-playbook. Note also that sometimes, external libraries are required for these inventory scripts to function.

When ansible or ansible-playbook is directed at an executable file for an inventory source, Ansible will execute that script with a single argument, --list. This is so that Ansible can get a listing of the entire inventory in order to build up its internal objects to represent the data. Once that data is built up, Ansible will then execute the script with a different argument for every host in the data to discover variable data. The argument used in this execution is --host <hostname>, which will return any variable data specific to that host.

The inventory scripts are too numerous to go through each in detail in this book. However, to demonstrate the process, we will work through the use of the EC2 dynamic inventory. The dynamic inventory scripts officially included with Ansible can be found on Github:

https://github.com/ansible/ansible/tree/devel/contrib/inventory

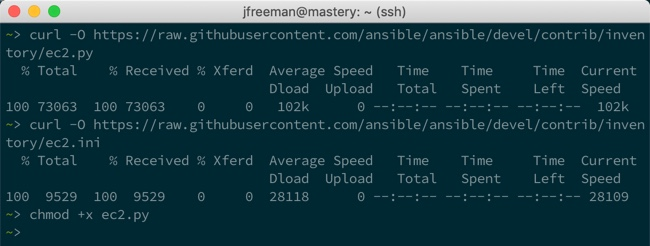
On browsing this directory system, we can see there is an ec2.py and associated example configuration file, ec2.ini. Download these onto your system and make the Python file executable:

If we take a look at the comments at the top of ec2.py, we can see it tells us that we need the Boto library installed. Installing this will depend on your operating system and Python environment, but on CentOS 7 (and other EL7 variants), it could be done with the following:

Now, take a look at the ec2.ini file, and edit it as appropriate. You can see that your AWS credentials could go into this file, but it is not recommended for security reasons. For this example, we will simply specify them using environment variables, and then run our dynamic inventory script with the --list parameter, as discussed in the previous screenshot. Doing so yields the following:

Voila! We have a listing of our current AWS inventory, along with a glimpse into the host variables for the discovered hosts. Note that, of course, the full output is far more complete than this.

With the AWS inventory in place, you could use this right away to run a single task or entire playbook against this dynamic inventory. For example, to use the ping module to check Ansible connectivity to all hosts in the inventory, you could run the following command:

ansible -i ec2.py all -m ping

This, of course, is just one example. However, if you follow this process for other dynamic inventory providers, you should get them working with ease.

In Chapter 9, Extending Ansible, we will develop our own custom inventory plugin to demonstrate how they operate.

Runtime inventory additions

Just like static inventory files, it is important to remember that Ansible will parse this data once, and only once, per ansible or ansible-playbook execution. This is a fairly common stumbling point for users of cloud dynamic sources, where frequently, a playbook will create a new cloud resource and then attempt to use it as if it were part of the inventory. This will fail, as the resource was not part of the inventory when the playbook launched. All is not lost though! A special module is provided that allows a playbook to temporarily add an inventory to the in-memory inventory object, the add_host module.

The add_host module takes two options, name and groups. The name should be obvious; it defines the hostname that Ansible will use when connecting to this particular system. The groups option is a comma-separated list of groups to add this new system to. Any other option passed to this module will become the host variable data for this host. For example, if we want to add a new system, name it newmastery.example.name, add it to the web group, and instruct Ansible to connect to it by way of IP address 192.168.10.30. This will create a task resembling the following:

- name: add new node into runtime inventory 
  add_host: 
    name: newmastery.example.name 
    groups: web 
    ansible_host: 192.168.10.30 

This new host will be available to use, by way of the name provided, or by way of the web group, for the rest of the ansible-playbook execution. However, once the execution has completed, this host will not be available unless it has been added to the inventory source itself. Of course, if this were a new cloud resource created, the next ansible or ansible-playbook execution that sourced inventory from that cloud would pick up the new member.

Inventory limiting

As mentioned earlier, every execution of ansible or ansible-playbook will parse the entire inventory it has been directed at. This is even true when a limit has been applied. A limit is applied at runtime by making use of the --limit runtime argument to ansible or ansible-playbook. This argument accepts a pattern, which is basically a mask to apply to the inventory. The entire inventory is parsed, and at each play, the limit mask supplied further limits the host pattern listed for the play.

Let's take our previous inventory example and demonstrate the behavior of Ansible with and without a limit. If you recall, we have the special group, all, that we can use to reference all the hosts within an inventory. Let's assume that our inventory is written out in the current working directory in a file named mastery-hosts, and we will construct a playbook to demonstrate the host on which Ansible is operating. Let's write this playbook out as mastery.yaml:

--- 
- name: limit example play 
  hosts: all
gather_facts: false tasks: - name: tell us which host we are on debug: var: inventory_hostname

The debug module is used to print out text, or values of variables. We'll use this module a lot in this book to simulate actual work being done on a host.

Now, let's execute this simple playbook without supplying a limit. For simplicity's sake, we will instruct Ansible to utilize a local connection method, which will execute locally rather than attempting to SSH to these non-existent hosts.

Let's take a look at the following screenshot:

As we can see, both hosts, backend.example.name and mastery.example.name, were operated on. Let's see what happens if we supply a limit, specifically to limit our run to frontend systems only:

We can see that only mastery.example.name was operated on this time. While there are no visual clues that the entire inventory was parsed, if we dive into the Ansible code and examine the inventory object, we will indeed find all the hosts within, and see how the limit is applied every time the object is queried for items.

It is important to remember that regardless of the host's pattern used in a play, or the limit supplied at runtime, Ansible will still parse the entire inventory set during each run. In fact, we can prove this by attempting to access the host variable data for a system that would otherwise be masked by our limit. Let's expand our playbook slightly and attempt to access the ansible_port variable from backend.example.name:

--- 
- name: limit example play 
  hosts: all 
  gather_facts: false 
 
  tasks: 
    - name: tell us which host we are on 
      debug: 
        var: inventory_hostname 
 
    - name: grab variable data from backend 
      debug: 
        var: hostvars['backend.example.name']['ansible_port'] 

We will still apply our limit, which will restrict our operations to just mastery.example.name:

We have successfully accessed the host variable data (by way of group variables) for a system that was otherwise limited out. This is a key skill to understand, as it allows for more advanced scenarios, such as directing a task at a host that is otherwise limited out. Delegation can be used to manipulate a load balancer to put a system into maintenance mode while being upgraded without having to include the load balancer system in your limit mask.