Discovering the basics of Git and GitHub
Git is a version control system created in 2005 by Linus Torvalds to improve code versioning and collaboration. Git is commonly used by software developers for file version control locally. Although there are many ways to use Git—including graphical user interface (GUI) applications—this book will only cover the basic commands as run on a command-line interface (CLI), to help you manipulate files locally and work with repositories hosted on GitHub.
Independently of the operating system that you are currently using, if you are using Git for the first time, you will need to configure it first. The next steps will walk you through this configuration, which only needs to be done once on your machine.
Configuring Git
Git is installed by default on Terminal and Git Bash. If you are not using one of these options to access the command line, ensure the option you are using has Git installed. If it does not, you can download Git by navigating to https://git-scm.com/book/en/v2/Getting-Started-Installing-Git.
One of the many commands in Git is git config, which will allow you to set configuration variables to control how Git operates and how it looks. You can then see these variables in either the ~/.gitconfig file or the ~/.config/git/config file. Although there are many variables that you can customize, this book will only cover the basic ones.
Proceed as follows:
- First, start by setting your name and email address, which Git uses for every commit you create.
Important note
It is highly recommended to use the same email address you used to create your GitHub user account.
- Open Terminal or Git Bash and enter the following commands, replacing your name and email address accordingly. Then, press Enter on your keyboard:
$ git config --global user.name "Priscila Heller"
$ git config --global user.email [email protected]
- Next, configure your default branch name—available for Git versions 2.28 onward—as follows:
$ git config --global init.defaultBranch main
- To verify that all your settings are correct, use the
git config --listcommand. The output will look similar to this:
$ git config --list
[email protected]
user.name=Priscila Heller
core.bare=false
Great! Now that you are done configuring Git, it's time to investigate the main Git commands commonly used in software development.
Basic Git commands
The basic Git commands that will be used throughout this book are listed here:
git initgit statusgit checkout -b <branch-name>git addgit commit -m "your message goes here"git remote addgit pushgit pullgit clone
git init and git status
Imagine that you have a folder on your computer, with many files containing code to create an application. This code was never version-controlled because you had not heard of Git up until now. Git allows you to transform that folder into a Git repository, by simply running git init from within that folder.
In the following example, the name of the folder is soon-to-be-a-github-repo. From within that folder, running git status will show a message explaining that the folder is not a Git repository:
$ git status
fatal: not a git repository (or any of the parent directories): .git
Transforming this folder into a Git repository is as simple as running git init. After running git init, the output of git status is also different, as can be seen here:
$ git init
Initialized empty Git repository in /Users/testesdapri/Desktop/soon-to-be-a-github-repo/.git/
$ git status
On branch main
No commits yet
Untracked files:
  (use "git add <file>..." to include in what will be committed)
            README.md
            index.html
            style.css
nothing added to commit but untracked files present (use "git add" to track)
The preceding output shows that git init transformed the soon-to-be-a-github-repo folder into a Git repository. Note the .git extension in the folder path. Considering that this folder is now a Git repository—also known as a local repository, git status also shows a different output: the status of the working repository. Note how it now shows untracked files, the files within the repository, the working branch, and recommended next commands.
git checkout and git add
The output of the git status command also shows On branch main. In Git, if the repository is a tree, a branch is—as its name suggests—a branch off that tree. Branches are created to allow for changes to be safely added to the code. Generally, those changes will eventually be merged back into the main branch of the repository, which is often called the master or main. It is considered best practice to create branches in order to work on code, and not work directly on the main branch. This will help ensure the safety and stability of your project.
In the next example, a branch will be created to add some changes to the code that lives inside the soon-to-be-a-github-repo repository. To do that, the git checkout -b read-me-feature command will be used. This command will check out from the main branch and create a new branch called read-me-feature, as illustrated in the following code snippet:
$ git checkout -b read-me-feature
Switched to a new branch 'read-me-feature'
Now that a new branch has been created, new lines of code can be added to a file of your choice. As an example, I am adding the line "Look! This repository has a new branch!" to the README.md file, as you can see here:

Figure 1.7 – Adding a line of code to the README.md file
Once those changes are completed, they can be added to staging using the git add . command. The dot (".") is used in this case to add all changed files to staging.
Note that the git add . command did not produce any output. This is expected. To verify that your editions have been added to staging, use git status, as illustrated in the following code snippet:
$ git add .
$
$ git status
On branch read-me-feature
No commits yet
Changes to be committed:
  (use "git rm --cached <file>..." to unstage)
     new file:   README.md
      new file:   index.html
      new file:   style.css
All changes have been added to the index, or staging, which is the area that holds a snapshot of all changes made to the working tree (also known as the working directory, or repository). The next step, as the preceding output suggests, is to commit those changes.
git commit
In Git, the term commit refers to recording changes to the repository. After running git add, this is a suggested next step, which can be accomplished by running git commit -m "short message to describe your change".
The changes to the files within the soon-to-be-a-github-repo repository have already been added to the index. The following output shows what happens once the git commit command is run:
$ git commit -m "Added a few generic lines"
[read-me-feature (root-commit) 53bd7bf] Added a few generic lines
 3 files changed, 17 insertions(+)
 create mode 100644 README.md
 create mode 100644 index.html
 create mode 100644 style.css
Typically, the next step after running git commit is to run git remote add in some cases, and then run git push to push the local changes up to the upstream remote repository, which—in this case—will be hosted on GitHub.
Important note
Before proceeding with the git remote add and git push commands, make sure you have created a repository on GitHub.
A public repository called a-github-repo was created on GitHub. Because this repository was created on a remote host, it is often referred to as the remote repository.
The git remote add command will create a connection between your soon-to-be-a-github-repo local repository and your https://github.com/user/a-github-repo remote repository. This connection will allow you to track changes that are happening on the remote repository, as well as send changes made to your local repository to the remote repository upstream on GitHub.
The git remote add command does not return anything when it is completed successfully. You can use the git remote -v command to list the remotes and confirm that everything worked as expected. Your output should look like this:
$ git remote add origin https://github.com/testesdapri/a-github-repo.git
$ git remote -v
origin    https://github.com/testesdapri/a-github-repo.git (fetch)
origin    https://github.com/testesdapri/a-github-repo.git (push)
Now that both the local repository and the remote repository are connected, you can push your changes to the remote repository. However, observe here the results of running git push:
$ git push
fatal: The current branch read-me-feature has no upstream branch.
To push the current branch and set the remote as upstream, use
    git push --set-upstream origin read-me-feature
Important note
The git push --set-upstream origin <new-branch> command will need to be run every time you create a branch locally that does not have a remote counterpart. If you don't remember this in the future, do not worry. Git will remind you with a message similar to the one shared previously.
To fix this, follow the instructions on the preceding output and run git push --set-upstream origin read-me-feature. This command will push your local changes to the remote repository, as well as create a remote read-me-feature branch in the remote repository. Any subsequent changes made locally to the read-me-feature branch can be pushed to the remote repository by simply running git push origin read-me-feature. The git push --set-upstream origin read-me-feature command is shown in the following snippet:
$ git push --set-upstream origin read-me-feature
Enumerating objects: 5, done.
Counting objects: 100% (5/5), done.
Delta compression using up to 12 threads
Compressing objects: 100% (4/4), done.
Writing objects: 100% (5/5), 564 bytes | 564.00 KiB/s, done.
Total 5 (delta 0), reused 0 (delta 0)
To https://github.com/testesdapri/a-github-repo.git/
 * [new branch]      read-me-feature -> read-me-feature
Branch 'read-me-feature' set up to track remote branch 'read-me-feature' from 'origin'.
Now that your changes have been pushed to GitHub successfully, your remote repository should look similar to this:
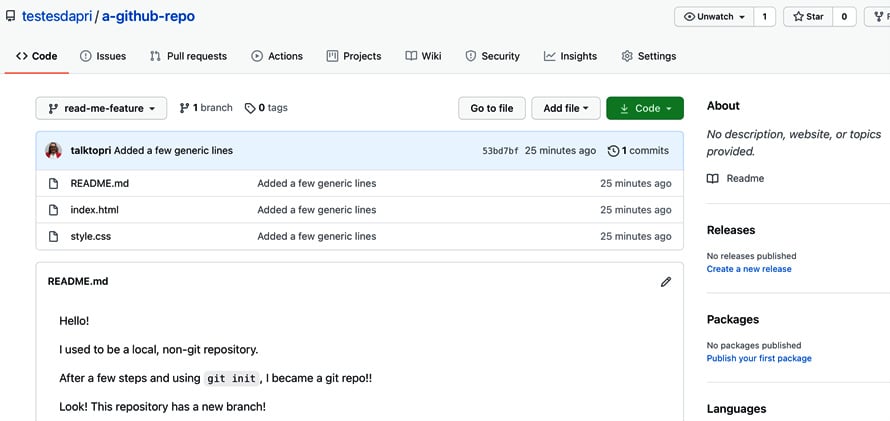
Figure 1.8 – A remote repository on GitHub
You have learned how to push code from your local repository to the remote repository on GitHub. Next, you will learn how to pull code from a remote repository to your local repository.
git pull
If any changes are made directly on the web interface of GitHub, they will not automatically reflect in your local repository. To see those changes reflected on your local repository, you can run the git pull command. This command will incorporate the changes from the remote repository into the local repository.
The following output shows how git branch -a was used to list all the available branches and how git checkout main was used to move from the read-me-feature branch to the main branch. The asterisk (*) next to the branch indicates that it is in use:
$ git pull
From https://github.com/testesdapri/a-github-repo
 * [new branch]      main       -> origin/main
Already up to date.
$ git branch -a
* read-me-feature
  remotes/origin/main
  remotes/origin/read-me-feature
$ git checkout main
Branch 'main' set up to track remote branch 'main' from 'origin'.
Switched to a new branch 'main'
$ git branch -a
* main
  read-me-feature
  remotes/origin/main
  remotes/origin/read-me-feature
git clone
The git clone command is commonly used to clone a repository hosted on GitHub down to your local machine. As an example, consider that you want to contribute to an Open-source project such as the https://github.com/github/docs repository. Although you could use the web interface to add your contributions, it is often preferred to have the code stored locally. To copy the remote repository down to your local machine, navigate to your repository page and click on Code, as illustrated in the following screenshot:
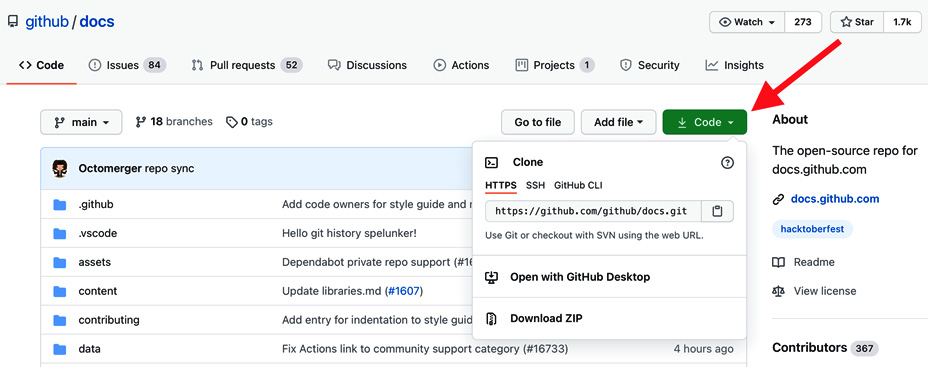
Figure 1.9 – Retrieving the Uniform Resource Locator (URL) to clone a remote repository
Then, copy either the HTTP Secure (HTTPS) link or the SSH link to your clipboard.
Important note
If you copy the HTTPS link, you will need to use your PAT in the next step. If you copy the SSH link, you will need to use your SSH key in the next step.
Next, open your Terminal or Git Bash and navigate to the directory where you want the copy of the remote repository to live. Then, enter the https://github.com/github/docs.git git clone command if you copied the HTTPS link in the last step, or the git clone [email protected]:github/docs.git command if you copied the SSH link. Hit Enter on your keyboard.
You should see an output like this, which confirms that the clone was successful:
# HTTPS clone
$ git clone https://github.com/github/docs.git
Cloning into 'docs'...
remote: Enumerating objects: 68677, done.
remote: Total 68677 (delta 0), reused 0 (delta 0), pack-reused 68677
Receiving objects: 100% (68677/68677), 167.24 MiB | 7.23 MiB/s, done.
Resolving deltas: 100% (46006/46006), done.
Checking out files: 100% (27024/27024), done.
#SSH clone
$ git clone [email protected]:github/docs.git
Cloning into 'docs'...
remote: Enumerating objects: 68677, done.
remote: Total 68677 (delta 0), reused 0 (delta 0), pack-reused 68677
Receiving objects: 100% (68677/68677), 167.24 MiB | 15.41 MiB/s, done.
Resolving deltas: 100% (46006/46006), done.
Checking out files: 100% (27024/27024), done.
Once the clone is complete, you can use the cd github/docs command to work from within the repository directory and start contributing code to this project.
Well done! You have learned the basics of Git. It's now time to read more about the basics of GitHub.
Basics of GitHub
GitHub is a platform globally known and used among software developers who need to host and collaborate on code.
Git repositories are the center of software development, and they are also the center of GitHub. GitHub repositories have their own features, such as issues, pull requests, project boards, and actions. GitHub Actions workflows live within a repository and, many times, will automate activities that happen within that same repository. Therefore, having a firm grasp of the main features of a repository will allow you to confidently implement creative CI/CD workflows.
A GitHub repository is a cloud-based directory where you can host files and folders. To create a repository on GitHub, you will need a user account. Follow the instructions in the Creating a free user account on GitHub section if you haven't already created your account.
To create a repository on GitHub, navigate to https://github.com and sign in using your username and password. Then, click on Create repository, as illustrated in the following screenshot:
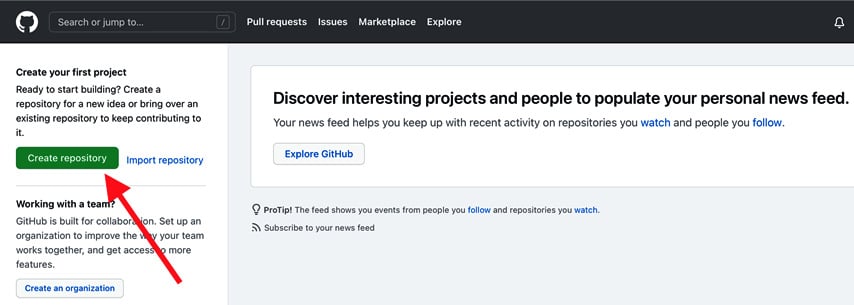
Figure 1.10 – Creating a repository on GitHub
On the next page, choose a repository name and add an optional description for your repository.
Only public repositories will be used throughout this book. Therefore, select the Public option.
Next, check the Add a README file option if you would like to create a README file to your repository.
A README is a file that can be added in order to communicate important information about how to use your repository, how to collaborate, what a project is about, licensing information, and so on. In cases where you have a local repository with a README file that you will later push up to the remote repository, it is best to leave the Add a README file option unchecked. You can also check this option now and edit the README file once the repository is created. In any case, it is considered best practice to add a README file to your project.
Once you are done selecting your preferences, click on Create repository.
In the next section, you will learn more about these tabs in a GitHub repository:
- Issues
- Pull requests
- Settings
The Actions tab will not be covered here, because Chapter 2, Deep Diving into GitHub Actions, will provide in-depth information about GitHub Actions, including the contents of the Actions tab in the repository.
Issues
Issues are created to suggest improvements, report bugs, discuss new ideas, set tasks, or ask questions about the repository and how to contribute to it. It is possible to assign labels, milestones, and assignees to issues, as well as filter issues based on those options.
To create an issue in the a-github-repo repository, navigate to the repository home page at https://github.com/user/a-github-repo/ and click on the Issues tab. Then, click on New issue, as illustrated in the following screenshot:
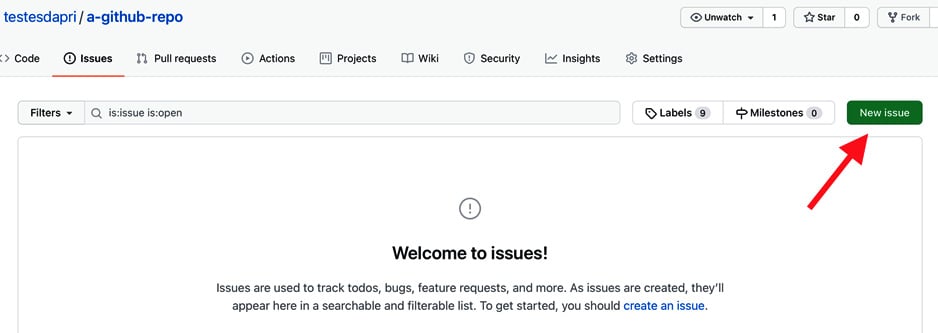
Figure 1.11 – Creating a new issue
On the next page, enter an issue title and a description. The body of the issue accepts Markdown, as the following screenshot shows:
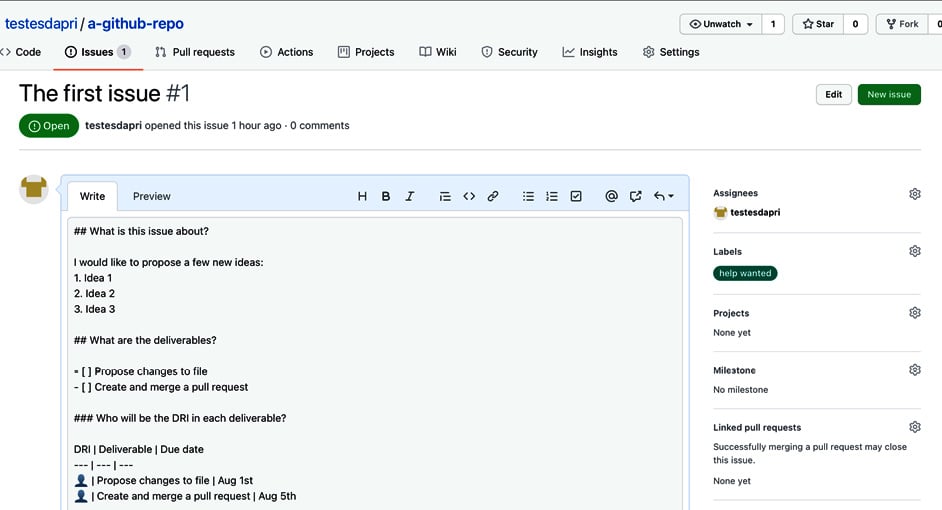
Figure 1.12 – Adding an issue title and description
The following options can be attributed to an issue:
- Assignees: Often used to assign the issues to one or more contributors who will work on the bug report or task.
- Labels: These are usually added to issues and pull requests as a way to categorize them.
- Projects: Project boards organized in columns that help organize pull requests and issues.
- Milestone: This helps track progress on group issues and pull requests.
- Linked pull requests: Issues are commonly created to report bugs. A pull request with a fix can be linked to the issue to show that the fix is being worked on and to automatically close the issue once the pull request is merged.
Add any options you like to the issue and click Submit New Issue.
Very good! You have successfully created an issue. To close an issue, click on the Close issue button at the bottom of the page.
Pull requests
In modern software development cycle practices, pull requests are used to propose changes to files within a repository. On GitHub, a pull request is created when a contributor wants to incorporate their changes into another branch in the same repository or in a parent repository.
To create a pull request, you will first need to add a change to a file that already exists in the repository or propose adding a new file to the repository. For this example, a quick edit will be added to the README file, where the line "This line was added through a pull request > merge process" will be added at the end of the file. Here is what the README file looks like before the edit:
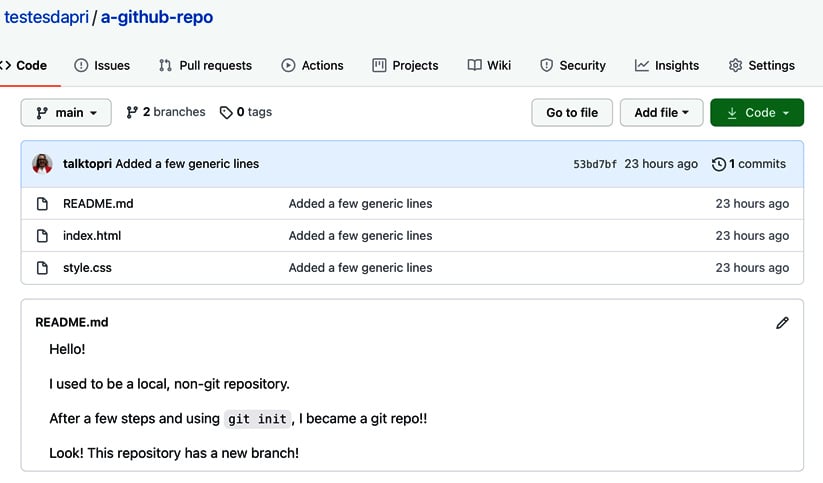
Figure 1.13 – README file before being edited
To edit the README file, navigate to https://github.com/testesdapri/a-github-repo/edit/main/README.md. Then, add "This line was added through a pull request > merge process" to the end of the file.
Then, enter a commit message, select the option to create a new branch (remember: it is advisable not to commit directly to the main branch of the repository in order to keep the code safe and healthy), and click on Propose changes.
Note how the commit message you created in the previous step is now the title of this pull request. To finish creating the pull request, add a description that will help the code reviewer understand what your changes will introduce.
You can link the pull request to an issue by using the fixes #number automation expression, as shown in the next screenshot. number is the number of the issue that the automation will close once the pull request is merged.
Similar to the options you can add to an issue, you can also add assignees, labels, projects, and milestones to a pull request, as well as adding reviewers and link issues.
Once you have finished creating a description and adding labels, or assigning contributors or reviewers, click on Create pull request. This is what the pull request will look like:
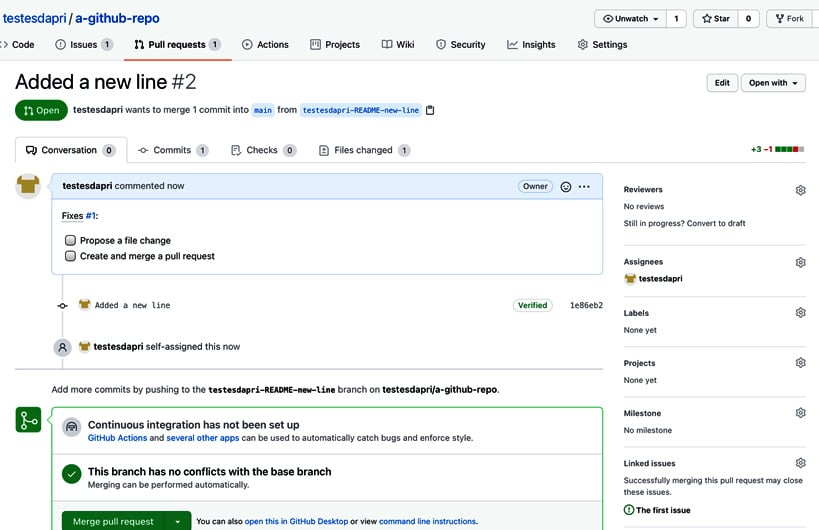
Figure 1.14 – A newly created pull request
Note how the issue you mentioned in the body description for the pull request is now linked under Linked issues.
Typically, the next steps of the software development cycle would include a code review, a feedback loop, and code quality tests. This example assumes that those steps have been completed. Next, it's time to merge these changes into the default branch. To do that, click on Merge pull request.
The result will look like this:
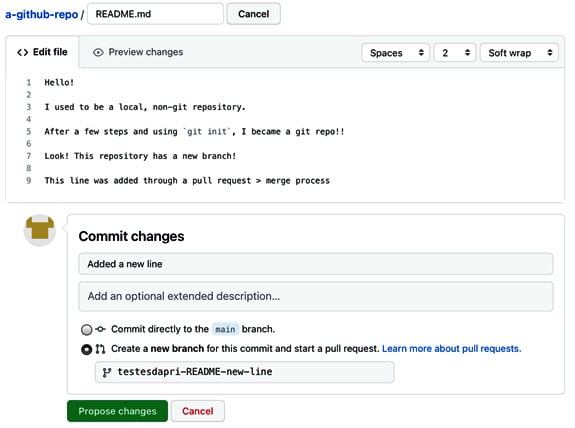
Figure 1.15 – A merged pull request
Now that the pull request has been merged, notice here how the issue linked to the pull request was automatically closed:
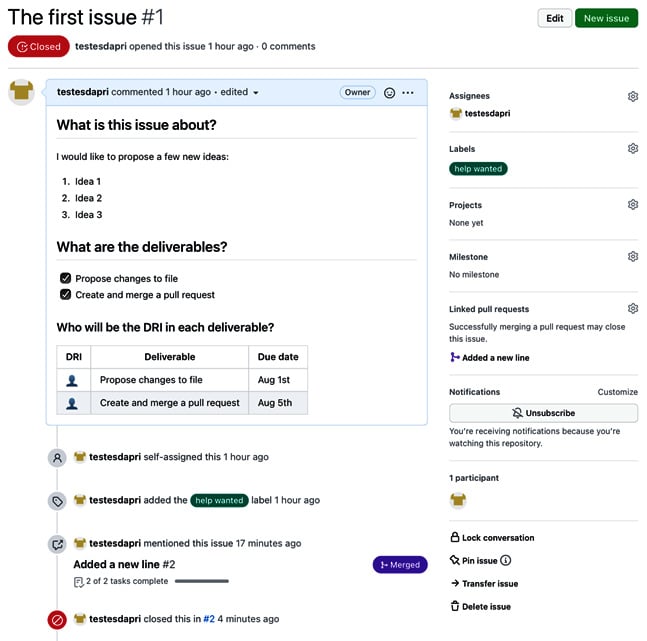
Figure 1.16 – A closed issue
The checkboxes on both the Issues and Pull requests pages were checked manually.
Settings
The Settings tab allows the repository owner to configure most features within a repository.
Although many settings are out of the scope of this book, you will learn more about the ones that are most commonly used in best practices of software development. You will also become familiar with settings needed in the implementation of some GitHub Actions workflows.
To see all the available settings, click on the Settings tab.
This subsection will cover the following settings:
- Manage access
- Branches
- Actions
- Secrets
Branches
This option allows you to perform important tasks, such as defining the default branch for your repository and creating branch protection rules.
As mentioned previously, it is important not to commit directly to the default branch, to keep code safe and healthy. To ensure this is the case, repository owners can create branch protection rules.
To do that, click on Add rule. Then, enter the name of the branch you want to protect. In the following example, the main branch was used:
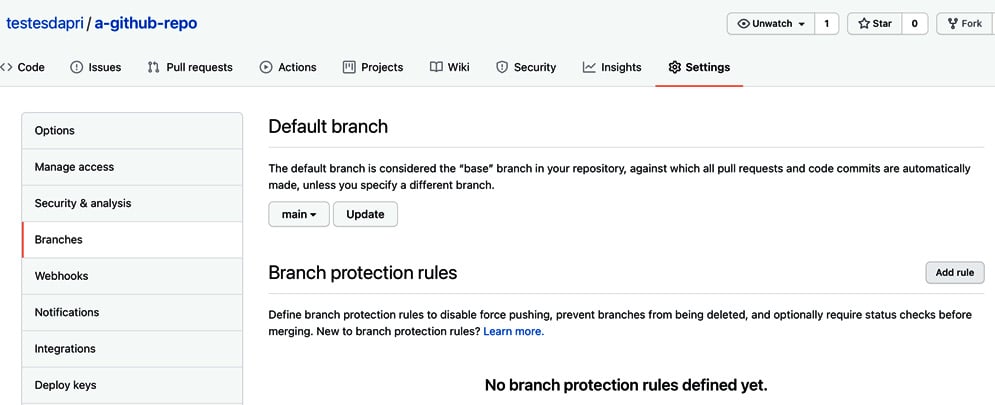
Figure 1.17 – Adding a branch protection rule
Next, check the checkboxes that best apply to your scenario and then click on Create, as illustrated in the following screenshot:
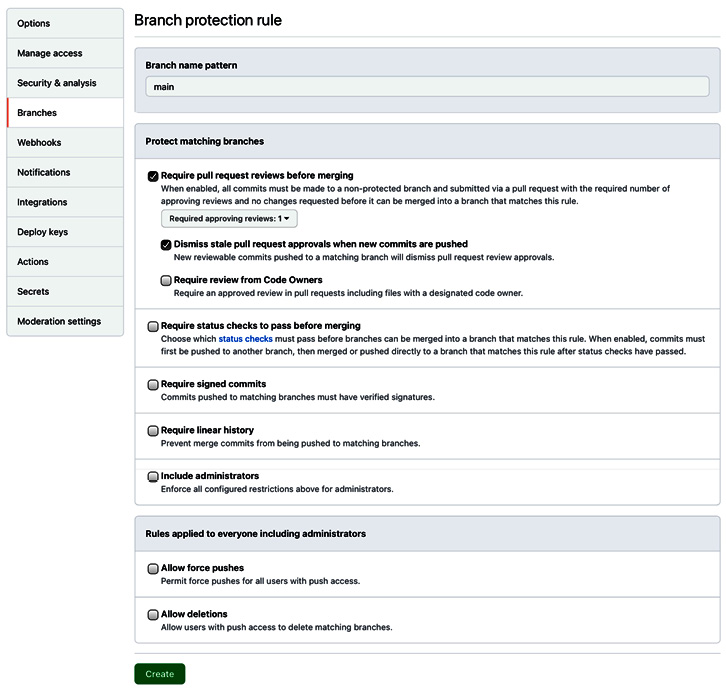
Figure 1.18 – Selecting branch protection rules
From now on, before pull requests are merged into the main branch, at least one review will be needed. As the preceding screenshot shows, this branch protection rule does not apply to repository administrators who can merge code to main freely, although doing that is not recommended.
Actions
These settings allow you to adjust options related to GitHub Actions, and you can set Actions permissions. For example, if you only want to allow the use of actions created by GitHub, you would select the Allow select actions option and then check the Allow actions created by GitHub checkbox, as illustrated in the following screenshot:
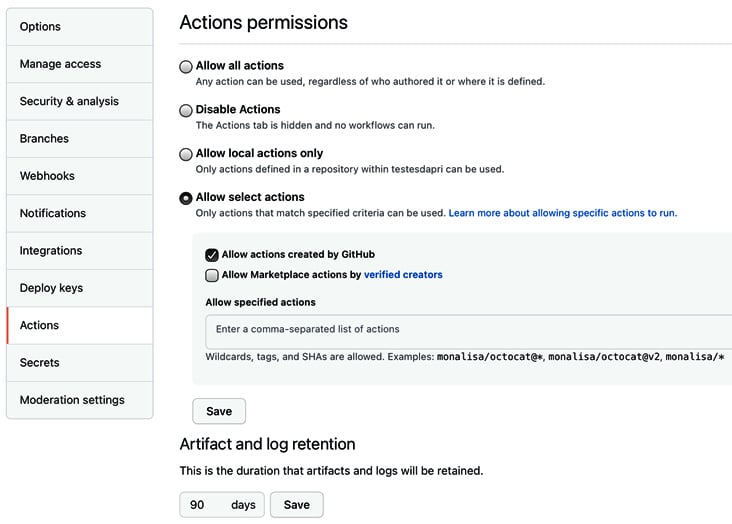
Figure 1.19 – Actions settings
You can also set artifact and log retention, as well as add a self-hosted GitHub Actions runner, which will be covered in more detail in future chapters.
Secrets
Some GitHub Actions workflows will require the use of environment variables. To keep sensitive information safe, you can add it as secrets. This will encrypt that information before passing them to workflows.
Secrets will be covered in more detail in future chapters.
Well done! In the past couple of sections, you have created an issue, added options such as labels and assignees, and closed the issue. You have also proposed changes to a file by using the GitHub web interface to create a new branch, edit a file, commit changes, create a pull request, and merge the pull request. You have also learned how to manage some repository settings.
Next, you will learn the basics of YAML, another foundational piece to review before diving into GitHub Actions.


