
Understanding the /etc/passwd and /etc/shadow files
Now that we know how to create (and delete) user accounts on our server, we are well on our way to being able to manage our users. But where exactly is this information stored? We know that users store their personal files in /home, but is there some kind of database somewhere that keeps track of which user accounts are on our system? Actually, user account information is stored in two special text files:
/etc/passwd/etc/shadow
You can display the contents of each of those two files with the following commands. Note that any user can look at the contents of /etc/passwd, while only root has access to /etc/shadow:
cat /etc/passwd
sudo cat /etc/shadow
Go ahead and take a look at these two files (just don't make any changes), and I will help you understand them.
Using /etc/passwd
First, let's go over the /etc/passwd file. What follows is some example output from this file on my test server. For brevity, I have limited the output to the last eight lines:
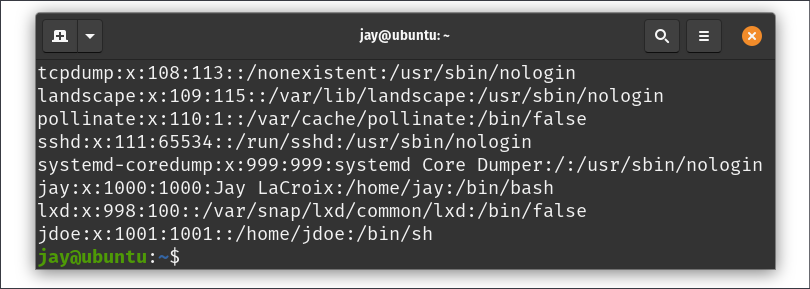
Figure 2.5: Example /etc/passwd file
Each line within this file corresponds to a user account on the system. Entries are split into columns, separated by a colon (:). The username is in the first column, so you can see that I've created users jay and jdoe. The next column on each is simply an x. I'll go over what that means a bit later. For now, let's skip to the third and fourth columns, which reference the UID and GID respectively. On a Linux system, user accounts and groups are actually referenced by their IDs. While it's easier for you and I to manage users by their names, usernames and group names are nothing more than a label placed on the UID and GID in order to help us identify them easier.
For example, it may be frustrating to try to remember that jdoe is UID 1001 on our server each time we want to manage this account. Managing it by referring to the account as jdoe is easier for humans, since we don't remember numbers as well as we do names. But to Linux, each time we reference user jdoe, we're actually just referencing UID 1001. When a user is created, the system (by default) automatically assigns the next available UID to the account. If you manage multiple Ubuntu servers, note that the UIDs will not match from one system to another, so keep in mind that UIDs don't synchronize between installations.
In my case (as shown in Figure 2.5), the UID of each user is the same as their GID. This is just a coincidence on my system and it isn't always that way in practice. While I'll discuss creating groups later in this chapter, understand that creating groups works in a similar way to creating users, in the sense that the group is assigned the next available GID in much the same way as new user accounts are assigned the next available UID. When you create a user, the user's primary group is the same as their username (unless you request otherwise). For example, when I created jdoe, the system also automatically created a jdoe group as well.
This is what you're actually seeing here—the UID for the user, as well as the GID for the user's primary group. Again, we'll get to groups in more detail later.
You probably also noticed that the /etc/passwd file on your system contains entries for many more users than the ones we've created ourselves. This is perfectly normal, as Linux uses user accounts for various processes and services that run in the background. You'll likely never interact with the default accounts at all, though you may someday create your own system user for a process to run as. For example, perhaps you'll create a data processor account for an automated data-processing script to run under.
Anyway, back to our /etc/passwd file. The fifth column is designated for user info, most commonly the user's first and last names. In my example, the fifth field is blank for jdoe, as I created jdoe with the useradd command, which didn't prompt me for the first and last names. This field is also nicknamed the GECOS field, and you may see it referred to as such when you read the documentation.
In the sixth column, the home directory for each user is shown. In the case of jdoe, it's set as /home/jdoe. Finally, we designate the user's shell as /bin/bash. This field refers to the default shell the user will use, which defaults to /bin/bash when an account is created with the adduser command, and /bin/sh when created with the useradd command. (If you have no preference, /bin/bash is the best choice for most.) If we want the user to use a different shell, we can clarify that here (though shells other than /bin/bash are beyond the scope of this book). If we wanted, we could change the user's shell to something invalid to prevent them from logging in at all. This is useful for when a security issue requires us to disable an account quickly.
Using /etc/shadow
With that out of the way, let's take a look at the /etc/shadow file. We can use cat to display the contents like any other text file, but unlike /etc/passwd, we need root privileges in order to view it. So, go ahead and display the contents of this file, and I'll walk you through it:
sudo cat /etc/shadow
This will display the following output:

Figure 2.6: Example /etc/shadow file
The preceding screenshot, Figure 2.6, shows the last three lines of this file on my server. First, we have the username in the first column—no surprises there. Note that the output is not showing the UID for each user in this file. The system knows which username matches to which UID based on the /etc/passwd file, so there's no need to repeat that here. In the second column, we have what appears to be random gobbledygook. Actually, that's the most important part of this entire file. That's the actual hash for the user's password.
Although the concept is beyond the scope of the book, a password hash is a conversion of the actual password to a different string that represents the original password. This is a one-way conversion, so you cannot find the actual password by reverse-engineering the hash. In the /etc/passwd file, the hash of the password is stored rather than the actual password, for security purposes.
If you recall, in the /etc/passwd file, each user listing had an x for the second column, and I mentioned I would explain that later. What the x refers to is the fact that the user's password is encrypted and simply not stored in /etc/passwd. It is instead stored in /etc/shadow. After all, the /etc/passwd file is viewable by everyone, so it would compromise security quite a bit if anyone could just open up the file and see what everyone's password hashes were.
In the days of old, you could actually store a user's password in /etc/passwd, but it's never done that way anymore. Whenever you create a user account on a modern Linux system, the user's password is encrypted (an x is placed in the second column of /etc/passwd for the user), and the actual password hash is stored in the second column of /etc/shadow to keep it away from prying eyes. Hopefully, now the relationship between these two files has become apparent.
Remember earlier I mentioned that the root user account is locked out by default? Well, let's actually see that in action. Execute the following command to see the root user account entry in /etc/shadow:
sudo cat /etc/shadow | grep root
On my system, I get the following output:

Figure 2.7: Example /etc/shadow file
You should notice right away that the root user account doesn't have a password hash at all. Instead, there's an asterisk where the password hash would've been. In practice, placing an asterisk or exclamation point here is one way to lock an account. Even easier, you can use the passwd -l command to lock an account without having to edit a file. But either way, we can still switch to the root account (which I'll show you how to do later on in this chapter). Entering an asterisk or exclamation mark in the second field creates the restriction that we can't directly log in as that user from the shell or over the network. We have to log in to the system as a normal user account first, and then we can still switch to that user if we want to.
With the discussion of password hashes out of the way, there are a few more fields within /etc/shadow entries that we should probably understand. Here's a contrived example line.
mulder:$6$TPxx8Z.:16809:0:99999:7:::
Continuing on with the third column, we can see the number of days since the Unix epoch that the password was last changed. For those that don't know, the Unix epoch is January 1, 1970. Therefore, we can read that column as the password having last been changed 16,809 days after the Unix epoch.
Personally, I like to use the following command to show more easily when the password was last changed:
sudo passwd -S <username>
This will result in an output that looks something like the following:

Figure 2.8: Checking the date of the last password change for a user
By executing this command, you can view information about any account on your system. The first column is obviously the username. The second has to do with the status of the password, which in this case is L, which refers to the fact that the user has a password that is locked. It would show P if the password was set and usable, or NP if the user didn't have a password at all.
The third column of this command's output gives you the actual date of the last password change for the user. The fourth column tells us how many days are required to pass before the user will be able to change their password again. In this example, jdoe can change the password any time because the minimum number of days is set to 0. We'll talk about how to set the minimum number of days later on in this chapter, but I'll give you a brief explanation of what this refers to. At first, it may seem silly to require a user to wait a certain number of days to be able to change their password. However, never underestimate the laziness of your users. It's quite common for a user, when required to change their password, to change their password to satisfy history requirements, only to then just change it back to what it was originally. By setting a minimum number of days, you're forcing a waiting period in between password changes, making it less convenient for your users to cycle back through to their original password.
The fifth column, as you can probably guess, is the maximum number of days that can pass between password changes. If you require your users to change their passwords every certain number of days, you'll see that in this column. By default, this is set to 99999 days. That number of days is way beyond the human lifespan, so it may as well be infinite.
Continuing with the sixth column, we have the number of days that will elapse before the expiration date on which the user is warned that they will soon be required to change their password. In the seventh column, we set how many days can pass after the password expires, in which case the account will be disabled. With our example user, this is not set. Finally, with the eighth column (which is not visible), we can see the number of days since the Unix epoch that will elapse before the account is disabled (in our case, there's nothing here, so there is no disabled day set).
We'll go over setting these fields later, but for now, hopefully you understand the contents of the /etc/shadow file better.
If at any time you'd like additional clarification, feel free to check out the Ubuntu man pages. A man page (short for manual page) can give you quite a bit more information about commands as well as files. For example, the following command shows you the man page for the ls command:
man ls
More specific to this section, you can retrieve man pages for the /etc/shadow files as well:
man passwd
man shadow
Press q on your keyboard to exit out of a man page. Feel free to check out the man pages for any command in this book to learn more as you go along.
Now that we fully understand how to manage our users, we can also look at how to provide them with default files in their home directory.