

Managing groups
Now that we understand how to create, manage, and switch between user accounts, we'll need to understand how to manage groups as well. The concept of groups in Linux is not very different from other platforms and pretty much serves the exact same purpose. With groups, you can more efficiently control a user's access to resources on your server. By assigning a group to a resource (a file, a directory, and so on), you can allow and disallow access to users by simply adding them or removing them from the group.
The way this works in Linux is that every file or directory has both a user and a group that takes ownership of it. This is contrary to platforms such as Windows, which can have multiple groups assigned to a single resource. With Linux, it's just one-to-one ownership: just one user and just one group assigned to each file or directory. If you list the contents of a directory on a Linux system, you can see this for yourself:
ls -l
The following is a sample line of output from a directory on one of my servers:
-rw-r--r-- 1 root bind 490 2020-04-15 22:05 named.conf
In this case, we can see that root owns the file and that the group bind is also assigned to it. Ignore the other fields for now; I'll explain them later when we get to the section of this chapter dedicated to permissions. For now, just keep in mind that one user and one group are assigned to each file or directory.
While each file or directory can only have one group assignment, any user account can be a member of any number of groups. Entering the groups command by itself with no options will tell you what groups your logged-in user is currently a member of. If you add a username to the groups command, you'll see which groups that user is a member of. Go ahead and give the groups command a try with and without providing a username to get the idea.
On the Ubuntu Server platform, you'll likely see that each of your user accounts is a member of a group that's named the same as your username. As I mentioned earlier, when you create a user account, you're also creating a group with the same name as the user. On some Linux distributions, though, a user's primary group will default to a group called users instead. If you were to execute the groups command as a user on the Ubuntu desktop platform, you would likely see additional groups. This is due to the fact that distributions of Linux that cater to being a server platform are often more stripped down and users on desktop platforms need access to more things such as printers, audio cards, and so on. Some packages that can be installed also add additional system users to the server.
If you were curious as to which groups exist on your server, all you would need to do is cat the contents of the /etc/group file. Similar to the /etc/passwd file we covered earlier, the /etc/group file contains information regarding the groups that have been created on your system. Go ahead and take a look at this file on your system:
cat /etc/group
The following is sample output from this file on one of my servers:
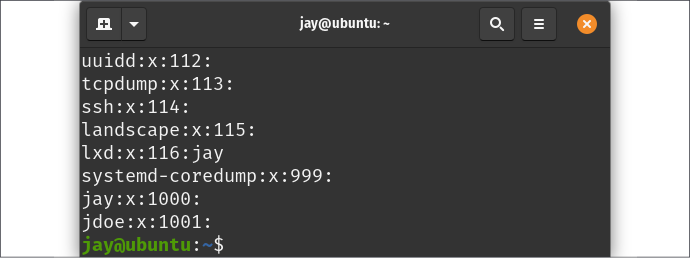
Figure 2.10: Sample output from the /etc/group file
Like before, the columns in this file are separated by colons, though each line is only four columns long. In the first column, we have the name of the group. No surprise there. In the second, we are able to store a password for the group, but this is not used often as it's actually a security risk to do so. In the third column, we have the GID, which is similar in concept to the UID from when we were discussing users. Finally, in the last column, we (would) see a comma-separated list of each user that is a member of each of the groups. In this case, we're seeing that one user, jay, is a member of the lxd group.
Several entries don't show any group memberships at all. Each user is indeed a member of their own group, so this is implied even though it doesn't explicitly call that out in this file. If you take a look at the /etc/passwd entries for your users, you will see that their primary group (shown as the third column in the form of a GID) references a group contained in the /etc/group file.
Creating new groups on your system is easy to do and is a great idea for categorizing your users and what they are able to do. Perhaps you can create an accounting group for your accountants, an admins group for those in your IT department, and a sales group for your salespeople. The groupadd command allows you to create new groups. If you wanted to, you could just edit the /etc/group file and add a new line with your group information manually, although, in my opinion, using groupadd saves you some work and ensures that group entries are created properly. Editing group and user files directly is typically frowned upon (and a typo can cause serious problems). Anyway, what follows is an example of creating a new group with the groupadd command:
sudo groupadd admins
If you take a look at the /etc/group file again after adding a new group, you'll see that a new line was created in the file and a GID was chosen for you (the first one that hadn't been used yet). Removing a group is just as easy. Just issue the groupdel command followed by the name of the group you wish to remove:
sudo groupdel admins
Next, we'll take a look at the usermod command, which will allow you to actually associate users with groups. The usermod command is more or less a Swiss Army knife; there are several things you can do with that command (adding a user to a group is just one of its abilities). If we wanted to add a user to our admins group, we would issue the following command:
sudo usermod -aG admins myuser
In that example, we're supplying the -a option, which means append, and immediately following that we're using -G, which means we would like to modify secondary group membership. I put the two options together with a single dash (-aG), but you could also issue them separately (-a -G) as well. The example I gave only adds the user to additional groups, it doesn't replace their primary group.
Be careful not to miss the -a option here, as you will instead replace all current group memberships with the new one, which is usually not what you want. The -a option means append, or to add the existing list of group memberships for that user.
If you wanted to change a user's primary group, you would use the -g option instead (lowercase g instead of an uppercase G as we used earlier):
sudo usermod -g <group-name> <username>
Feel free to check out the man pages for the usermod command, to see all the nifty things it allows you to do with your users. You can peruse the man page for the usermod command with the following command:
man usermod
One additional example is changing a user's /home directory. Suppose that one of your users has undergone a name change, so you'd like to change their username, as well as moving their previous home directory (and their files) to a new one. The following commands will take care of that:
sudo usermod -d /home/jsmith jdoe -m
sudo usermod -l jsmith jdoe
In that example, we're moving the home directory for jdoe to /home/jdoe, and then in the second example, we're changing the username from jdoe to jsmith.
If you wish to remove a user from a group, you can use the gpasswd command to do so. gpasswd -d will do the trick:
sudo gpasswd -d <username> <grouptoremove>
In fact, gpasswd can also be used in place of usermod to add a user to a group:
sudo gpasswd -a <username> <group>
So, now you know how to manage groups. With the efficient management of groups, you'll be able to manage the resources on your server better. Of course, groups are relatively useless without some explanation of how to manage permissions (otherwise, nothing would actually be enforcing a member of a group to be allowed access to a resource). Later on in this chapter, we'll cover permissions so that you have a complete understanding of how to manage user access.