

Forwarding logs to syslog, SMTP, and other options
In addition to forwarding logs to Panorama, other server profiles can be set up so that logs can be sent to a third-party log management or SIEM via Simple Network Management Protocol (SNMP). All profiles can be created in the Device > Server Profiles menu.
SNMP trap server profile
As shown in the following screenshot, there are two variations of the SNMP trap profile. SNMP protocol version V2c is very simple and requires only a server IP or FQDN, as well as a community string. This is insecure and should not be deployed in an untrusted network and should only be used if the receiving server is legacy. The V3 protocol version uses both an authentication password and a privacy password. SNMP traps and the privacy password are encrypted using AES 128; the authentication password is sent hashed with SHA1-160. Both passwords need to be between 8 and 256 characters in length. engineID is used as an identification number by the SNMP server and must consist of a hexadecimal format, prefixed by 0x and another 10 to 128 characters. If this is left empty, the firewall will use its serial number as the ID:
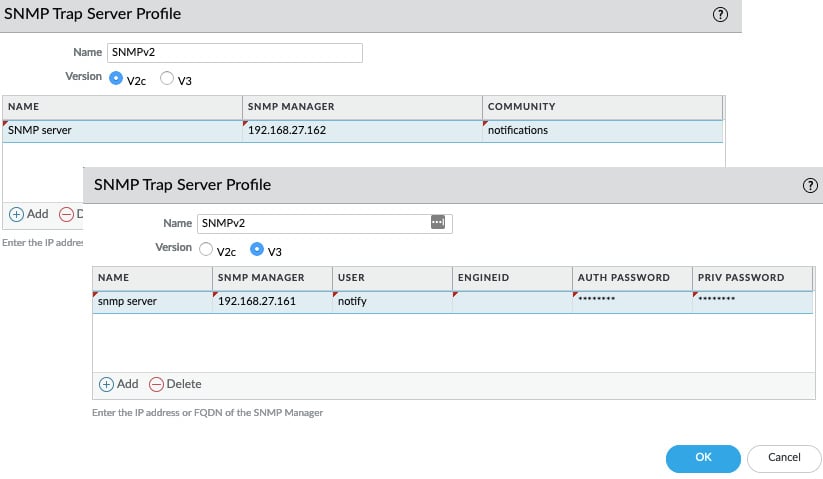
Figure 1.6 – SNMP trap profile
Syslog server profile
As you can see in the following screenshot, for syslog, you can select traditional UDP or TCP connections over port 514 or enable ssl encryption via port 6514. These ports can be changed if needed. The format can be changed to either BSD or RFC5424 IETF, and the facility field can be adjusted to accommodate how the receiving server manages incoming messages:
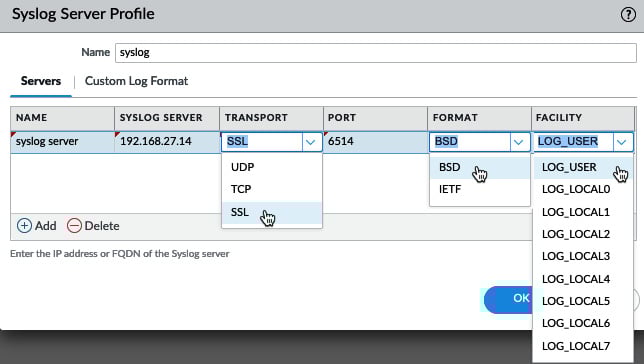
Figure 1.7 – Syslog server settings
An additional feature in the syslog profile is the ability to select the fields to include in forwarded logs for each log database. As shown in the following screenshot, this allows you to choose which fields and in which order they will appear in the forwarded log. This can come in handy if only a limited number of fields are supported, or to weed out unneeded log data. If the syslog server requires some characters to be escaped, you can list them here and define the escape character.
For example, a semicolon (;) may need to be escaped by encapsulating it with single quotes (') for compatibility reasons. Enable escaping and add the required characters, as shown here:
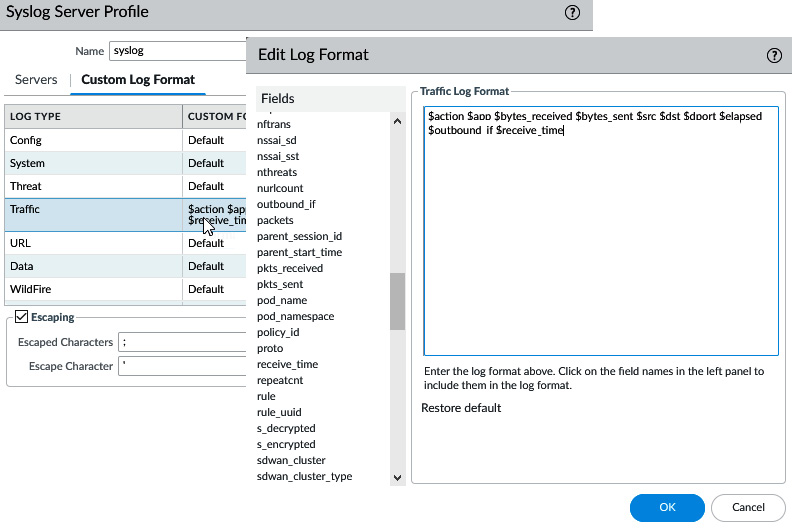
Figure 1.8 – Syslog custom log format
By default, the forwarded syslog message will include the source firewall's FQDN hostname. If the syslog server prefers an IP address or simple hostname, this default value can be changed in Device > Setup > Logging and Reporting Settings > Log Export and Reporting > Syslog HOSTNAME Format.
Email server profile
The Simple Mail Transfer Protocol (SMTP) profile can be configured with a friendly Email Display Name (this display name is injected in the From field in smtp DATA) so that the recipient can easily identify the firewall as the sender, the source email address (so that the relay will accept the sender), and the recipient. Only one email can be added in the To field, so an additional sender field is available to add a second email address. As shown in the following screenshot, since PAN-OS 10.0, the connection can be set to use SMTP over TLS 1.1 or 1.2 for added security. The authentication method can be set to Auto, Login, or Plain: Login with a base64 encoded username and password but send them separately or Plain with a Base64 encoded username and password but send them together. Auto will let the client and server sort out the preferred method of sending the username and password.
Logs can also be customized so that only the relevant fields are forwarded via email:
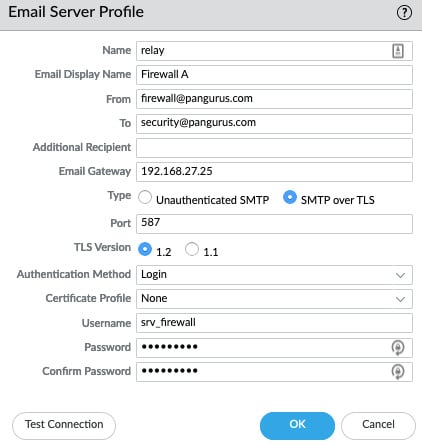
Figure 1.9 – SMTP profile
Important consideration
Emails can be a great notification method for critical events as most people will have immediate access to incoming emails, but over-abundant use of email notifications may lead to alert fatigue and important messages may go ignored or filtered. Use email notifications sparingly and only for the most critical notifications.
HTTP server profile
The HTTP profile can be used in two separate ways; first, you can add server details, choose a HTTP or HTTPS protocol, set the destination port and TLS version. Second, a certificate profile can be added, and a username and password can also be added.
This profile can be used to simply forward logs via HTTP or the payload can be edited to integrate with third-party API- or HTTP-based services. Several pre-defined payloads are available, so, as illustrated in the following screenshot, ServiceNow tickets can be created as the result of a log file being generated:
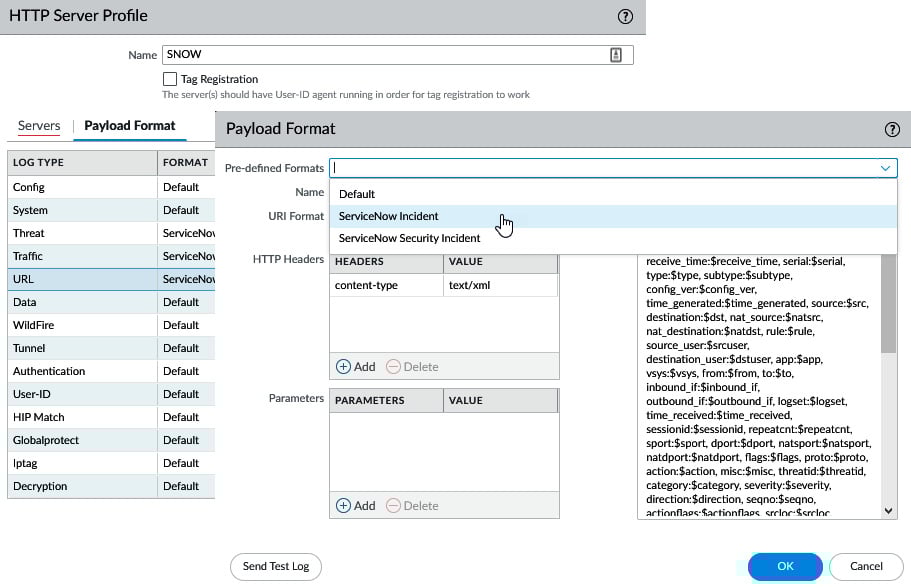
Figure 1.10 – Predefined formatting
As shown in the following screenshot, you can also enable Tag Registration. This changes the profile from regular log forwarding to a dynamic tagging role. This type of profile can be used to send dynamic tag registration or deregistration to a remote User-ID Agent (both a firewall and server installed agent) that has XML enabled. See the Log forwarding profile section later in this chapter for more details:
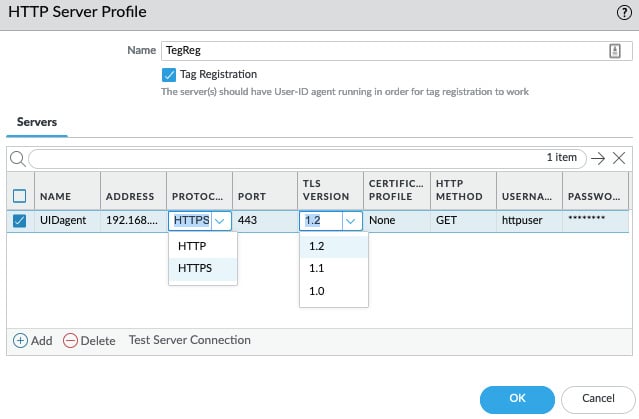
Figure 1.11 – HTTP server profile
For a regular HTTP Server Profile, the GET, PUT, POST, and DELETE methods are available, while for Tag Registration, only GET is supported as a HTTP method currently.
Netflow Profile
The Netflow Profile is the only profile that is assigned directly to an interface, as shown in the following screenshot. Unlike other log forwarding server profiles, no filter can be added to selectively forward certain logs; instead, all session information on an interface is directly streamed to the Netflow server:
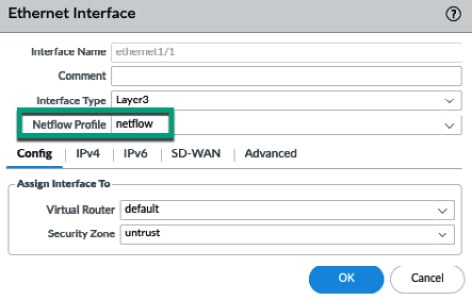
Figure 1.12 – Adding a Netflow profile to an interface
Now that we have reviewed the available log forwarding profiles, we'll learn how to use them to forward logs.
Configuring system log forwarding on the firewall
Logs on the firewall fall roughly into two main categories: system logs and session-based logs. Each is made up of several more specific logs. Log forwarding must be configured for each log type individually. The system logs can be configured via Device > Log Settings. As shown in the following screenshot, the available logs are System, Configuration, User-ID, HIP Match, GlobalProtect, and IP Tag:
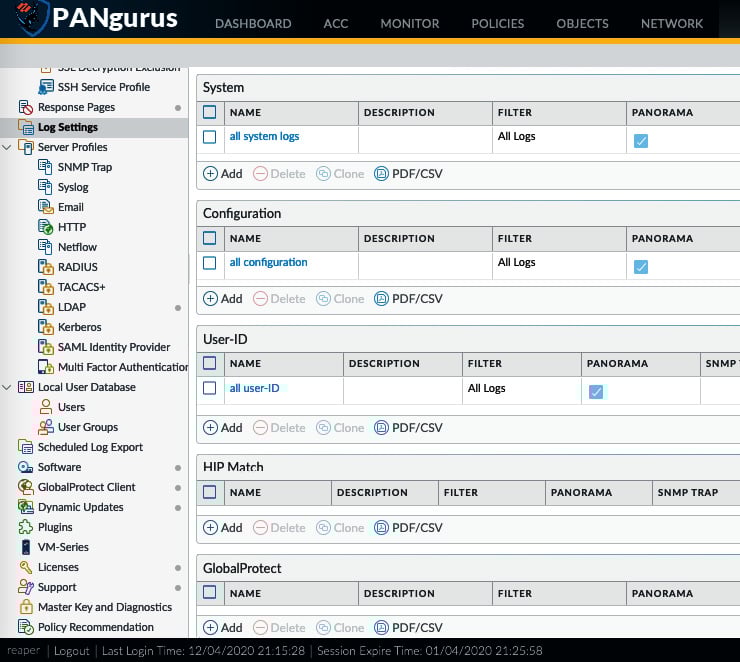
Figure 1.13 – System log forwarding configuration
Each log type can have multiple profiles associated with it, thus allowing filters and filter-specific actions to be applied. All the profiles are applied, so if a profile exists that sends all the logs of a certain type to Panorama, for example, a second profile for the same log type with a filter does not need to have Panorama checked.
In the preceding screenshot, you can see that we have already set up log forwarding for System log, Configuration logs, and User-ID logs to be sent to Panorama. Additional log forwarding Server Profiles can be added in the same profile, or in different profiles with different filters assigned. The following screenshot shows how to add an additional profile with a Filter set to critical events and one or more log forwarding profiles.
When this profile is added to the system logs, both profiles will be applied at the same time for each log. Log forwarding actions will be applied, depending on the filters that have been set in the profiles: the all system logs profile will always forward all logs to Panorama, while critical system events will match both profiles. The syslog server listed in the second profile will also receive the log:
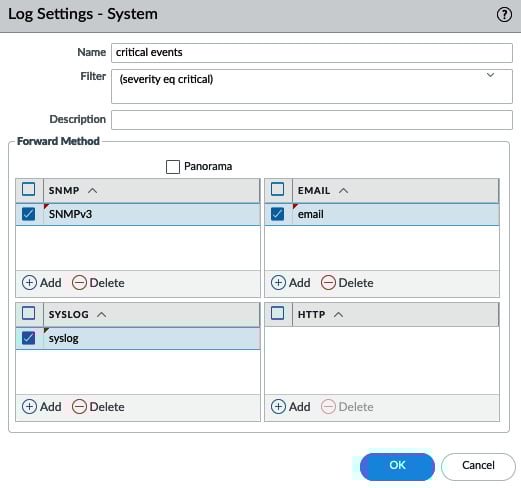
Figure 1.14 – Adding additional server profiles to the System log forwarding profile
To determine a Filter, if any, you can click the little arrow to the right of the Filter field. Severity filters are preloaded and can simply be clicked. Alternatively, you can open the filter builder to review all the available attributes and values that can be added to the filter:

Figure 1.15 – Filter builder
Now that we've seen how to forward system logs, we will take a closer look at how to forward session-based logs.