

Managing passwords and password policies
In this chapter, we’ve already covered a bit of password management, since I’ve given you a few examples of the passwd command. If you recall, the passwd command allows us to change the password of the currently logged-in user. In addition, using passwd as root (and supplying a username) allows us to change the password for any user account on our system. But that’s not all this command can do.
Locking and unlocking user accounts
One thing I’ve neglected to mention regarding the passwd command is the fact that you can use it to lock and unlock a user’s account. There are many reasons why you may want to do this. For instance, if a user is going on vacation or extended leave, perhaps you’d want to lock their account so that it cannot be used while they are away. After all, the fewer active accounts, the smaller your attack surface. To lock an account, use the -l option:
sudo passwd -l <username>
And to unlock it, use the -u option:
sudo passwd -u <username>
However, locking an account will not prevent the user from logging in if they have access to the server via SSH while utilizing public key authentication. In that case, you’d want to remove their ability to use SSH as well. One common way of doing this is to limit SSH access to users who are members of a specific group. When you lock an account, simply remove them from the group. Don’t worry so much about the SSH portion of this discussion if this is new to you. We will discuss securing your SSH server in Chapter 21, Securing Your Server. For now, just keep in mind that you can use passwd to lock or unlock accounts, and if you utilize SSH, you’ll want to lock your users out of that to prevent them from logging in.
However, there’s more to password management than the passwd command, as we can also implement our own policies, such as viewing or adjusting password expiration details.
Setting password expiration information
Earlier, I mentioned that you can set an expiration date on a user’s password (during our discussion on the /etc/shadow file). In this section, we’ll go through how to actually do that. Specifically, the chage command gives us this ability. We can use chage to alter the expiration period of a user’s password, but it’s also a more convenient way of viewing current expiration information than viewing the /etc/shadow file. With the -l option of chage, along with providing a username, we can see the relevant info:
sudo chage -l <username>
Using sudo or root is not required to run chage. You’re able to view expiration information for your own username without needing to escalate permissions. However, if you want to view information via chage for any user account other than your own, you will need to use sudo.
In the example that follows, we can see the output of this command from a sample user account:
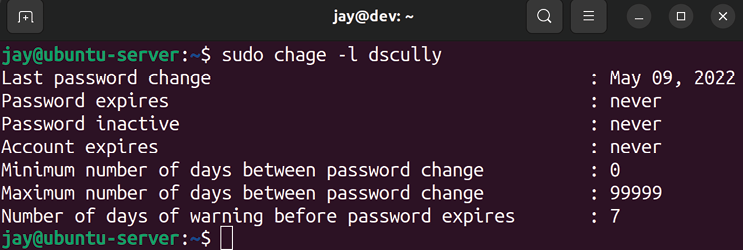
Figure 2.11: Output from the chage command
In the output, we can see values for the date of expiration, the maximum number of days between password changes, and so on. Basically, it’s the same information stored in /etc/shadow but it’s much easier to read.
If you would like to change this information, chage will again be the tool of choice. The first example I’ll provide is a very common one. When creating user accounts, you’ll certainly want them to change their password when they first log in.
Unfortunately, not everyone will be keen on doing so. The chage command allows you to force a password change for a user when they first log in. Basically, you can set their number of days to expiry to 0 as follows:
sudo chage -d 0 <username>
You can see the results of this command immediately if you run chage -l again against the user account you just modified:
sudo chage -l <username>
The output will display information regarding the password change:
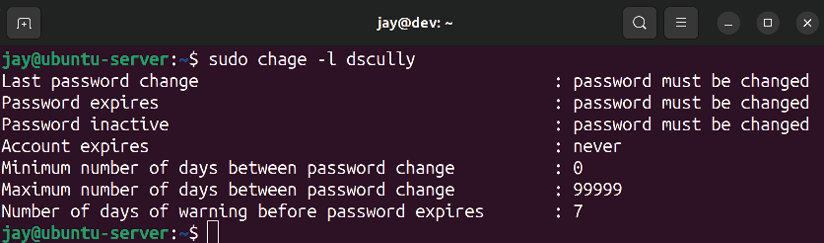
Figure 2.12: The chage command listing a user that has a required password change period set
To set a user account to require a password change after a certain period of days, the following will do the trick:
sudo chage -M 90 <username>
In that example, I’m setting the user account to expire and require a password change in 90 days. When the impending date reaches 7 days before the password is to be changed, the user will see a warning message when they log in.
As I mentioned earlier, users will often do whatever they can to cheat password requirements and may try to change their password back to what it was originally after satisfying the initially required password change. You can set the minimum number of days with the -m flag, as you can see in the next example where we set it to 5 days:
sudo chage -m 5 dscully
The trick with setting a minimum password age is to set it so that it will be inconvenient for the user to change their password to the original one, but you still want a user to be able to change their password when they feel the need to (so don’t set it too long, either). If a user wants to change their password before the minimum number of days elapses (for example, if your user feels that their account may have been compromised), they can always have you change it for them. However, if you make your password requirements too much of an inconvenience for your users, it can also work against you.
Setting a password policy
Next, we should discuss setting a password policy. After all, forcing your users to change their passwords does little good if they change it to something simple, such as abc123. A password policy allows you to force requirements on your users for things such as length, complexity, and so on.
To facilitate this, we have Pluggable Authentication Module (PAM) at our disposal. PAM gives us additional functionality and control over the process of authentication, and also provides additional plugins we can use to extend authentication and add additional features. Although a full walkthrough of PAM isn’t covered in this book, I recommend keeping it fresh in your mind in case you want to add additional features later.
Specific to the subject of setting up a password policy, we can install a PAM module to enable this, which involves installing a new package:
sudo apt install libpam-cracklib
Next, let’s take a look at the following file, which is provided with Ubuntu. Feel free to open it with a text editor, such as nano, as we’ll need to edit it:
sudo nano /etc/pam.d/common-password
An extremely important tip while modifying configuration files related to authentication (such as password requirements, sudo access, SSH, and so on) is to always keep a root shell open at all times while you make changes, and in another shell, test those changes. Do not log out of your initial root window until you are 100% certain that your changes have been thoroughly tested. While testing a policy, make sure that not only can your users log in, but your admins too. Otherwise, you may remove your ability to log in to a server and make changes.
To enable a history requirement for your passwords (meaning the system remembers the last several passwords a user has used, preventing them from reusing them), we can add the following line to the file:
password required pam_pwhistory.so remember=99 use_authok
In the example config line, I’m using remember=99, which (as you can probably guess) will cause our system to remember the last 99 passwords for each user and prevent them from using those passwords again. If you’ve configured a minimum password age earlier, for example, 5 days, it would take the user 495 days to cycle back to their original password if you take into account that the user changes their password once every 5 days, 99 times. That pretty much makes it impossible for the user to utilize their old passwords.
Another field worth mentioning within the /etc/pam.d/common-password file is the section that reads difok=3. This configuration mandates that at least three characters have to be different before the password is considered acceptable. Otherwise, the password would be deemed too similar to the old one and refused. You can change this value to whatever you like; the default is normally 5 but Ubuntu defaults it to 3 in their implementation of this config file. In addition, you’ll also see obscure mentioned in the file as well, which prevents simple passwords from being used (such as common dictionary words and so on).
Setting a password policy is a great practice to increase the security of your server. However, it’s also important to not get carried away. In order to strike a balance between security and user frustration, the challenge is always to create enough restrictions to increase your security, while trying to minimize the frustration of your users. Of course, the mere mention of the word “password” to a typical user is enough to frustrate them, so you can’t please everyone. But in terms of overall system security, I’m sure your users will appreciate the fact that they can be reasonably sure that you as an administrator have taken the necessary precautions to keep their (and your company’s) data safe. When it comes down to it, use your best judgment.
Since we’re on the subject of security, we should also take a look at configuring sudo itself, which we’ll take care of in the next section.