

Hardening the management interface
It is paramount that the management interface is kept secure and access is limited to only those administrators that need access. It is recommended to place the physical management interface in an Out-of-Band (OoB) network, which limits exposure to the broader network. If access to the management server is needed from a different network, it is best to set up a dual-homes bastion host that mediates the connection, either by only allowing admins to log into it and use services from there, or having it set as a (transparent) proxy with a log of all sessions and limiting the source users and IP subnets as much as possible. Admin accounts also need to be set so they only have access to the sections of the configuration they need to access and use external authentication.
Limiting access via an access list
The management interface local access list can be edited by navigating to Device | Setup | Interfaces and clicking on the Management Interface:
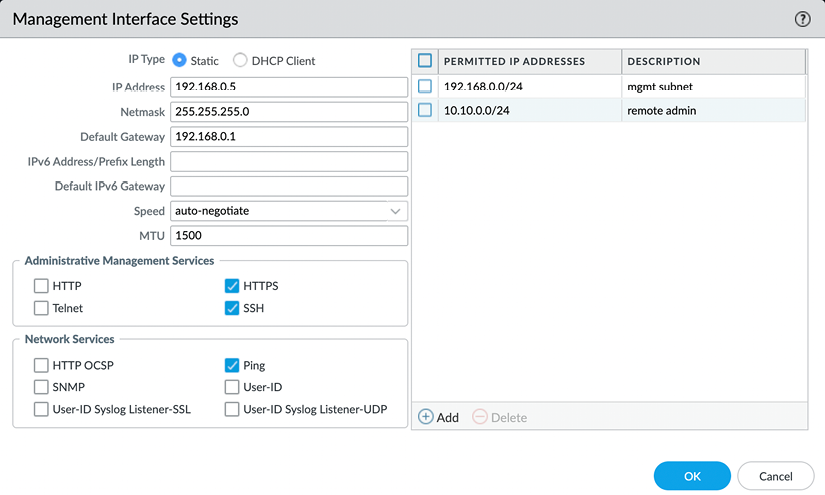
Figure 2.25: Management interface access list
The associated CLI configure mode command is as follows:
admin@PA-220>configure
admin@PA-220#set deviceconfig system permitted-ip 192.168.27.0/24 description "management net"
You can also attach an interface management profile (shown in the following screenshot) to an interface, which enables the selected services (SSH and HTTPS, usually) on the IP address of the assigned data plane interface. This is not recommended as it introduces significant risk if not implemented properly:
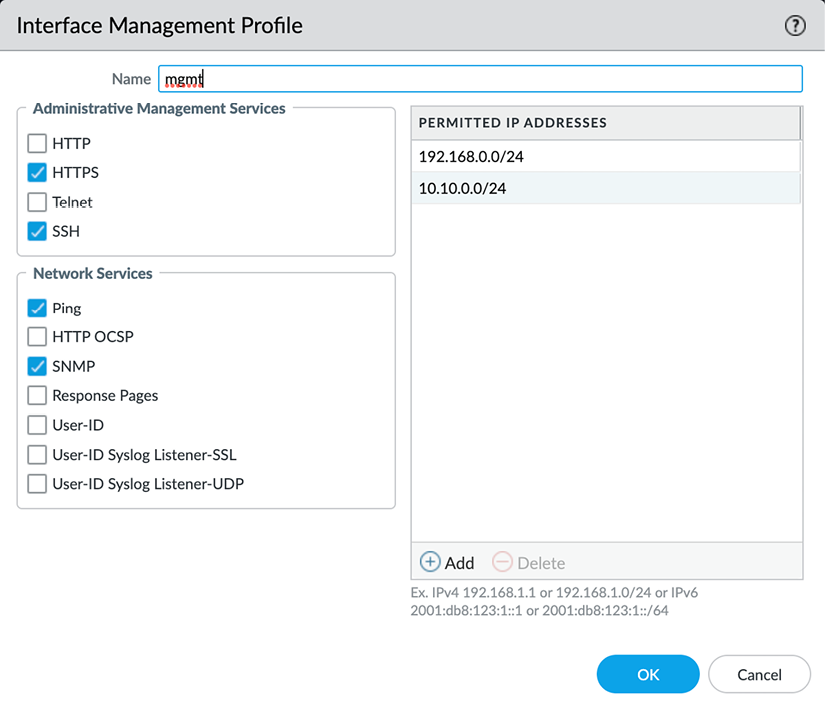
Figure 2.26: Interface Management Profile
If you must enable this profile, make sure it is on a sufficiently shielded interface, preferably a loopback interface, that has security policies associated with gaining access to the management services. As a secondary measure, also enable an access list on the profile.
These profiles can be configured in Network | Network Profiles | Interface Management Profile and then attached to an interface in Network | Interfaces under the Advanced tab of the selected interface:
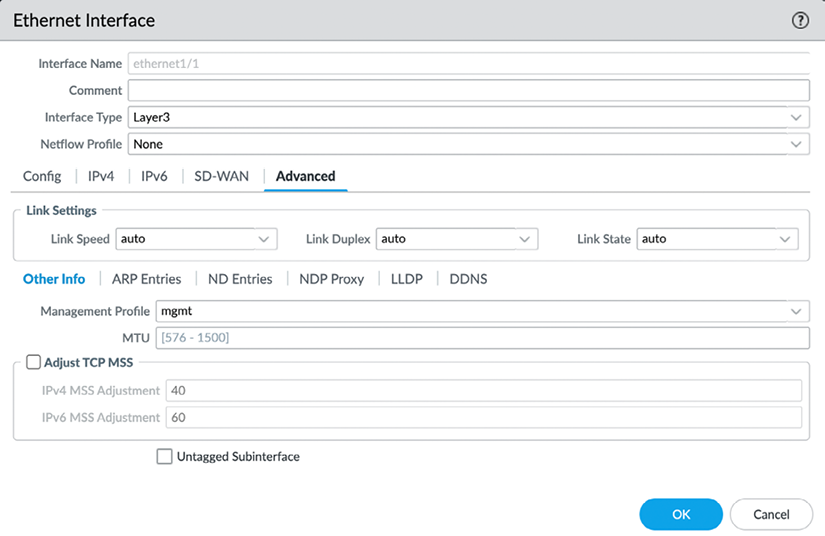
Figure 2.27: An interface management profile attached to an interface
The CLI command to create an interface management profile, set its services to HTTPS and SSH, and add an ACL is as follows:
# set network profiles interface-management-profile mgmt https yes ssh yes permitted-ip 10.15.15.37
The subsequent ACL items can be set via the following command:
# set network profiles interface-management-profile mgmt permitted-ip 192.168.0.5
Now that access to the management interface has been set, let’s look at access from the management interface.
Accessing internet resources from offline management
If the management interface does not have access to the internet, this can create interesting challenges as it will not be able to retrieve updates or perform cloud lookups. A workaround is to enable service routes that route specific applications, services, or protocols via the backplane onto a designated data plane interface, allowing the management plane to reach out to the internet while its physical interface does not have access outside of its management LAN.
Service routes can be configured from the Device | Setup | Services menu, where you can click on Service Route Configuration to get the following dialog:
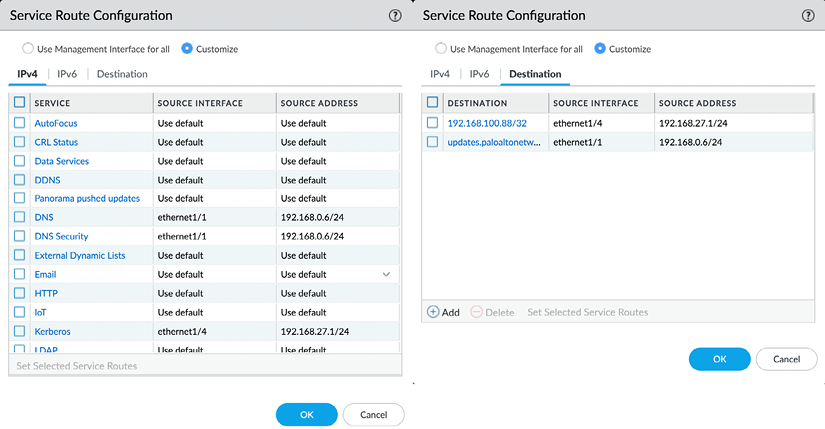
Figure 2.28: Service Route Configuration
Once you set the radio button from Use Management Interface for all to Customize, you will be able to select which source interface will be used for each service. From the Destination tab, you can also add specific IP addresses or entire subnets that need to be routed out of a specific interface. The routing table used by the target interface will be used to determine how the session is routed to the destination.
The associated CLI configuration command to set a service route is as follows:
#set deviceconfig system route service dns source interface ethernet1/8
If you want to see a full list of all the available services, hit the Tab key after typing service:
#set deviceconfig system route service <Tab>
  autofocus                    AutoFocus Cloud
  crl-status                   CRL servers
  ddns                         DDNS server(s)
  ...
This will enable access to resources that are normally not accessible through the management network. In the next section, we’ll prepare administrator accounts and provide access as needed.
Admin accounts
The “admin” account is probably one of the most abused accounts in internet history, so your next task is to get rid of it and replace it with named accounts. Instead of the default “admin” account, it is best to use named accounts so changes can be tracked by the user and personalized access can be granted easily.
When creating new administrator accounts there are two types of accounts available, dynamic and role-based, which you can select by setting the Administrator Type toggle:
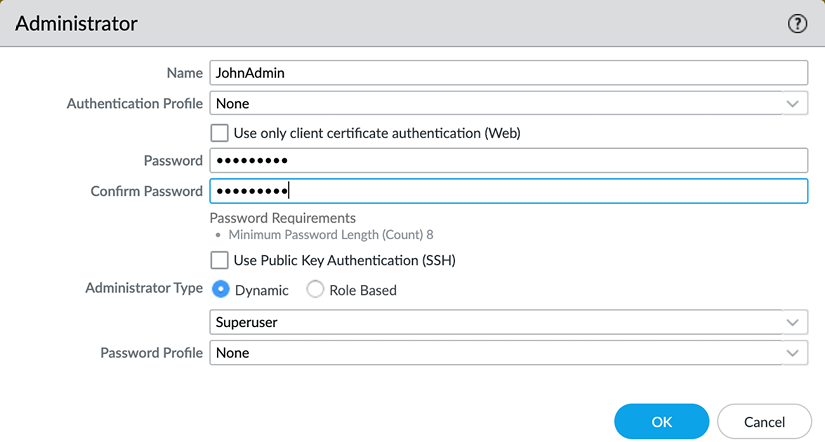
Figure 2.29: Creating a new admin account
First we’ll take a look at dynamic account profiles and their benefits.
Dynamic accounts
Dynamic accounts are comprised of superusers, who can do everything, and device administrators, who can do everything besides create new users or virtual systems. Virtual system-capable devices also have virtual system administrators, who are also device administrators and are restricted to one or several specific virtual systems. There are also read-only flavors of both that can view everything but not make changes.
Your first account will need to be a new superuser to replace the default admin account.
Role-based administrators
Once all the required superusers and device administrators are created, additional role-based administrators can be added for teams that only require limited functionality.
Role-based administrators can be customized down to individual menu items so that they can do anything or have read-only or no access.
The roles can be configured through the Device | Admin Roles menu:

Figure 2.30: Admin Role Profile
Set each topic to one of the following options by clicking the icon to cycle to the option you need:
- A red cross indicates that these administrators will not see the menu item
- A lock indicates that the admin will be able to see objects or menu items, but not make any changes
- A green checkmark indicates that the admin has full access to this menu item and can make changes to objects or configurations within it
In the XML API/REST API tabs, each role can be granted or denied access to certain API calls:
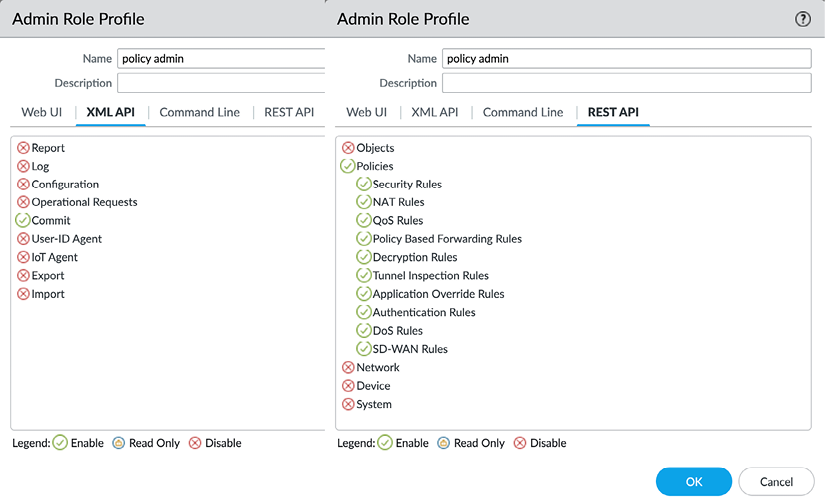
Figure 2.31: XML API/REST API
In the Command Line tab, each role can be granted a certain level of access or denied access altogether:

Figure 2.32: The Command Line permissions
Now that we can set up administrator accounts, we should also create a password security profile to prevent weak password discipline.
Password security
You will need to add a password profile by going to Device | Password Profiles to ensure that the password is changed on a regular basis:
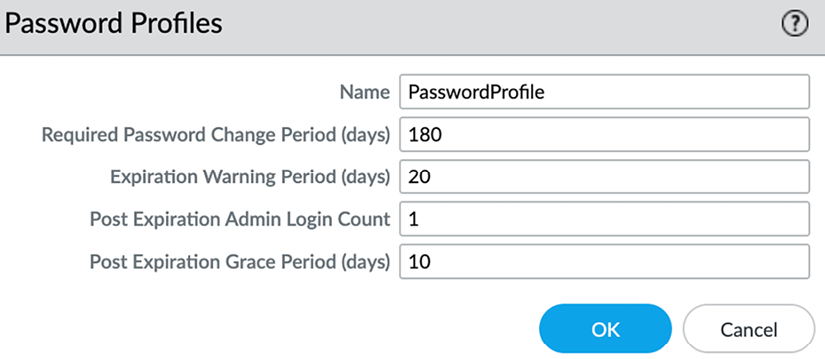
Figure 2.33: Password Profiles
These are the configurable settings in the Password Profile:
- The change period indicates how long a password is valid
- The expiration warning pops up a warning when an admin logs on if their password is about to expire
- The post-expiration login feature allows the admin to log on a certain number of times, even after their password has expired
- The post-expiration grace period indicates how long an admin will be able to log on after their account has expired before it is locked permanently and will require intervention from a different admin
Additionally, you should enforce a minimum password complexity for local accounts to ensure no weak passwords are used by administrators via Device | Setup | Management | Minimum Password Complexity:
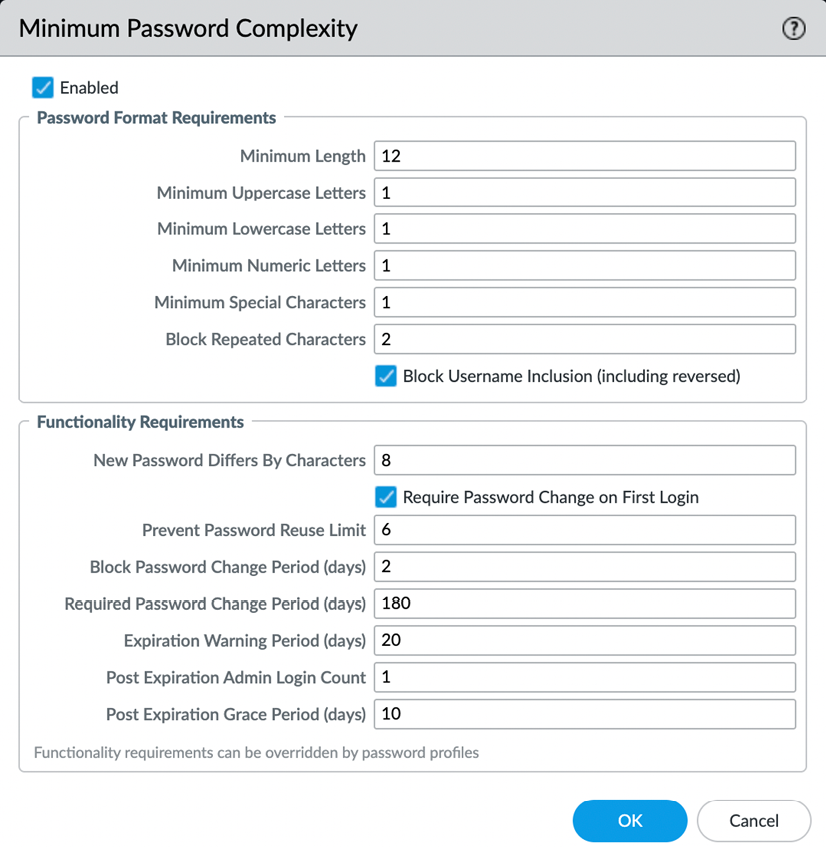
Figure 2.34: Minimum Password Complexity
NIST has an extensive guideline on authentication and life cycle management that can be found at https://pages.nist.gov/800-63-3/sp800-63b.html.
Let’s now look at the external authentication factors.
External authentication
It is best to use external authentication factors, such as Kerberos, LDAP, RADIUS, or SAML, to keep control over credentials in a centralized system, which enables admins to only change passwords once for multiple devices or to be locked out of all critical infrastructure at once if they leave the organization.
It is a good safeguard to keep one “break-glass” local account in case the management interface loses all access to the external authentication servers. This account should only be used in case of emergency and an alert should be sent when the account is used to log on. See Chapter 9, Logging and Reporting, on how to set up a profile that can send out an alert if the account is used.
You first need to create a server profile from the Device | Server Profiles menu. Each server type has its own configuration parameters. The following profiles are available:
- TACACS+ (Terminal Access Control Access Control System Plus) is an authentication protocol developed by Cisco that is still used in many environments for terminal access authentication.
- LDAP (Lightweight Directory Access Protocol) is probably one of the most commonly available protocols to authenticate against directory services and will work with Microsoft Active Directory, eDirectory, and custom LDAP servers.
- RADIUS (Remote Authentication Dial-In User Service) is an open standard authentication protocol that is widely used in remote access authentication.
- Kerberos is an authentication protocol that is mostly used for single sign-on and relies on a negotiation that does not require the exchange of passwords.
- SAML (Security Assertion Markup Language) uses an XML framework to exchange security information and is mostly used with cloud-based Identity Providers (IdPs). It integrates with Multi-Factor Authentication (MFA) very easily.
- Multi-factor profiles allow for several built-in MFA providers to be configured and added separately to an authentication profile.
Let’s take a look at each profile and how to set their basic configuration.
The TACACS+ server profile
TACACS+ requires you to choose between Password Authentication Protocol (PAP) and Challenge-Handshake Authentication Protocol (CHAP) and set the secret associated with connecting to the TACACS+ authentication server.
Optionally, you can set the profile so that it can only be used for administrator authentication, and set the profile to use a single session for all authentication events, rather than a new session per authentication event:
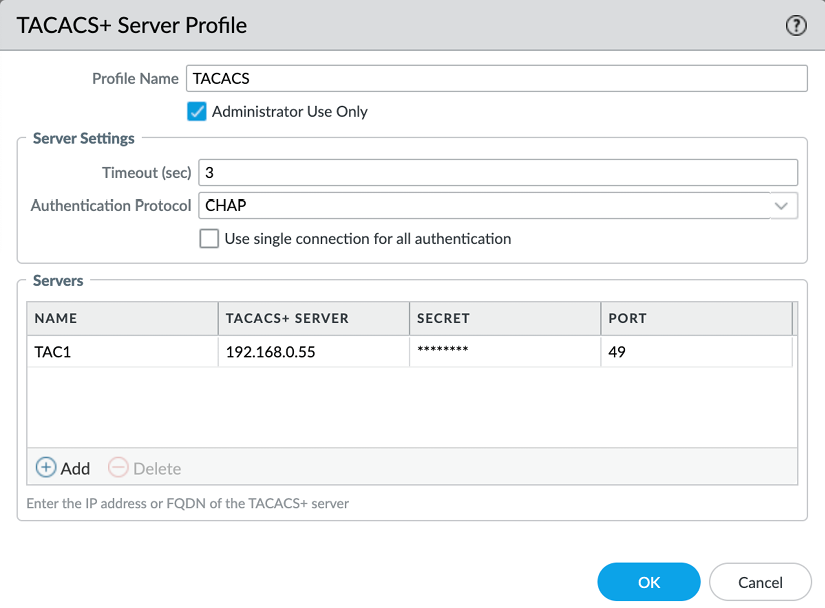
Figure 2.35: TACACS+ Server Profile
While TACACS+ is somewhat rare, LDAP authentication is very common.
The LDAP server profile
For an LDAP profile, you need to provide the type of the LDAP server, which can be active-directory, E-directory, sun, or other.
One thing to remember is that when you configure the server IPs and you have Require SSL/TLS secured connection enabled, the default port for LDAPS is 636, rather than 389.
You need to provide a Base DN value, which is the domain name (or the distinguished name) of the LDAP tree. The Bind DN field is for the user account that will be used to connect to the LDAP server and perform the request and its password. Bind DN can be fully qualified, as shown in the following screenshot, or be a User Principal Name (UPN) formatted as user@domain:
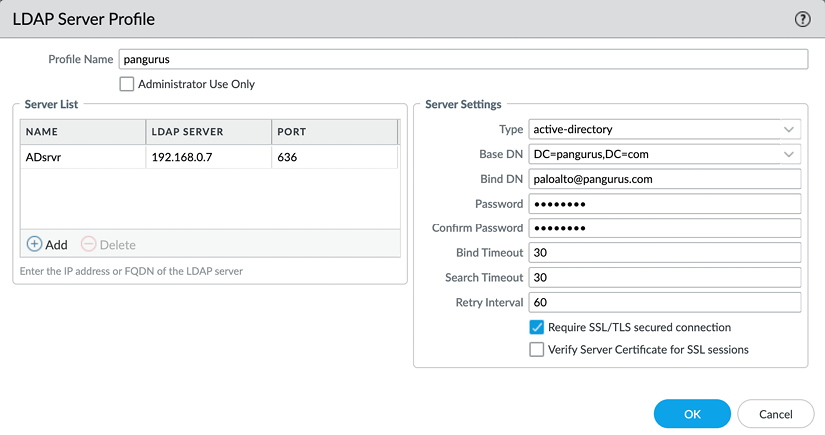
Figure 2.36: LDAP Server Profile
If your LDAP server has an externally signed certificate, enable Verify Server Certificate for SSL sessions to ensure the authenticity of your server. For the certificate check to work, the LDAP server root and intermediary certificates need to be in the device certificate store in Device | Certificate Management | Certificates | Device Certificates. The server name in the profile must match the Fully Qualified Domain Name (FQDN) certificate and Subject AltName attribute for this check to pass.
The RADIUS server profile
RADIUS is one of the most popular authentication methods and supports the following authentication protocols:
- PEAP-MSCHAPv2: Protected Extensible Authentication Protocol (PEAP) with Microsoft CHAP v2 provides improved security over PAP or CHAP by transmitting both the username and password in an encrypted tunnel.
- PEAP with Generic Token Card (GTC): PEAP with GTC enables the use of one-time tokens in an encrypted tunnel.
- EAP-TTLS with PAP: EAP with Tunneled Transport Layer Security (TTLS) and PAP is used to transport plain text credentials for PAP in an encrypted tunnel. EAP-TTLS uses certificates to secure the connection and should be the preferred protocol as it is the most secure.
- CHAP: Used if the RADIUS server does not support EAP or PAP or is not configured for it.
- PAP: Used if the RADIUS server does not support EAP or CHAP or is not configured for it.
Palo Alto Networks uses vendor code 25461.
Like the other profiles, RADIUS can be set so that it is only used for administrator authentication. The Allow users to change passwords after expiry option is limited to GlobalProtect users if the profile is also used to authenticate GlobalProtect inbound connections.
The Make Outer Identity Anonymous option ensures the admin username is not visible for anyone sniffing the authentication sessions if PEAP-MSCHAPv2, PEAP with GTC, or EAP-TTLS are used and the server supports this:
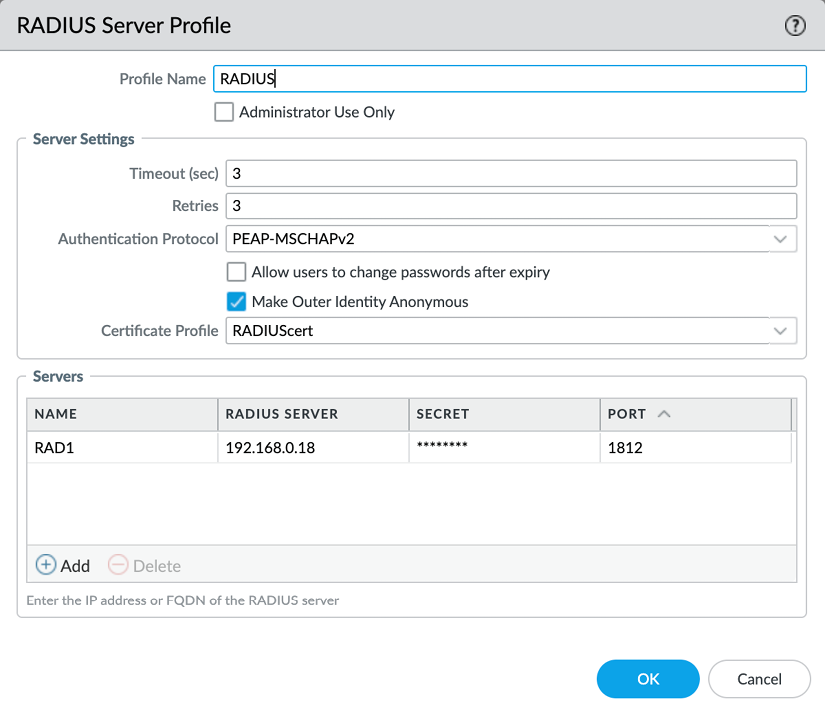
Figure 2.37: RADIUS Server Profile
The certificate verification for RADIUS server profiles requires a certificate profile that allows more checks to be performed than just having the root certificate in the trusted certificate store compared to TACACS+. Several mechanisms can be used to verify server validity and actions can be taken if particular conditions are met with the certificate check, such as opting to allow or block a session if the certificate is valid but has expired:
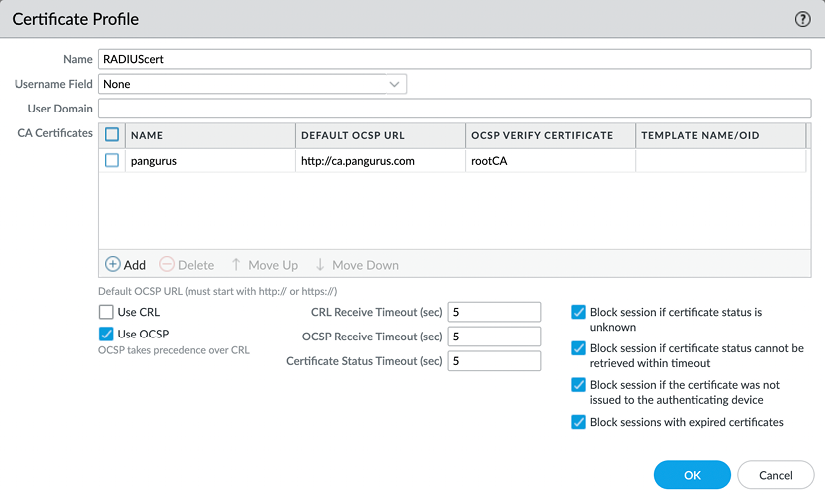
Figure 2.38: Certificate Profile
Next, we will have a look at the Kerberos server profile.
The Kerberos server profile
The Kerberos server profile is very simple to configure as it only requires an IP or FQDN and a port number, but it does require a few specific configuration settings:
- The firewall needs to have the domain set from Device | Setup | Management | General Settings
- The firewall is synced to an NTP server from Device | Setup | Services so that its clock is in sync with the local
ActiveDirectoryserver - Its DNS servers need to be set to internal DNS servers that are joined to the domain, rather than external DNS servers
With single sign-on adoption on the rise and many authentication services making a move to the cloud, the popularity of SAML authentication is also increasing.
The SAML server profile
The SAML profile enables authentication against an external Single Sign-On (SSO) provider (such as PingID and Okta).
Your Identity Provider (IdP) should provide you with the following:
- An identifier so that it can certify whether the authentication session originates from you
- The root and intermediary certificates, which you can load to Device | Certificate Management | Device Certificates to verify the identity of the SSO and Single Log-Out (SLO) sites
- An SSO URL
- An SLO URL
SAML HTTP binding provides an option to post, which sends a Base64-encoded HTML form to the IdP, or redirect, in which case the firewall will send Base64-encoded and URL-encoded SSO messages within the URL parameters.
You can sign SAML messages to the IdP with Certificate for Signing Requests, which can be configured in the authentication profile:
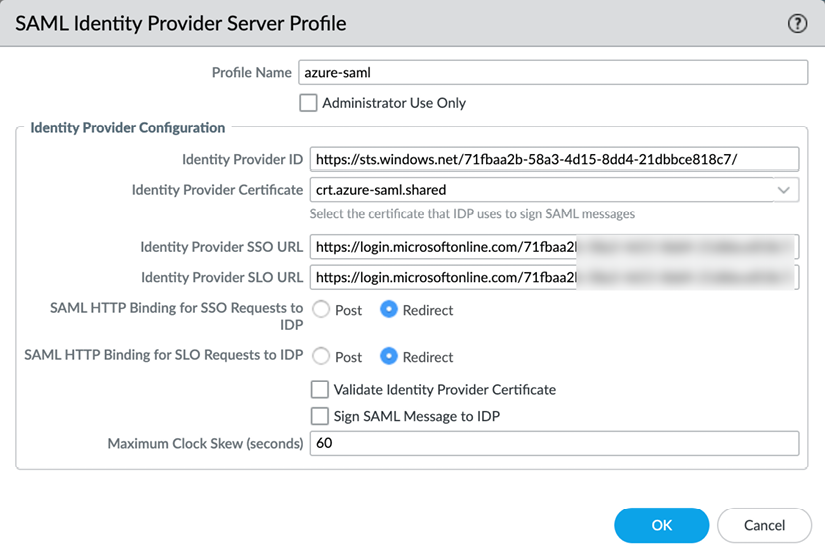
Figure 2.39: SAML Identity Provider Server Profile
It is highly recommended to add multi-factor authentication as regular passwords require good hygiene from each administrator and could be inadvertently shared, stolen, or guessed. If your regular authentication does not support integrating an additional factor like SMS, push messages, tokens, etc. you can add an MFA profile and add the extra profile to the authentication profile.
The multi-factor authentication profile
Currently, four MFA providers are available as standalone profiles: Duo, Okta, RSA, and PingID. To configure this profile, you will need some parameters from the provider.
Settings such as the API host may depend on your geolocation and keys and secrets will be unique identifiers to your account:
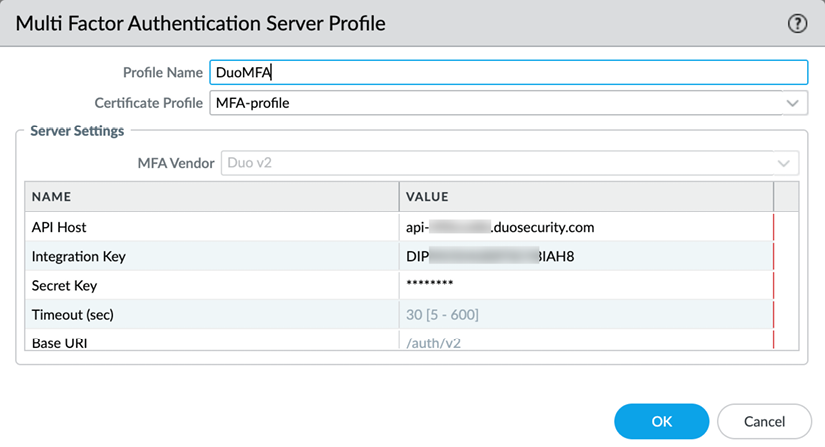
Figure 2.40: Multi Factor Authentication Server Profile
Once the appropriate server profiles have been set up, they need to be added to an authentication profile.
Authentication profile
Now that the appropriate server profile has been configured for your environment, we can go ahead and set up an authentication profile, which will set the stage for the administrators to sign in. Go to Device | Authentication Profile and create a new authentication profile.
The Authentication tab lets you choose the type of authentication you want to use for this profile; this will match the server profile you configured in one of the previous steps. You can then add additional parameters, such as setting sAMAccountName or userPrincipalName for LDAP. Username Modifier lets you control how the username that the end user enters is translated and sent to the authentication server. This allows you to simply forward what the user inputs or add the user domain in UPN format (user@domain) or traditional domain\user backslash format:
%USERINPUT%%USERDOMAIN%\%USERINPUT%%USERINPUT%@%USERDOMAIN%
This may be necessary in a multi-forest domain environment:
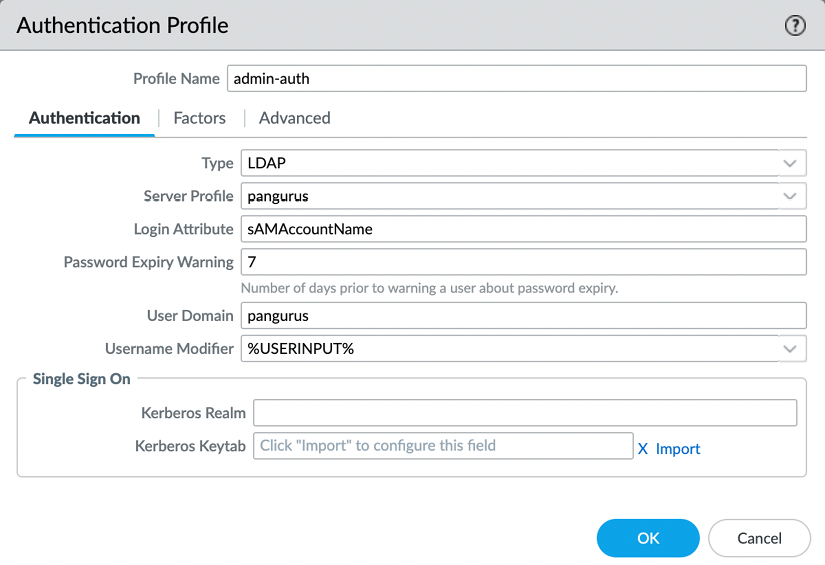
Figure 2.41: Authentication profile LDAP example
In the Factors tab, you can add a profile for an MFA policy that will trigger the secondary authentication once a user logs in:
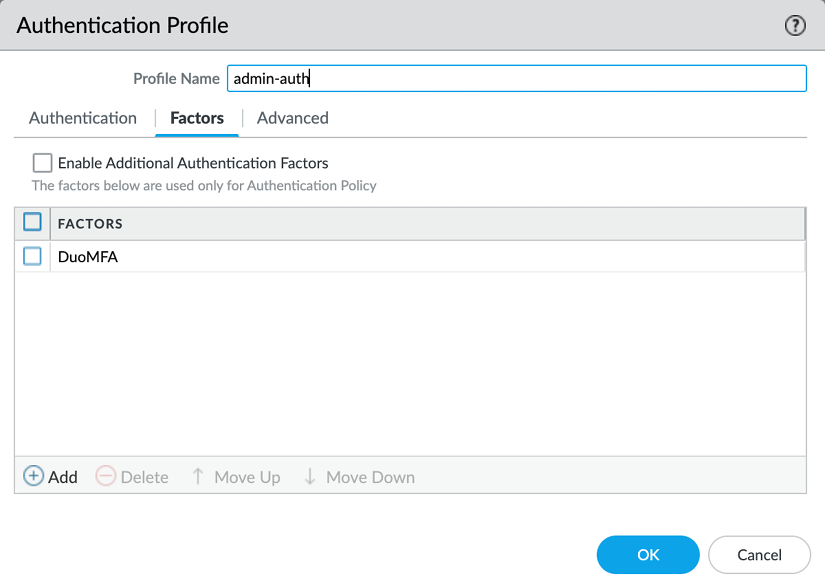
Figure 2.42: Authentication profile MFA
The Advanced tab creates a bit of a chicken-and-egg situation as it requires you to tell the firewall which usernames or user groups are allowed to attempt authentication, but the list of users is only populated after you have properly set up the User-ID. If you have not set up a User-ID group mapping yet, set the user to all until you can return and narrow down the list to the actual admin user groups or usernames.
For security purposes, you should configure a lockout policy that prevents logins for an amount of time after several failed attempts to log in:
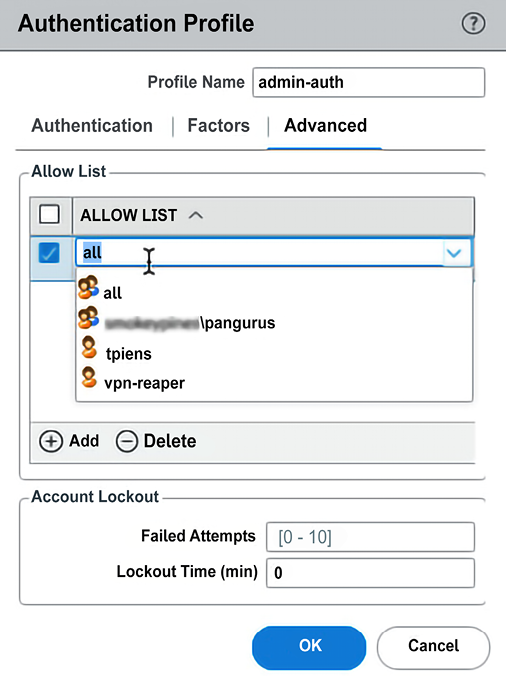
Figure 2.43: Authentication profile allowed users
When the profile is created, you can use it instead of a static password when creating administrator accounts.
This will replace the static password for the administrator with remote authentication:

Figure 2.44: Admin account with an authentication profile
With the topics we covered in this last section you are now able to set up admin accounts that are not only restricted to the access they need (complying with RBAC requirements) but can also leverage external authentication mechanisms and add MFA to strengthen administrator access and prevent unauthorized access. In the next section, we will learn about the different types of interfaces.