
Creating feature and development branches, as well as an environment
In this section, we will be creating feature and develop branches. Post that, we will create a project in CodePipeline that triggers when there is a commit in the develop branch. In the CodePipeline project, we will also be using a stage that uses CloudFormation to spin up a new Elastic Beanstalk development environment and then deploy the application in the development environment.
Creating feature and develop branches
To create feature and develop branches in CodeCommit, follow these next steps:
- Go to the AWS Cloud9 console shell and type the following commands:
Nikit:~/environment/northstar (master) $ git checkout -b feature/image
Switched to a new branch 'feature/image'
Nikit:~/environment/northstar (feature/image) $ git push origin feature/image
Total 0 (delta 0), reused 0 (delta 0)
To https://git-codecommit.us-east-1.amazonaws.com/v1/repos/northstar
 * [new branch]      feature/image -> feature/image
- Once you perform the steps, you will be able to see a feature branch in the CodeCommit Branches section, as illustrated in the following screenshot:
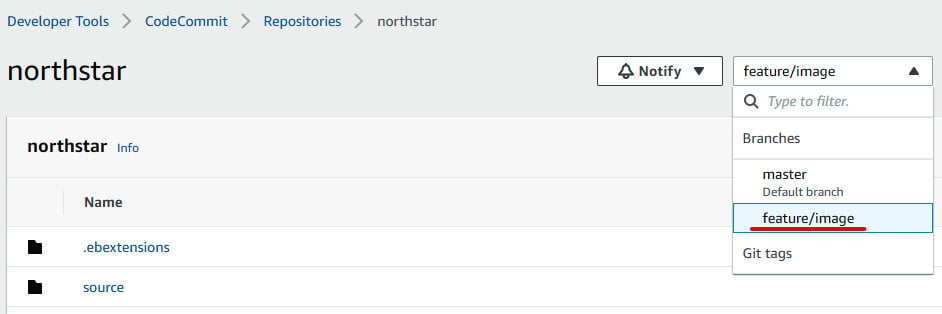
Figure 1.31 – CodeCommit console with the feature branch
- Similarly, we need to create a develop branch by running the following commands:
Nikit:~/environment/northstar (feature/image) $ git checkout -b develop
Switched to a new branch 'develop'
Nikit:~/environment/northstar (develop) $ git push origin develop
Total 0 (delta 0), reused 0 (delta 0)
To https://git-codecommit.us-east-1.amazonaws.com/v1/repos/northstar
 * [new branch]      develop -> develop
- Again, you can go to the CodeCommit console to verify the presence of a develop branch. Both the develop branch and feature branch contain the latest code from the master branch.
We have created two branches: a feature branch and a develop branch. Now, let's create a development environment and pipeline.
Creating a development environment and pipeline
Since CodeStar uses a CloudFormation template to create an environment, we need to modify the existing CloudFormation template to create a development environment. Perform the following steps to replace the existing CloudFormation template:
- Go to the AWS Cloud9 shell, navigate to the
northstarfolder, and make sure you are in the develop branch. Now, copy a file namedcodestar-EBT-cft.yamlpresent in theAWS-CodeStarfolder to the currentnorthstardirectory by running the following commands:Nikit:~/environment/northstar (develop) $ cp ../Modern-CI-CD-on-AWS/chapter-01/codestar-EBT-cft.yaml . Nikit:~/environment/northstar (develop) $ mv codestar-EBT-cft.yaml template.yml
- Now, push the new file into CodeCommit, as follows:
Nikit:~/environment/northstar (develop) $ git add template.yml
Nikit:~/environment/northstar (develop) $ git commit -m "adding development environment"
[develop 20dd426] adding development environment
 Committer: nikit <[email protected]>
 1 file changed, 235 insertions(+), 95 deletions(-)
Nikit:~/environment/northstar (develop) $ git push origin develop
Enumerating objects: 5, done.
Counting objects: 100% (5/5), done.
Compressing objects: 100% (3/3), done.
Writing objects: 100% (3/3), 1.59 KiB | 1.59 MiB/s, done.
Total 3 (delta 1), reused 0 (delta 0)
To https://git-codecommit.us-east-1.amazonaws.com/v1/repos/northstar
   aca723e..20dd426  develop -> develop
You must be wondering which changes we have made that in that template.yml CloudFormation template. During the start of the CodeStar project, the template.yml CloudFormation template includes the resource configuration of Elastic Beanstalk. But to add a new environment, you must add those new environment resource configurations to this template file.
Important Note
At this point, if you compare the template.yml file of the master branch and the develop branch, you will see that we are creating two different environments, develop and prod, and renaming the existing one to staging.
Since we have done the code changes, let's create a development pipeline that will also spin up a development environment. Follow these next steps:
- We need to create a role that allows CloudFormation to performany action on other services. By default, CodeStar creates a
CodeStarWorkerCloudFormationRolePolicyrole through theawscodestar-<projectname>CloudFormation stack—in our case,awscodestar-northstar. We need to modify this stack so that we can allow the role to give some extra permissions to the resources that we will be creating. Proceed as follows:- Copy the contents of the
permission.yamlfile in the AWS CodeStar repository. Now, go to CloudFormation console and click on Stacks, then search forawscodestar-northstar, as illustrated in the following screenshot:
- Copy the contents of the
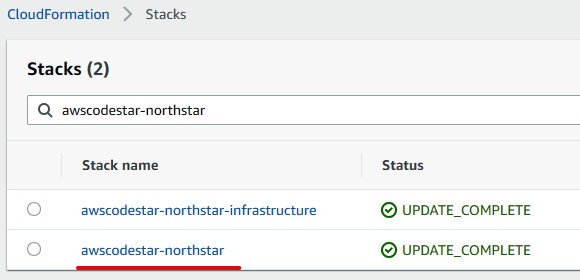
Figure 1.32 – CloudFormation stack lists
- Select
awscodestar-northstar, and then click on Update on the right-hand side. - After that, select the Edit template in designer radio button and click on View in Designer, as illustrated in the following screenshot:
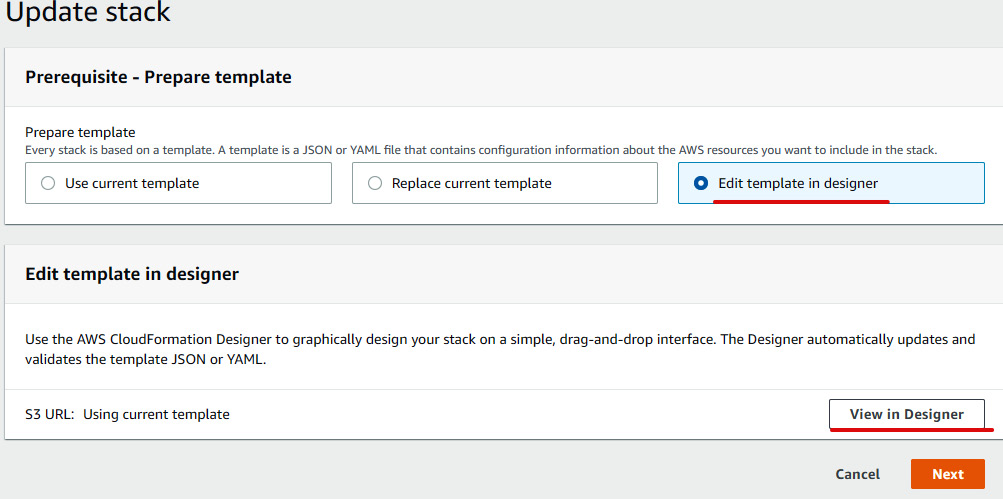
Figure 1.33 – CloudFormation stack update
- We will be redirected to the Template designer page. Switch the template language from JavaScript Object Notation (JSON) to YAML Ain't Markup Language (YAML), then replace the entire content that you copied from the
Permission.yamlfile. Then, click on the Validate Template icon (tick in a square box) to validate the template. If the template is valid, then click on the Create stack icon (upward arrow inside a cloud). - You will then be redirected to the previous Update stack page with the S3 Uniform Resource Locator (URL), as illustrated in the following screenshot. Click on Next to update the changes:
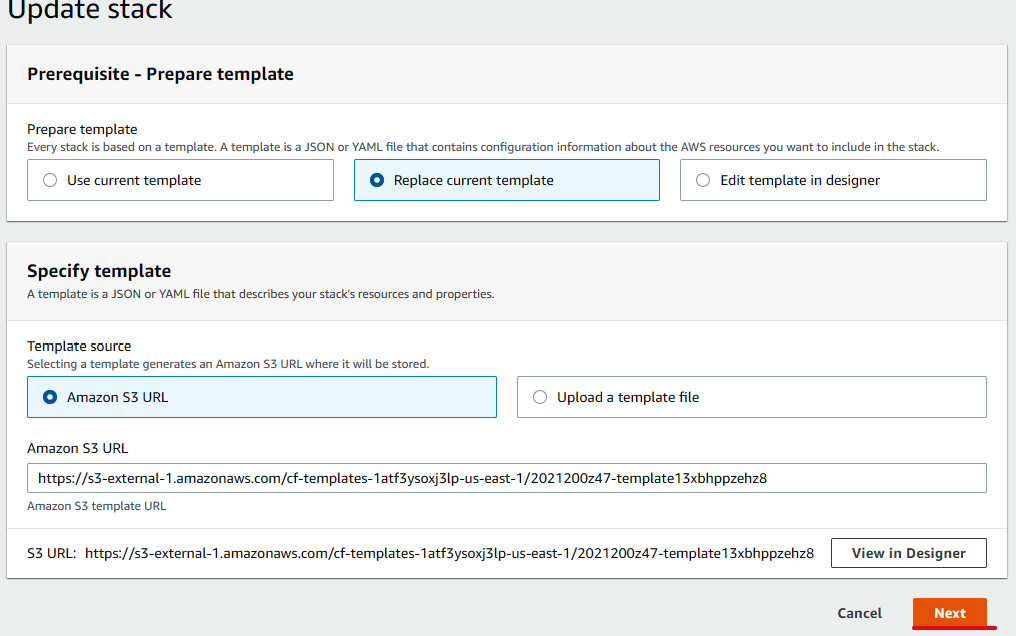
Figure 1.34 – Replacing the existing template
- Verify the stack details and click on Next, then again click on Next. Review all the stack changes, then check the acknowledgment box in the Capabilities section. After that, click on Update stack, as illustrated in the following screenshot:
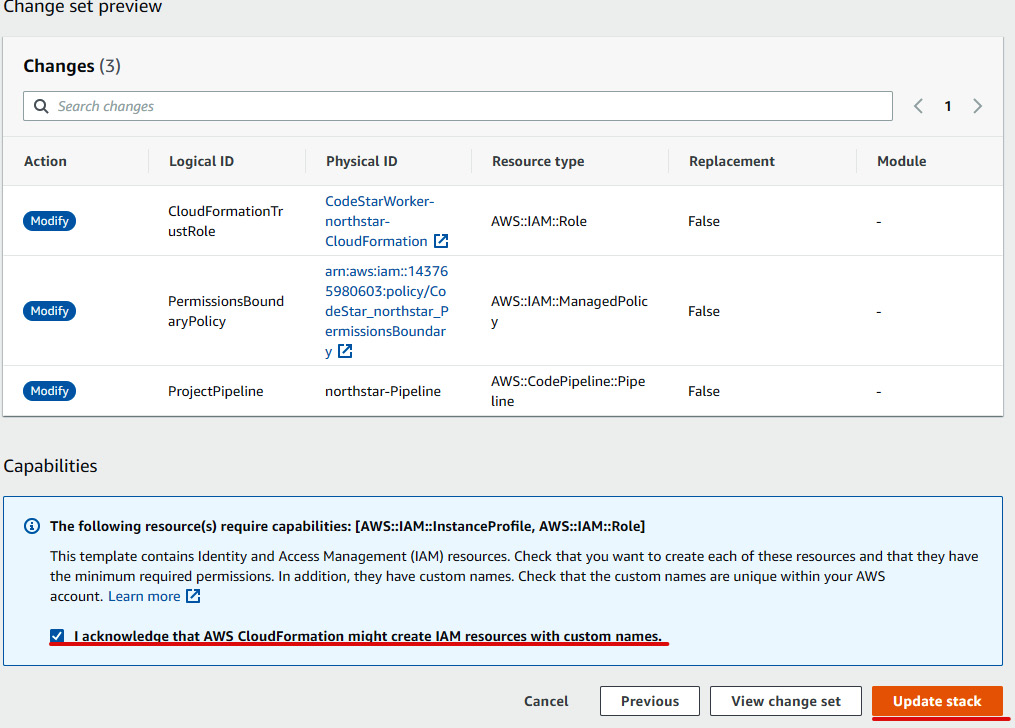
Figure 1.35 – Confirming change set
- Carrying out the preceding steps will update the CloudFormation role with the new permission we added.
- Once we have updated the policy inside role, we then need to create a pipeline by cloning the existing pipeline. Go to the CodePipeline console and click on
northstar-Pipeline(see Figure 1.27), and then click on Clone pipeline. - In the Clone pipeline configuration, rename the pipeline
northstar-Pipeline-dev, and under Service role, select Existing Service role and CodeStarWorker-northstar-ToolChain. Under Artifact store, choose Custom location and select the existing bucket name that refers to the development pipeline. Under Encryption key, select Default AWS Managed Key and click on Clone, as illustrated in the following screenshot:
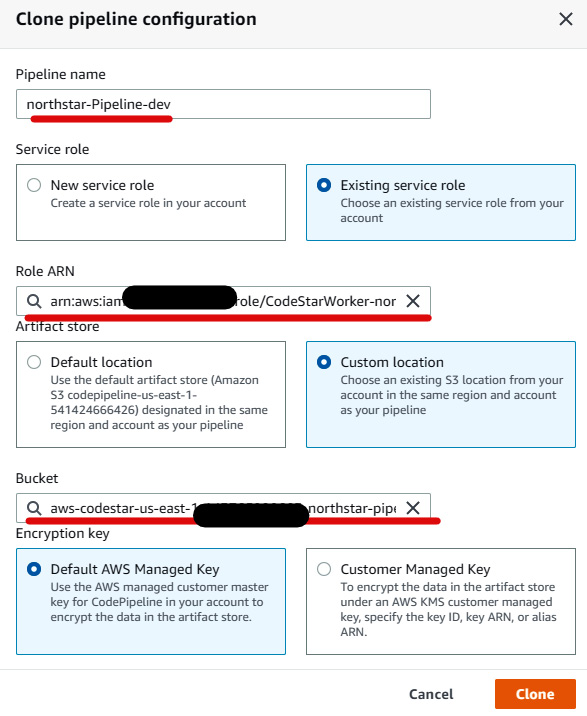
Figure 1.36 – Pipeline clone configuration
- You need to stop the execution of the pipeline because we need to make further changes to point the pipeline to the develop branch. To stop the execution of the pipeline, click on Stop Execution, mention the execution number, select Stop and abandon, then provide a comment, and finally, click on Stop.
- Now, to make the changes to the development pipeline, we need to edit the pipeline by clicking on the Edit button, as illustrated in the following screenshot:
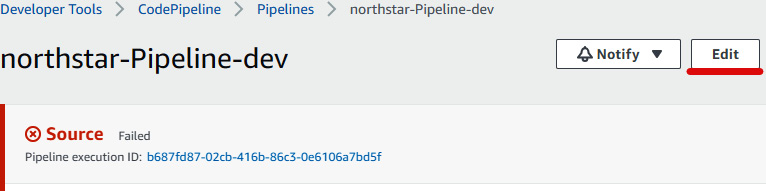
Figure 1.37 – Pipeline edit stages
- We will be able to edit multiple stages here, and we need to modify each stage. Click on the Edit stage of Source, then click on the icon highlighted in the following screenshot:
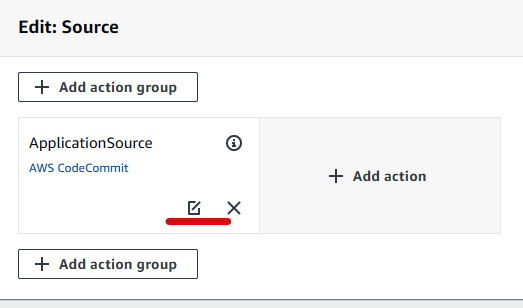
Figure 1.38 – Editing stage configuration
- In the Edit action page, mention
developunder Branch name and rename the output artifactnorthstar-devSourceArtifact, as illustrated in the following screenshot. Then, click on Done to save the action and click on Done again to save the stage:

Figure 1.39 – Source action group configuration
- Similarly, edit the build stage. In the Edit action page, select northstar-devSourceArtifact under Input artifacts and rename the output artifact
northstar-devBuildArtifact, as illustrated in the following screenshot. Then, click on Done to save the action and click on Done again to save the stage:
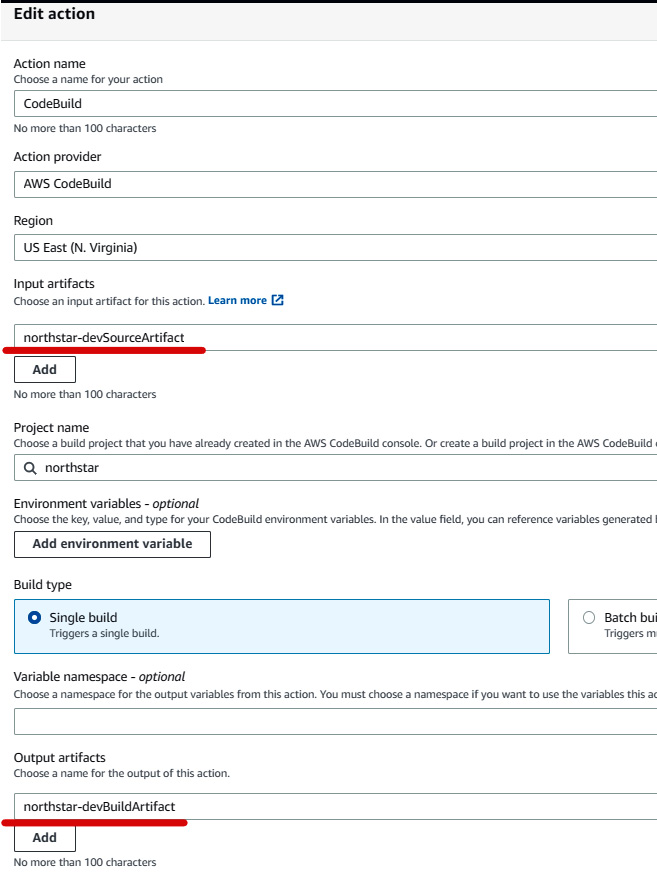
Figure 1.40 – Build action group configuration
- Again, click on Edit for the deploy stage. There will be two action groups, GenerateChangeSet and ExecuteChangeSet. Edit GenerateChangeSet first. Select northstar-devBuildArtifact under Input artifacts. Modify the stack name to
awscodestar-northstar-infrastructure-dev. Enterpipeline-changesetunder Change set name. Select northstar-devBuildArtifact under Template | Artifact name as well as under Template configuration | Artifact name. Under the Advanced section, add a new"Stage":"Dev"key-value pair, then click on Done. The process is illustrated in the following screenshot:
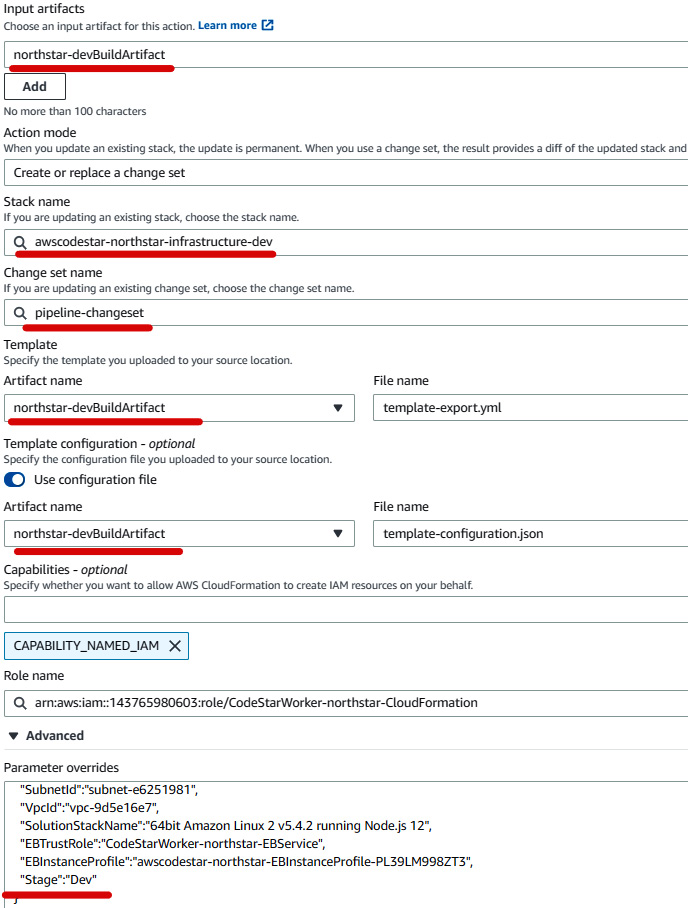
Figure 1.41 – Generating change set action group configuration
- Edit the
ExecuteChangeSetaction group. Just modify Stack name toawscodestar-northstar-infrastructure-dev. Under Change set name, keep pipeline-changeset, and after that, click on Done to save the action group. Then, click on Done to save the stage. - After that, click on Save. Ignore the ValidationError message shown in the following screenshot:
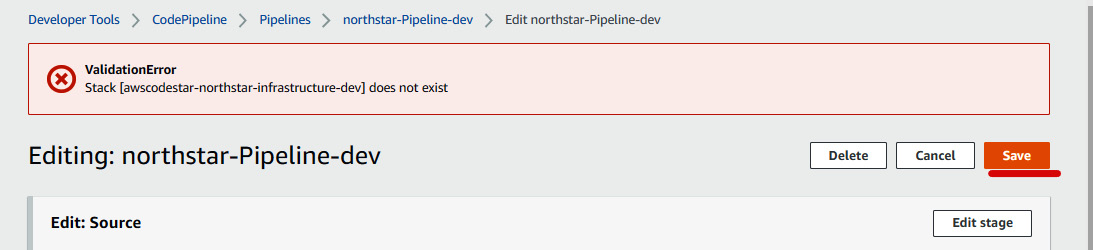
Figure 1.42 – Saving the development pipeline
- At this stage, our development pipeline is ready to get executed. We will trigger this pipeline by modifying the code in the develop branch. Go to the Cloud9 IDE and select the
default.jadefile innorthstar/source/templates. Edit the body page title toAWS CODESTAR-DEV. Save and push to the develop branch.
The process is illustrated in the following screenshot:
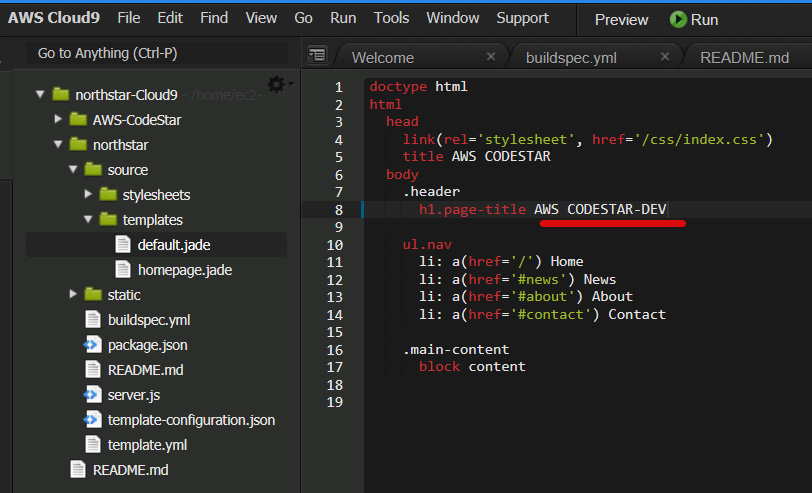
Figure 1.43 – Modifying the code for the develop branch
- The moment code gets pushed to the develop branch, it will trigger
northstar-Pipeline-develop. You can also see the commit message in the pipeline. This pipeline fetches the code from the develop branch, then does the build using the steps mentioned inbuildspec.yml. After the build, it generates the artifact and pushes it to the S3 bucket. Then, at the deploy stage, it basically creates a CloudFormation change set using the parameter we passed, then it executes the change set. The change set basically includes the creation of a development environment, which is a single-instance Elastic Beanstalk environment, and the deployment of an application in the development environment. - Once the pipeline finishes, you can go to the Elastic Beanstalk console and look for
northstarappDev, as illustrated in the following screenshot, then click on that environment:
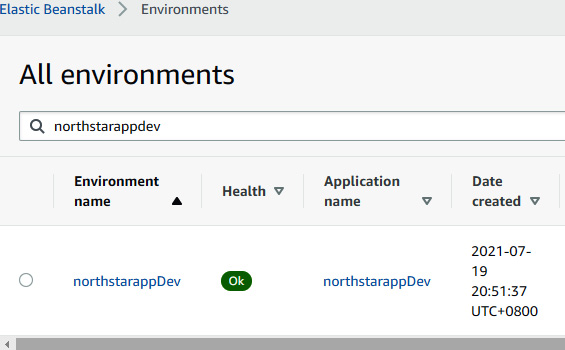
Figure 1.44 – Elastic Beanstalk console showing new development environment
- You will be redirected to the environment page, where you can access the application by clicking on the link, as illustrated in the following screenshot:
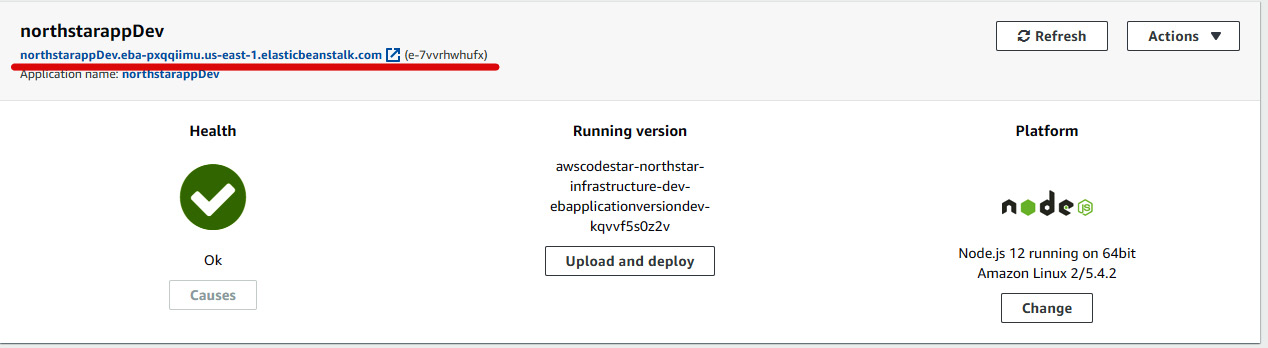
Figure 1.45 – Development environment console page
- You will be able to see the updated application, as illustrated here:
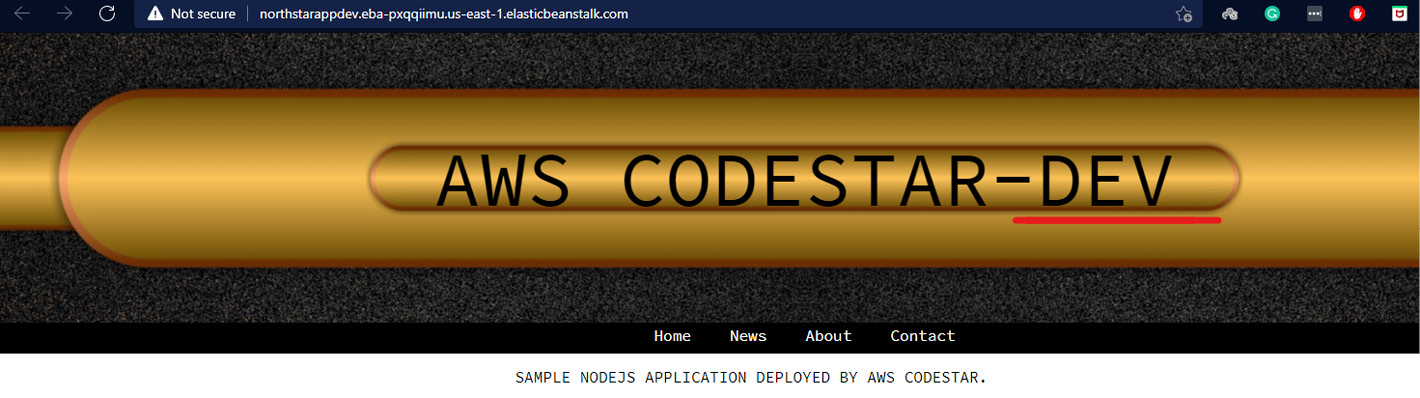
Figure 1.46 – Development environment Node.js web application
So, we have created a feature branch, a develop branch, a development pipeline, and a development environment. In the next section, we will validate the PR raised from the feature branch to the develop branch using CodeBuild and a Lambda function.