
Docker Basics
Until now, we have seen the different advantages that containerization provides as opposed to running applications on a VM. Docker is the most commonly used containerization technology by a wide margin. In this section, we will start with some Docker basics and perform some exercises to get you first-hand experience of working with Docker.
Note
Apart from Docker, there are other container managers such as containerd and podman. They behave differently in terms of features and user experiences, for example, containerd and podman are claimed to be more lightweight than Docker, and better fit than Kubernetes. However, they are all Open Container Initiatives (OCI) compliant to guarantee the container images are compatible.
Although Docker can be installed on any OS, you should be aware that, on Windows and macOS, it actually creates a Linux VM (or uses equivalent virtualization technology such as HyperKit in macOS) and embeds Docker into the VM. In this chapter, we will use Ubuntu 18.04 LTS as the OS and the Docker Community Edition 18.09.7.
Before you proceed, please ensure that Docker is installed as per the instructions in the Preface. You can confirm whether Docker is installed by querying the version of Docker using the following command:
docker --version
You should see the following output:
Docker version 18.09.7, build 2d0083d
Note
All the commands in the following sections are executed as root. Enter sudo -s in the terminal, followed by the admin password when prompted, to get root access.
What's behind docker run?
After Docker is installed, running a containerized application is quite simple. For demonstration purposes, we will use the Nginx web server as an example application. We can simply run the following command to start up the Nginx server:
docker run -d nginx
You should see the similar result:

Figure 1.4: Starting up Nginx
This command involves several actions, described as follows:
docker runtells Docker Engine to run an application.- The
-dparameter (short for--detach) forces the application to run in the background so that you won't see the output of the application in the terminal. Instead, you have to rundocker logs <container ID>to implicitly get the output.Note
The "detached" mode usually implies that the application is a long-running service.
- The last parameter,
nginx, indicates the image name on which the application is based. The image encapsulates the Nginx program as well as its dependencies.
The output logs explain a brief workflow: first, it tried to fetch the nginx image locally, which failed, so it retrieved the image from a public image repository (Docker Hub, which we will revisit later). Once the image is downloaded locally, it uses that image to start an instance, and then outputs an ID (in the preceding example, this is 96c374…), identifying the running instance. As you can observe, this is a hexadecimal string, and you can use the beginning four or more unique characters in practice to refer to any instance. You should see that even the terminal outputs of the docker commands truncate the ID.
The running instance can be verified using the following command:
docker ps
You should see the following result:

Figure 1.5: Getting a list of all the running Docker containers
The docker ps command lists all the running containers. In the preceding example, there is only one container running, which is nginx. Unlike a typical Nginx distribution that runs natively on a physical machine or VM, the nginx container functions in an isolated manner. The nginx container does not, by default, expose its service on host ports. Instead, it serves at the port of its container, which is an isolated entity. We can get to the nginx service by calling on port 80 of the container IP.
First, let's get the container IP by running the following command:
docker inspect --format '{{.NetworkSettings.IPAddress}}' <Container ID or NAME>
You should see the following output (it may vary depending on your local environment):
172.17.0.2
As you can see, in this case, the nginx container has an IP address of 172.17.0.2. Let's check whether Nginx responds by accessing this IP on port 80:
curl <container IP>:80
You should see the following output:
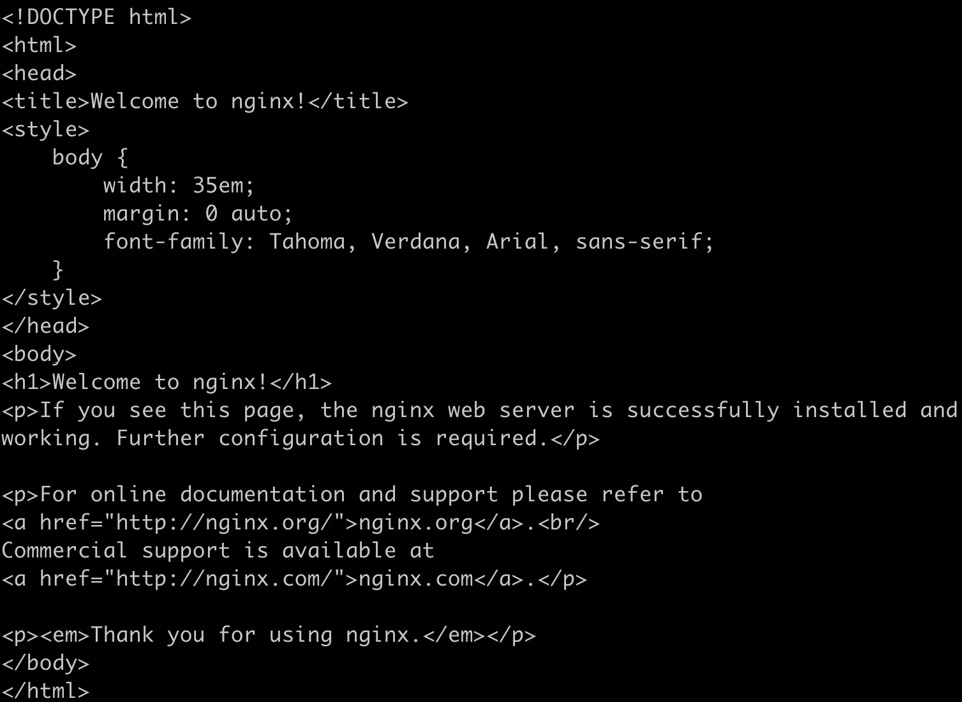
Figure 1.6: Response of the Nginx container
As you can see in Figure 1.6, we get a response, which is displayed in the terminal as the source HTML of the default home page.
Usually, we don't rely on the internal IP to access the service. A more practical way is to expose the service on some port of the host. To map the host port 8080 to the container port 80, use the following command:
docker run -p 8080:80 -d nginx
You should see a similar response:
39bf70d02dcc5f038f62c276ada1675c25a06dd5fb772c5caa19f02edbb0622a
The -p 8080:80 parameter tells Docker Engine to start the container and map the traffic on port 8080 of the host to the inside container at port 80. Now, if we try to access the localhost on port 8080, we will be able to access the containerized nginx service. Let's try it out:
curl localhost:8080
You should see the same output as in Figure 1.6.
Nginx is an example of a type of workload that doesn't have a fixed termination time, that is, it does not just show output and then terminates. This is also known as a long-running service. The other type of workload, which just runs to completion and exits, is called a short-time service, or simply a job. For containers running jobs, we can omit the -d parameter. Here is an example of a job:
docker run hello-world
You should see the following response:
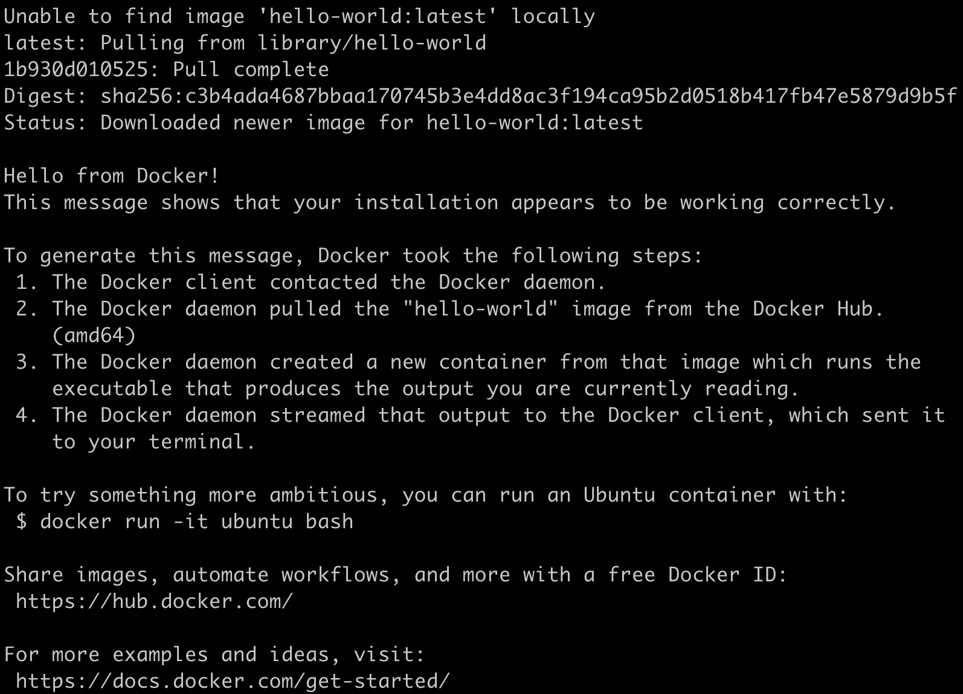
Figure 1.7: Running the hello-world image
Now, if you run docker ps, which is intended to list running containers, it doesn't show the hello-world container. This is as expected since the container has finished its job (that is, printing out the response text that we saw in the previous screenshot) and exited. To be able to find the exited container, you can run the same command with the -a flag, which will show all the containers:
docker ps -a
You should see the following output:

Figure 1.8: Checking our exited container
For a container that has stopped, you can delete it using docker rm <container ID>, or rerun it with docker run <container ID>. Alternatively, if you rerun the docker run hello-world, it will again bring up a new container with a new ID and exit after it finishes its job. You can try this out yourself as follows:
docker run hello-world
docker ps -a
You should see the following output:
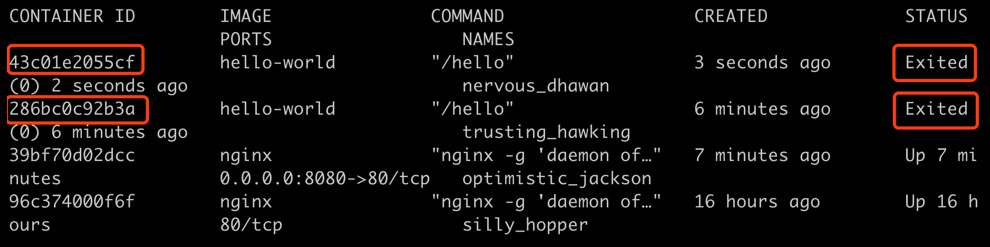
Figure 1.9: Checking multiple exited containers
Thus, you can see that running multiple containers based on the same underlying image is pretty straightforward.
By now, you should have a very basic understanding of how a container is launched, and how to check its status.
Dockerfiles and Docker Images
In the VM era, there was no standard or unified way to abstract and pack various kinds of applications. The traditional way was to use a tool, such as Ansible, to manage the installation and update the processes for each application. This is still used nowadays, but it involves lots of manual operations and is error-prone due to inconsistencies between different environments. From a developer's perspective, applications are developed on local machines, which are vastly different from the staging and eventual production environment.
So, how does Docker resolve these issues? The innovation it brings is called Dockerfile and Docker image. A Dockerfile is a text file that abstracts a series of instructions to build a reproducible environment including the application itself as well as all of its dependencies.
By using the docker build command, Docker uses the Dockerfile to generate a standardized entity called a Docker image, which you can run on almost any OS. By leveraging Docker images, developers can develop and test applications in the same environment as the production one, because the dependencies are abstracted and bundled within the same image. Let's take a step back and look at the nginx application we started earlier. Use the following command to list all the locally downloaded images:
docker images
You should see the following list:

Figure 1.10: Getting a list of images
Unlike VM images, Docker images only bundle the necessary files such as application binaries, dependencies, and the Linux root filesystem. Internally, a Docker image is separated into different layers, with each layer being stacked on top of another one. In this way, upgrading the application only requires an update to the relevant layers. This reduces both the image footprint as well as the upgrade time.
The following figure shows the hierarchical layers of a hypothetical Docker image that is built from the base OS layer (Ubuntu), the Java web application runtime layer (Tomcat), and the topmost user application layer:
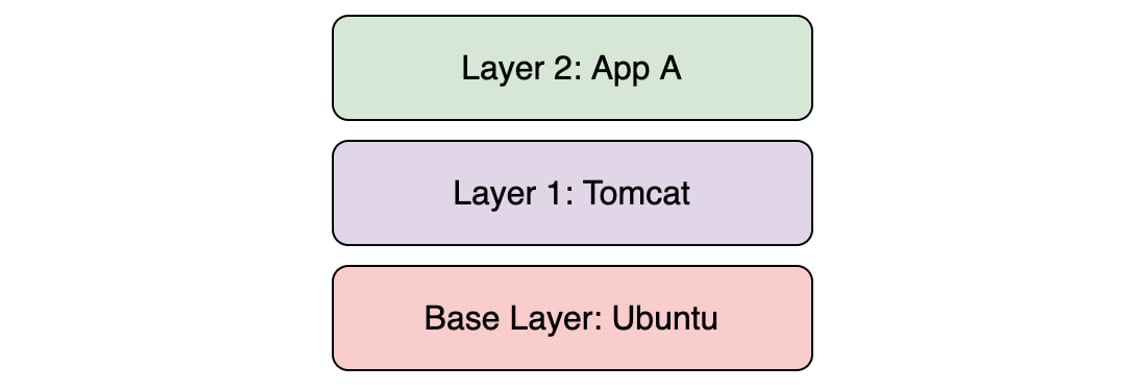
Figure 1.11: An example of stacked layers in a container
Note that it is common practice to use the images of a popular OS as a starting point for building Docker images (as you will see in the following exercise) since it conveniently includes the various components required to develop an application. In the preceding hypothetical container, the application would use Tomcat as well as some dependencies included in Ubuntu in order to function properly. This is the only reason that Ubuntu is included as the base layer. If we wanted, we could bundle the required dependencies without including the entire Ubuntu base image. So, don't confuse this with the case of a VM, where including a guest OS is necessary.
Let's take a look at how we can build our own Docker image for an application in the following exercise.
Exercise 1.01: Creating a Docker Image and Uploading It to Docker Hub
In this exercise, we will build a Docker image for a simple application written in Go.
We're going to use Go in this exercise so that the source code and its language dependencies can be compiled into a single executable binary. However, you're free to use any programming language you prefer; just remember to bundle the language runtime dependencies if you're going to use Java, Python, Node.js, or any other language:
- For this exercise, we will create a file named
Dockerfile. Note that this filename has no extension. You can use your preferred text editor to create this file with the following content:FROM alpine:3.10 COPY k8s-for-beginners / CMD ["/k8s-for-beginners"]
Note
From the terminal, whenever you create a file using any simple text editor such as vim or nano or using the
catcommand, it will be created in the current working directory in any Linux distro or even macOS. The default working directory when you open the terminal is/home/. If you prefer to use a different directory, please take that into account when following any of the exercise steps throughout this book.The first line specifies which base image to use as the foundation. This example uses Alpine, a popular base image that takes only about 5 MB and is based on Alpine Linux. The second line copies a file called
k8s-for-beginnersfrom the directory where theDockerfileis located to the root folder of the image. In this example, we will build a tiny web server and compile it to a binary with the namek8s-for-beginners, which will be placed in the same directory as theDockerfile. The third line specifies the default startup command. In this case, we just start our sample web server. - Next, let's build our sample web server. Create a file named
main.gowith the following content:package main import ( "fmt" "log" "net/http" ) func main() { http.HandleFunc("/", handler) log.Fatal(http.ListenAndServe("0.0.0.0:8080", nil)) } func handler(w http.ResponseWriter, r *http.Request) { log.Printf("Ping from %s", r.RemoteAddr) fmt.Fprintln(w, "Hello Kubernetes Beginners!") }As you can observe from
func main(), this application serves as a web server that accepts an incoming HTTP request at port 8080 on the root path and responds with the messageHello Kubernetes Beginners. - To verify this program works, you can just run
go run main.go, and then openhttp://localhost:8080on the browser. You're expected to get the "Hello Kubernetes Beginners!" output. - Use
go buildto compile runtime dependencies along with the source code into one executable binary. Run the following command in the terminal:CGO_ENABLED=0 GOOS=linux GOARCH=amd64 go build -o k8s-for-beginners
Note
Unlike step 3, the arguments
GOOS=linux GOARCH=amd64tell the Go compiler to compile the program on a specific platform, which turns out to be compatible with the Linux distro we are going to build this problem into.CGO_ENABLED=0is aimed to generate a statically linked binary so that it can work with some minimum-tailored image (For example, alpine). - Now, check whether the
k8s-for-beginnersfile is created:ls
You should see the following response:
Dockerfile k8s-for-beginners main.go
- Now we have both the
Dockerfileand the runnable binary. Build the Docker image by using the following command:docker build -t k8s-for-beginners:v0.0.1 .
Don't miss the dot (
.) at the end of this command. You should see the following response: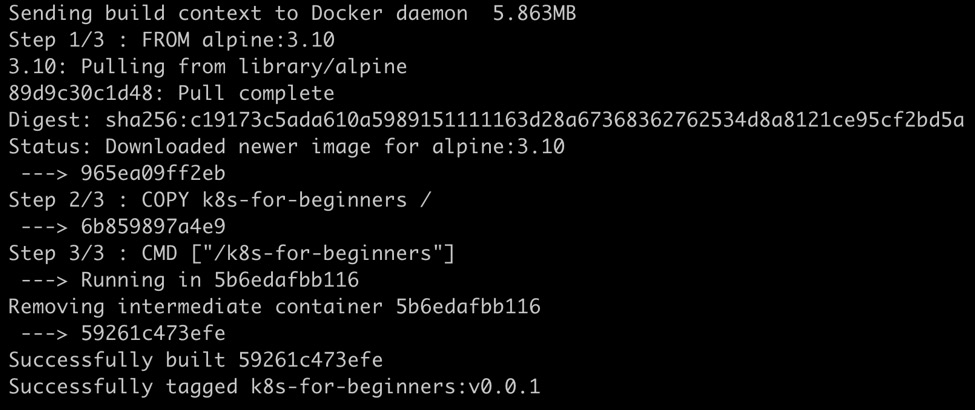
Figure 1.12: Output of docker build command
There are two parameters in the command that we used:
-t k8s-for-beginners:v0.0.1provides a tag on the image with format<imagename:version>, while.(the dot at the end of the command) denotes the path to look for theDockerfile. In this case,.refers to the current working directory.Note
If you clone the GitHub repository for this chapter, you will find that we have provided a copy of the
Dockerfilein each directory so that you can conveniently run thedocker buildcommand by navigating to the directory. - Now, we have the
k8s-for-beginners:v0.0.1image available locally. You can confirm that by running the following command:docker images
You should see the following response:

Figure 1.13: Verifying whether our Docker image has been created
An interesting thing to observe is that the image merely consumes 11.4 MB, which includes both the Linux system files and our application. A tip here is to only include necessary files in the Docker image to make it compact so that it is easy to distribute and manage.
Now that we have built our image, we will run it in a container in the next exercise. Another thing to note is that, currently, this image resides on our local machine, and we can build a container using it only on our machine. However, the advantage of packaging an application with its dependencies is that it can be easily run on different machines. To easily facilitate that, we can upload our images to online Docker image repositories such as Docker Hub (https://hub.docker.com/).
Note:
In addition to Docker Hub, there are other public image repositories such as quay.io, gcr.io, and more. You can refer to the documentation of the respective repository to configure it properly in your Docker client.
Exercise 1.02: Running Your First Application in Docker
In Exercise 1.01, Creating a Docker Image and Uploading it to Docker Hub, we packaged the web application into a Docker image. In this exercise, we will run it and push it to Docker Hub:
- First, we should clean up any leftover containers from the previous exercise by running the following command in the terminal:
docker rm -f $(docker ps -aq)
You should see the following response:
43c01e2055cf
286bc0c92b3a
39bf70d02dcc
96c374000f6f
We have seen that
docker ps -areturns the information of all the containers. The extraqin the-aqflag means "quiet" and the flag will only display numeric IDs. These IDs will be passed todocker rm -f, and, therefore, all the containers will be removed forcefully. - Run the following command to start the webserver:
docker run -p 8080:8080 -d k8s-for-beginners:v0.0.1
You should see the following response:
9869e9b4ab1f3d5f7b2451a7086644c1cd7393ac9d78b6b4c1bef6d423fd25ac
As you can see in the preceding command, we are mapping the internal port
8080of the container to the host machine's port8080. The8080:8080parameter preceded by-pmaps port8080of the container to port8080on the host machine. The-dparameter indicates the detached mode. By default, Docker checks the local registry first. So, in this case, the local Docker image will be used for launching the container. - Now, let us check whether it works as expected by sending an HTTP request to
localhostat port8080:curl localhost:8080
The
curlcommand checks for a response from the stated address. You should see the following response:Hello Kubernetes Beginners!
- We can also observe the logs of the running container by using the following commands:
docker logs <container ID>
You should see the following logs:
2019/11/18 05:19:41 Ping from 172.17.0.1:41416
Note
Before running the following commands, you should register for a Docker Hub account and have your username and password ready.
- Finally, we need to log in to Docker Hub, and then push the local image to the remote Docker Hub registry. Use the following command:
docker login
Now enter the username and password to your Docker Hub account when prompted. You should see the following response:

Figure 1.14: Logging in to Docker Hub
- Next, we will push the local image,
k8s-for-beginners:v0.0.1, to the remote Docker Hub registry. Run the following command:docker push k8s-for-beginners:v0.0.1
You should see the following response:

Figure 1.15: Failing to push the image to Docker Hub
But wait, why does it say, "
requested access to the resource is denied"? That is because the parameter followed by thedocker pushmust comply with a<username/imagename:version>naming convention. In the previous exercise, we specified a local image tag,k8s-for-beginners:v0.0.1, without a username. In thedocker pushcommand, if no username is specified, it will try to push to the repository with the default username,library, which also hosts some well-known libraries such as Ubuntu, nginx, and more. - To push our local image to our own user, we need to give a compliant name for the local image by running
docker tag <imagename:version> <username/imagename:version>, as shown in the following command:docker tag k8s-for-beginners:v0.0.1 <your_DockerHub_username>/k8s-for-beginners:v0.0.1
- You can verify that the image has been properly tagged using the following command:
docker images
You should see the following output:

Figure 1.16: Checking the tagged Docker image
After tagging it properly, you can tell that the new image actually has the same
IMAGE IDas the old one, which implies they're the same image. - Now that we have the image tagged appropriately, we're ready to push this image to Docker Hub by running the following command:
docker push <your_username>/k8s-for-beginners:v0.0.1
You should see a response similar to this:

Figure 1.17: Image successfully pushed to Docker Hub
- The image will be live after a short time on Docker Hub. You can verify it by replacing the
<username>with your username in the following link:https://hub.docker.com/repository/docker/<username>/k8s-for-beginners/tags.You should be able to see some information regarding your image, similar to the following image:

Figure 1.18: The Docker Hub page for our image
Now our Docker image is publicly accessible for anyone to use, just like the nginx image we used at the beginning of this chapter.
In this section, we learned how to build Docker images and push them to Docker Hub. Although it looks inconspicuous, it is the first time we have a unified mechanism to manage the applications, along with their dependencies, consistently across all environments. Docker images and their underlying layered filesystem are also the primary reason why container technology has been widely adopted in recent years, as opposed to a decade ago.
In the next section, we will dive a little deeper into Docker to see how it leverages Linux container technologies.