
The Essence of Linux Container Technology
All things look elegant and straightforward from the outside. But what's the magic working underneath to make a container so powerful? In this section, we will try to open the hood to take a look inside. Let us take a look at a few Linux technologies that lay the foundation for containers.
Namespace
The first key technology relied upon by containers is called a Linux namespace. When a Linux system starts up, it creates a default namespace (the root namespace). Then, by default, the processes created later join the same namespace, and, hence, they can interact with each other boundlessly. For example, two processes are able to view the files in the same folder, and also interact through the localhost network. This sounds pretty straightforward, but technically it's all credited to the root namespace, which connects all the processes.
To support advanced use cases, Linux offers the namespace API to enable different processes being grouped into different namespaces so that only the processes that belong to the same namespace can be aware of each other. In other words, different groups of processes are isolated. This also explains why we mentioned earlier that the isolation of Docker is process-level. The following is a list of the types of namespaces supported in the Linux kernel:
- Mount namespaces
- PID (Process ID) namespaces
- Network namespaces
- IPC (Inter-Process Communication) namespaces
- UTS (Unix Time-sharing System) namespaces
- User namespaces (since Linux kernel 3.8)
- Cgroup namespaces (since Linux kernel 4.6)
- Time namespaces (to be implemented in a future version of the Linux kernel)
For the sake of brevity, we will choose two easy ones (UTS and PID) and use concrete examples to explain how they're reflected in Docker later.
Note
If you are running macOS, some of the following commands will need to be used differently, since we are exploring Linux features. Docker on macOS runs inside a Linux VM using HyperKit. So, you need to open another terminal session and log into the VM:
screen ~/Library/Containers/com.docker.docker/Data/vms/0/tty
After this command, you may see an empty screen. Press Enter, and you should have root access to the VM that is running Docker. To exit the session, you can press Ctrl + A + K, and then press Y when asked for confirmation for killing the window.
We recommend that you use a different terminal window to access the Linux VM. We will mention which commands need to be run in this terminal session if you are using macOS. If you are using any Linux OS, you can ignore this and simply run all the commands in the same terminal session, unless mentioned otherwise in the instructions.
Once a Docker container is created, Docker creates and associates a number of namespaces with the container. For example, let's take a look at the sample container we created in the previous section. Let's use the following command:
docker inspect --format '{{.State.Pid}}' <container ID>
The preceding command checks the PID of the container running on the host OS. You should see a response similar to the following:
5897
In this example, the PID is 5897, as you can see in the preceding response. Now, run this command in the Linux VM:
ps -ef | grep k8s-for-beginners
This should give an output similar to this:

Figure 1.19: Checking the PID of our process
The ps -ef command lists all the running processes on the host OS, and | grep k8s-for-beginners then filters this list to display the processes that have k8s-for-beginners in their name. We can see that the process also has the PID 5897, which is consistent with the first command. This reveals an important fact that a container is nothing but a particular process running directly on the host OS.
Next, run this command:
ls -l /proc/<PID>/ns
For macOS, run this command in the VM terminal. You should see the following output:
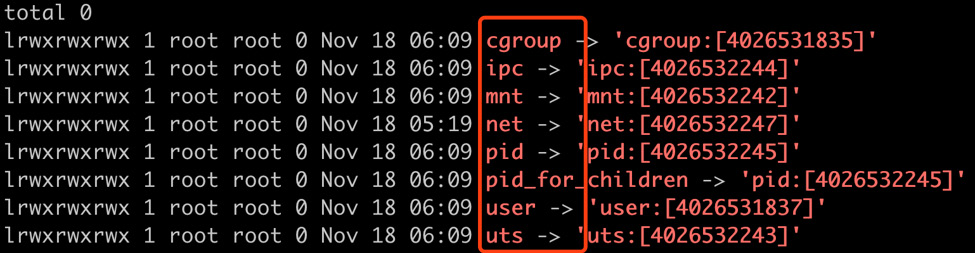
Figure 1.20: Listing the different namespaces created for our container
This command checks the /proc folder (which is a Linux pseudo-filesystem) to list all the namespaces created along with the start of the container. The result shows some well-known namespaces (take a look at the highlighted rectangle) such as uts, pid, net, and more. Let's take a closer look at them.
The uts namespace is created to enable the container to have its hostname instead of the host's hostname. By default, a container is assigned its container ID as the hostname, and it can be changed using the -h parameter while running a container, as shown here:
docker run -h k8s-for-beginners -d packtworkshops/the-kubernetes-workshop:k8s-for-beginners
This should give the following response:
df6a15a8e2481ec3e46dedf7850cb1fbef6efafcacc3c8a048752da24ad793dc
Using the returned container ID, we can enter the container and check its hostname using the following two commands one after the other:
docker exec -it <container ID> sh
hostname
You should see the following response:
k8s-for-beginners
The docker exec command tries to enter into the container and execute the sh command to launch the shell inside the container. And once we're inside the container, we run the hostname command to check the hostname from inside the container. From the output, we can tell that the -h parameter is in effect because we can see k8s-for-beginners as the hostname.
In addition to the uts namespace, the container is also isolated in its own PID namespace, so it can only view the processes launched by itself, and the launching process (specified by CMD or ENTRYPOINT in the Dockerfile that we created in Exercise 1.01, Creating a Docker Image and Uploading it to Docker Hub) is assigned PID 1. Let's take a look at this by entering the following two commands one after the other:
docker exec -it <container ID> sh
ps
You should see the following response:

Figure 1.21: The list of processes inside our container
Docker provides the --pid option for a container to join another container's PID namespace.
In addition to the uts and pid namespaces, there are some other namespaces that Docker leverages. We will examine the network namespace ("net" in Figure 1.20) in the next exercise.
Exercise 1.03: Joining a Container to the Network Namespace of Another Container
In this exercise, we will recreate the k8s-for-beginners container without host mapping, and then create another container to join its network namespace:
- As with the previous exercise, remove all the existing containers by running the following command:
docker rm -f $(docker ps -aq)
You should see an output similar to this:
43c01e2055cf
286bc0c92b3a
39bf70d02dcc
96c374000f6f
- Now, begin by running our container using the following command:
docker run -d packtworkshops/the-kubernetes-workshop:k8s-for-beginners
You should see the following response:
33003ddffdf4d85c5f77f2cae2528cb2035d37f0a7b7b46947206ca104bbbaa5
- Next, we will get the list of running containers so that we can see the container ID:
docker ps
You should see the following response:

Figure 1.22: Getting a list of all of the running containers
- Now, we will run an image called
netshootin the same network namespace as the container that we created in step 1, by using the--netparameter:docker run -it --net container:<container ID> nicolaka/netshoot
Use the container ID of our previous container that we obtained in the previous step. You should see a response that is similar to the following:

Figure 1.23: Starting up the netshoot container
nicolaka/netshootis a tiny image packaged with some commonly used network libraries such asiproute2,curl, and more. - Now, let's run the
curlcommand insidenetshootto check whether we are able to access thek8s-for-beginnerscontainer:curl localhost:8080
You should see the following response:
Hello Kubernetes Beginners!
The preceding example proves that the
netshootcontainer was created by joining the network namespace ofk8s-for-beginners; otherwise, accessing port8080onlocalhostwouldn't have got us a response. - This can also be verified by double-checking the network namespace IDs of the two containers, which we will do in the following steps.
To confirm our result, let us first open another terminal without exiting the
netshootcontainer. Get the list of containers to ensure both containers are running:docker ps
You should see a response as follows:

Figure 1.24: Checking whether both of the k8s-for-beginners and netshoot containers are online
- Next, get the PID of the
k8s-for-beginnerscontainer:docker inspect --format '{{.State.Pid}}' <container ID>You should see the following response:
7311
As you can see, the PID for this example is
7311. - Now get the pseudo-filesystem of the process using the preceding PID:
ls -l /proc/<PID>/ns/net
If you are using macOS, run this command on the Linux VM in another terminal session. Use the PID you obtained in the previous step in this command. You should see the following response:
lrwxrwxrwx 1 root root 0 Nov 19 08:11 /proc/7311/ns/net -> 'net:[4026532247]'
- Similarly, get the PID of the
netshootcontainer using the following command:docker inspect --format '{{.State.Pid}}' <container ID>Use the appropriate container ID from step 6 in this command. You should see the following response:
8143
As you can see, the PID of the
netshootcontainer is8143. - Next, we can get its pseudo-filesystem using its PID or by using this command:
ls -l /proc/<PID>/ns/net
If you are using macOS, run this command on the Linux VM in another session. Use the PID from the previous step in this command. You should see the following response:
lrwxrwxrwx 1 root root 0 Nov 19 09:15 /proc/8143/ns/net -> 'net:[4026532247]'
As you can observe from the outputs of step 8 and step 10, the two containers share the same network namespace (
4026532247). - As a final cleanup step, let's remove all of the containers:
docker rm -f $(docker ps -aq)
You should see a response similar to the following:
61d0fa62bc49
33003ddffdf4
- What if you want to join a container to the host's root namespace? Well,
--net hostis a good way of achieving that. To demonstrate this, we will start a container using the same image, but with the--net hostparameter:docker run --net host -d packtworkshops/the-kubernetes-workshop:k8s-for-beginners
You should see the following response:
8bf56ca0c3dc69f09487be759f051574f291c77717b0f8bb5e1760c8e20aebd0
- Now, list all of the running containers:
docker ps
You should see the following response:

Figure 1.25: Listing all the containers
- Get the PID of the running container using the following command:
docker inspect --format '{{.State.Pid}}' <container ID>Use the appropriate container ID in this command. You should see the following response:
8380
- Find the network namespace ID by looking up the PID:
ls -l /proc/<PID>/ns/net
If you are using macOS, run this command on the Linux VM. Use the appropriate PID in this command. You should see the following response:
lrwxrwxrwx 1 root root 0 Nov 19 09:20 /proc/8380/ns/net -> 'net:[4026531993]'
You may be confused by the
4026531993namespace. By giving the--net hostparameter, shouldn't Docker bypass the creation of a new namespace? The answer to this is that it's not a new namespace; in fact, it's the aforementioned Linux root namespace. We will confirm this in the next step. - Get the namespace of PID
1of the host OS:ls -l /proc/1/ns/net
If you are using macOS, run this command on the Linux VM. You should see the following response:
lrwxrwxrwx 1 root root 0 Nov 19 09:20 /proc/1/ns/net -> 'net:[4026531993]'
As you can see in this output, this namespace of the host is the same as that of the container we saw in step 15.
From this exercise, we can get an impression of how a container is isolated into different namespaces, and also which Docker parameter can be used to relate it with other namespaces.
Cgroups
By default, no matter which namespace a container joins, it can use all of the available resources of the host. That is, for sure, not what we want when we are running multiple containers on a system; otherwise, a few containers may hog the resources shared among all the containers.
To address this, the cgroups (short for Control Groups) feature was introduced in Linux kernel version 2.6.24 onward to limit the resource usage of processes. Using this feature, a system administrator can control the most important resources, such as memory, CPU, disk space, and network bandwidth.
In Ubuntu 18.04 LTS, a series of cgroups under path /sys/fs/cgroup/<cgroup type> are created by default.
Note
You can run mount -t cgroup in order to view all the cgroups in Ubuntu; though, we are leaving them out of the scope of this book since they are not very relevant to us.
Right now, we don't quite care about the system processes and their cgroups; we just want to focus on how Docker is related in the whole cgroups picture. Docker has its cgroups folders under the path /sys/fs/cgroup/<resource kind>/docker. Use the find command to retrieve the list:
find /sys/fs/cgroup/* -name docker -type d
If you are using macOS, run this command on the Linux VM in another session. You should see the following results:
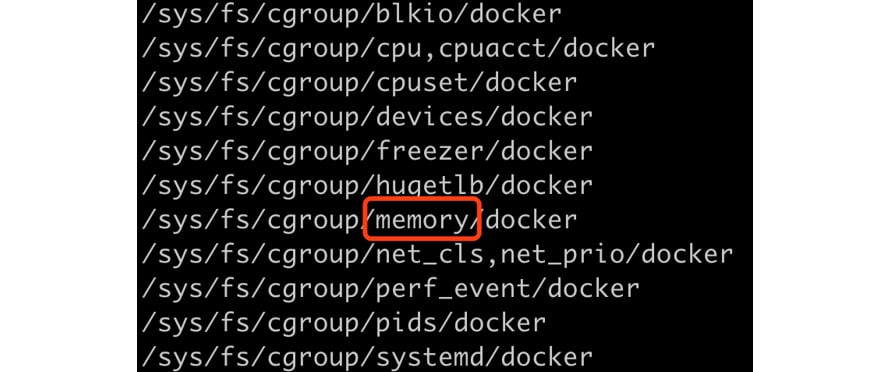
Figure 1.26: Getting all the cgroups related to Docker
Each folder is read as a control group, and the folders are hierarchical, meaning that each cgroup has a parent from which it inherits properties, all the way up to the root cgroup, which is created at the system start.
To illustrate how a cgroup works in Docker, we will use the memory cgroup, highlighted in Figure 1.26 as an example.
But first, let's remove all existing containers using the following command:
docker rm -f $(docker ps -aq)
You should see a response similar to the following:
61d0fa62bc49
Let's confirm that by using the following command:
docker ps
You should see an empty list as follows:
CONTAINER ID     IMAGE       COMMAND          CREATED          STATUS
        PORTS          NAMES
Let's see whether there is a cgroup memory folder:
find /sys/fs/cgroup/memory/docker/* -type d
If you are using macOS, run this command on the Linux VM. You should then see the following response:
root@ubuntu: ~# find /sys/fs/cgroup/memory/docker/* -type d
No folders show up. Now, let's run a container:
docker run -d packtworkshops/the-kubernetes-workshop:k8s-for-beginners
You should see the output similar to the following:
8fe77332244b2ebecbda27a4496268264218c4e59614d59b5849a22b12941e1
Check the cgroup folder again:
find /sys/fs/cgroup/memory/docker/* -type d
If you are using macOS, run this command on the Linux VM. You should see this response:
/sys/fs/cgroup/memory/docker/8fe77332244b2ebecbda27a4496268264218c4e59614d59b5849a22b12941e1
By now, you can see that once we create a container, Docker creates its cgroup folder under a specific resource kind (in our example, it's memory). Now, let's take a look at which files are created in this folder:
ls /sys/fs/cgroup/memory/docker/8fe77332244b2ebecbd8a2704496268264218c4e59614d59b5849022b12941e1
If you are using macOS, run this command on the Linux VM. Please use the appropriate path that you obtained from the previous screenshot for your instance. You should see the following list of files:
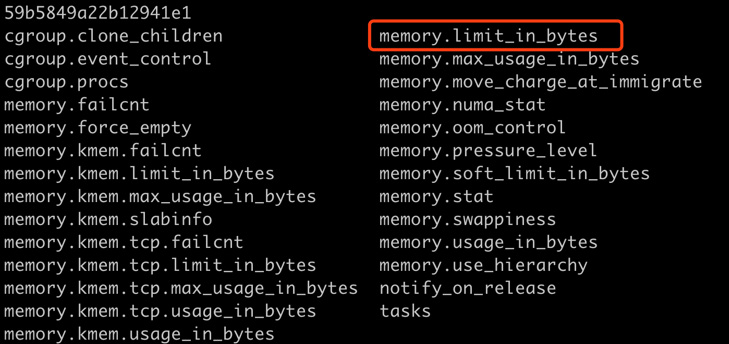
Figure 1.27: Exploring memory cgroups created by Docker
We won't go through every setting here. The setting we're interested in is memory.limit_in_bytes, as highlighted previously, which denotes how much memory the container can use. Let's see what value is written in this file:
cat /sys/fs/cgroup/memory/docker/8fe77332244b2ebecbd8a2704496268264218c4e59614d59b5849022b12941e1/memory.limit_in_bytes
If you are using macOS, run this command on the Linux VM. You should see the following response:
9223372036854771712
The value 9223372036854771712 is the largest positive signed integer (263 – 1) in a 64-bit system, which means unlimited memory can be used by this container.
To discover how Docker deals with the containers that overuse claimed memory, we're going to show you another program that consumes a certain amount of RAM. The following is a Golang program used to consume 50 MB of RAM incrementally and then hold the entire program (sleep for 1 hour) so as to not exit:
package main
import (
        "fmt"
        "strings"
        "time"
)
func main() {
        var longStrs []string
        times := 50
        for i := 1; i <= times; i++ {
                fmt.Printf("===============%d===============\n", i)
                // each time we build a long string to consume 1MB                     (1000000 * 1byte) RAM
                longStrs = append(longStrs, buildString(1000000,                     byte(i)))
        }
        // hold the application to exit in 1 hour
        time.Sleep(3600 * time.Second)
}
// buildString build a long string with a length of `n`.
func buildString(n int, b byte) string {
        var builder strings.Builder
        builder.Grow(n)
        for i := 0; i < n; i++ {
                builder.WriteByte(b)
        }
        return builder.String()
}
You may try building an image using this code, as shown in Exercise 1.01, Creating a Docker Image and Uploading it to Docker Hub. This code will be used in place of the code provided in step 2 of that exercise, and then you can tag the image with <username>/memconsumer. Now, we can test resource limitations. Let's use the Docker image and run it with the --memory (or -m) flag to instruct Docker that we only want to use a certain amount of RAM.
If you are using Ubuntu or any other Debian-based Linux, to continue with the chapter, you may need to manually enable cgroup memory and swap capabilities if you see the following warning message when running this command:
docker info > /dev/null
This is the warning message that you may see:
WARNING: No swap limit support
The steps to enable cgroup memory and swap capabilities are as follows:
Note
The following three steps are not applicable if you are using macOS.
- Edit the
/etc/default/grubfile (you may need root privileges for this). Add or edit theGRUB_CMDLINE_LINUXline to add the following two key-value pairs:GRUB_CMDLINE_LINUX="cgroup_enable=memory swapaccount=1"
- Run
update-grubusing root privileges. - Reboot the machine.
Next, we should be able to limit the container memory usage to 100 MB by running the following command:
docker run --name memconsumer -d --memory=100m --memory-swap=100m packtworkshops/the-kubernetes-workshop:memconsumer
Note
This command pulls the image that we have provided for this demonstration. If you have built your image, you can use that by using <your_username>/<tag_name> in the preceding command.
You should see the following response:
WARNING: Your kernel does not support swap limit capabilities or the cgroup is not mounted. Memory limited without swap.
366bd13714cadb099c7ef6056e3b72853735473938b2e633a5cdbf9e94273143
This command disables usage on the swap memory (since we specify the same value on --memory and --memory-swap) so as to gauge the consumption of memory easily.
Let's check the status of our container:
docker ps
You should see the following response:

Figure 1.28: Getting the list of containers
Now, let's confirm the restrictions placed on the container by reading the cgroup file for the container:
cat /sys/fs/cgroup/memory/docker/366bd13714cadb099c7ef6056e3b7285373547e9e8b2e633a5cdbf9e94273143/memory.limit_in_bytes
If you are using macOS, run this command on the Linux VM. Please use the appropriate path in this command. You should see the following response:
104857600
The container is launched with a request of 100 MB of RAM, and it runs without any problem since it internally only consumes 50 MB of RAM. From the cgroup setting, you can observe that the value has been updated to 104857600, which is exactly 100 MB.
But what if the container requests less than 50 MB, while the program running in it requires more than 50 MB? How will Docker and Linux respond to that? Let's take a look.
First, let's remove any running containers:
docker rm -f $(docker ps -aq)
You should see the following response:
366bd13714ca
Next, we're going to run the container again, but we will request only 20 MB of memory:
docker run --name memconsumer -d --memory=20m --memory-swap=20m packtworkshops/the-kubernetes-workshop:memconsumer
You should see this response:
298541bc46855a749f9f8944860a73f3f4f2799ebda7969a5eada60e3809539bab
Now, let's check the status of our container:
docker ps
You should see an empty list like this:
CONTAINER ID     IMAGE       COMMAND      CREATED        STATUS
       PORTS          NAMES
As you can see, we cannot see our container. Let's list all kinds of containers:
docker ps -a
You should see the following output:

Figure 1.29: Getting a list of all containers
We found our container. It has been forcibly killed. It can be verified by checking the container logs:
docker logs memconsumer
You should see the following output:
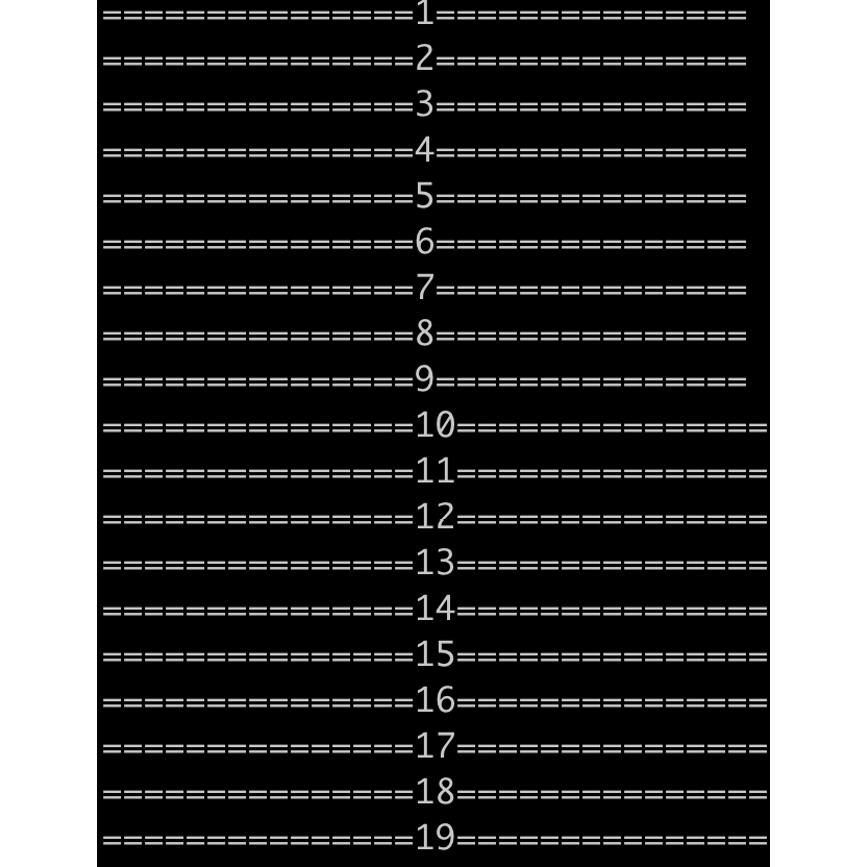
Figure 1.30: The logs of our terminated container
The container tried to increase the memory consumed by 1 MB each time, and when it came to the memory limit (20 MB), it was killed.
From the preceding examples, we have seen how Docker exposes flags to end-users, and how those flags interact with underlying Linux cgroups to limit resource usage.
Containerization: The Mindset Change
In the previous sections, we looked at the anatomy of Linux namespaces and cgroups. We explained that a container is essentially a process running natively on the host OS. It is a special process with additional limitations such as OS-level isolation from other processes and the control of resource quotas.
Since Docker 1.11, containerd has been adopted as the default container runtime, instead of directly using Docker Daemon (dockerd) to manage containers. Let's take a look at this runtime. First, restart our container normally:
docker run -d packtworkshops/the-kubernetes-workshop:k8s-for-beginners
You should see the following response:
c7ee681ff8f73fa58cf0b37bc5ce08306913f27c5733c725f7fe97717025625d
We can use ps -aef --forest to list all of the running processes in a hierarchy, and then use | grep containerd to filter the output by the containerd keyword. Finally, we can use -A 1 to output one extra line (using -A 1) so that at least one running container shows up:
ps -aef --forest | grep containerd -A 1
If you are using macOS, run this command on the Linux VM without the --forest flag. You should see the following response:

Figure 1.31: Getting processes related to containerd
In the output, we can see that containerd (PID 1037) acts as the top parent process, and it manages containerd-shim (PID 19374), and containerd-shim manages most of the child processes of k8s-for-beginners (PID 19394), which is the container we started.
Keeping the core idea of a container in mind can help you while migrating any VM-based applications to container-based ones. Basically, there are two patterns to deploy applications in containers:
Several Applications in One Container
This kind of implementation requires a supervisor application to launch and hold the container. And then, we can put applications into the container as child processes of the supervisor. The supervisor has several variants:
- A customized wrapper script: This needs complicated scripting to control the failures of managed applications.
- A third-party tool such as supervisord or systemd: Upon application failures, the supervisor is responsible for getting it restarted.
One Application in One Container
This kind of implementation does not require any supervisor as in the previous case. In fact, the life cycle of the application is tied to the life cycle of the container.
A Comparison of These Approaches
By deploying several applications in a single container, we are essentially treating a container as a VM. This container as a lightweight VM approach was once used as a promotion slogan of container technologies. However, as explained, they vary in a lot of aspects. Of course, this way can save the migration efforts from the VM-based development/deployment model to the containers, but it also introduces several drawbacks in the following aspects:
- Application life cycle control: Looking from the outside, the container is exposed as one state, as it is essentially a single host process. The life cycles of the internal applications are managed by the "supervisor", and, therefore, cannot be observed from the outside. So, looking from the outside, you may observe that a container stays healthy, but some applications inside it may be restarting persistently. It may keep restarting due to a fatal error in one of its internal applications, which you may not be able to point out.
- Version upgrade: If you want to upgrade any one of the different applications in a container, you may have to pull down the entire container. This causes unnecessary downtime for the other applications in that container, which don't need a version upgrade. Thus, if the applications require components that are developed by different teams, their release cycles have to be tightly coupled.
- Horizontal scaling: If only one application needs to be scaled out, you have no option but to scale out the whole container, which will also replicate all the other applications. This leads to a waste of resources on the applications that don't need scaling.
- Operational concerns: Checking the logs of the applications becomes more challenging as the standard output (
stdout) and error (stderr) of the container don't represent the logs of the applications inside containers. You have to make an extra effort to manage those logs, such as installing additional monitoring tools to diagnose the health of each application.
Technically, having multiple applications in a single container works, and it doesn't require many mindset changes from a VM perspective. However, when we adopt the container technology to enjoy its benefits, we need to make a trade-off between migration conveniences and long-term maintainability.
The second way (that is, having one application in one container) enables a container to automatically manage the life cycle of the only application present inside it. In this way, we can unify container management by leveraging native Linux capabilities, such as getting an application status by checking the container state and fetching application logs from the stdout/stderr of the container. This enables you to manage each application in its own release cycle.
However, this is not an easy task. It requires you to rethink the relationship and dependencies of different components so as to break the monolithic applications into microservices. This may require a certain amount of refactoring of the architectural design to include both source code and delivery pipeline changes.
To summarize, adopting container technology is a break-up-and-reorganize journey. It not only takes time for the technology to mature but also, more importantly, it requires changes in people's mindsets. Only with this mindset change can you restructure the applications as well as the underlying infrastructure to unleash the value of containers and enjoy their real benefits. It's the second reason that container technologies only started to rise in recent years instead of a decade ago.