
Alibaba Cloud (also known as Aliyun) offers multiple templates that you can use to provision a Kubernetes environment. There are four main service categories:
- Kubernetes: Self-managed Kubernetes deployed with three masters on ECS instances within a single zone. Worker nodes can be on either ECS or bare-metal.
- Managed Kubernetes: Similar to the Kubernetes cluster option, except master nodes are managed by Alibaba Cloud.
- Multi-AZ Kubernetes: Similar to the Kubernetes cluster option, except the self-managed master and worker instances can be deployed in separate availability zones.
- Serverless Kubernetes: A Kubernetes service offering where you deploy container applications without having to manage and maintain clusters instances:

In this section, we will cover how to provision a highly available Multi-AZ Kubernetes cluster without needing to provision or manage master and etcd instances.
Getting ready
All the operations mentioned here require an Alibaba Cloud account (also known as Aliyun) with an AccessKey. If you don't have one already, go to https://account.alibabacloud.com and create an account.
How to do it…
This section will take you through how to configure a Kubernetes cluster on Alibaba Cloud. This section is further divided into the following subsections to make this process easier:
- Installing the command-line tools to configure Alibaba Cloud services
- Provisioning a highly available Kubernetes cluster on Alibaba Cloud
- Connecting to Alibaba Container Service clusters
Installing the command-line tools to configure Alibaba Cloud services
For this recipe, we will use the Alibaba Cloud console and generate the API request parameters from the dashboard that will be used with the CLI. You will also need the Alibaba Cloud CLI, aliyun, and kubectl installed.
- Run the following command to download the aliyun tool:
$ curl -O https://aliyuncli.alicdn.com/aliyun-cli-linux-3.0.15-amd64.tgz
- Extract the files and install them:
$ tar –zxvf aliyun-cli*.tgz && sudo mv aliyun /usr/local/bin/.
- Verify the aliyun CLI version you're using:
$ aliyun --version
- If you haven't created an AccessKey, go to Security Management in your account and create one (https://usercenter.console.aliyun.com/#/manage/ak).
- Complete the CLI configuration by entering your AccessKey ID, AccessKey Secret, and region ID:
$ aliyun configure
Configuring profile '' in '' authenticate mode...
Access Key Id []: <Your AccessKey ID>
Access Key Secret []: <Your AccessKey Secret>
Default Region Id []: us-west-1
Default Output Format [json]: json (Only support json))
Default Language [zh|en] en: en
Saving profile[] ...Done.
- Enable bash/zsh autocompletion:
$ aliyun auto-completion
- Go to the Container Service console (https://cs.console.aliyun.com) to give permissions to the container service to access cloud resources. Here, select AliyunCSDefaultRole, AliyunCSServerlessKuberentesRole, AliyunCSClusterRole, and AliyunCSManagedKubernetesRole and click on Confirm Authorization Policy.
Make sure you have the Resource Orchestration Service (ROS) and Autoscaling services enabled since they are required to get Kubernetes clusters deployed. ROS is used to automatically provision and configure resources for auto-deployment, operation, and maintenance based on your template, while Autoscaling is used to adjust compute resources based on demand.
Provisioning a highly available Kubernetes cluster on Alibaba Cloud
Let's perform the following steps:
- Open a browser window and go to the Alibaba Cloud Virtual Private Cloud console at https://vpc.console.aliyun.com.
- Make sure you select a region with at least three zones (most of the regions in mainland China have more than three zones) and click on Create VPC.
- Give a unique name to your VPC and select an IPv4 CIDR block. In our example, this is 10.0.0.0/8.
- Enter a name for your first VSwitch ( k8s-1), and select a zone (Beijing Zone A).
- Set an IPv4 CIDR block. In our example, we used 10.10.0.0./16.
- Click on the Add button and repeat steps 4 and 5 to get different zones. Use the following CIDR block information:
| VSwitch 2 | VSwitch 3 | |
| Name: | k8s-2 | k8s-3 |
| Zone: | Beijing Zone B | Beijing Zone E |
| IPv4 CIDR Block: | 10.20.0.0/16 | 10.30.0.0/16 |
- Click OK to create your VPC and VSwitches.
- Open the Aliyun Web console on your web browser (https://cs.console.aliyun.com.).
- Click on Create Kubernetes Cluster.
- Select Standard Managed Cluster.
- Click on the Multi-AZ Kubernetes tab, give your cluster a name, and select the same region that you used to create your VPCs and VSwitches.
- If you have selected the same region, the VPC dropdown will be populated with k8s-devops-cookbook-vpc. Now, select all three VSwitches that we've created:
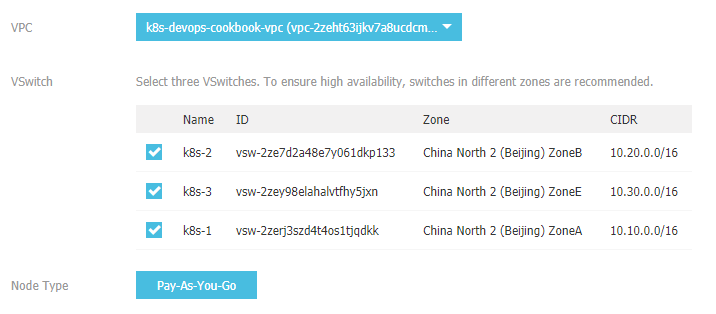
- Set the instance types for the Master node configuration in each zone.
- Set the instance type for the Worker node configuration in each zone and the number of nodes in every zone to 3. Otherwise, use the defaults.
- Select the Kubernetes version (1.12.6-aliyun.1, at the time of writing).
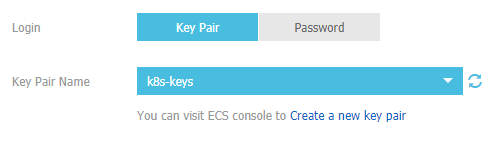
- Select Key Pair Name from the drop-down menu, or create one by clicking Create a new key pair:
- Alibaba offers two CNI options: Flannel and Terway. The difference is explained in the There's more… section of this recipe. Leave the default network options using Flannel. The default parameters support up to 512 servers in the cluster.
- Monitoring and logging will be explained in Chapter 8, Observability and Monitoring on Kubernetes, and Chapter 10, Logging on Kubernetes. Therefore, this step is optional. Check the Install cloud monitoring plug-in on your ECS and Using Log Service options to enable monitoring and logging.
- Now, click on Create to provision your Multi-AZ Kubernetes cluster. This step may take 15-20 minutes to complete.
Connecting to Alibaba Container Service clusters
To get access to your cluster on Alibaba Cloud, you need to follow these steps:
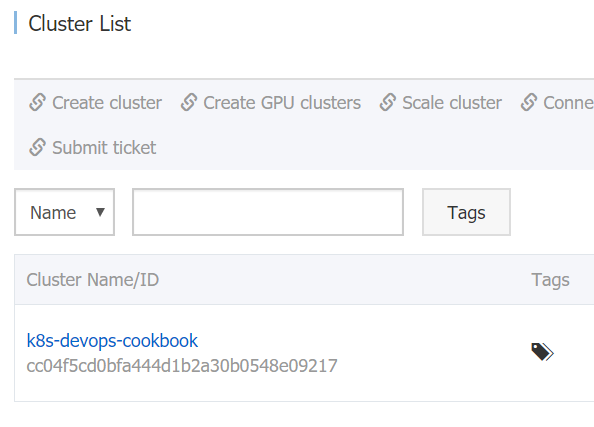
- To get the cluster's credentials, go to the Clusters menu and click on the cluster name you want to access:
- Copy the content displayed in the KubeConfig tab to your local machine's $HOME/.kube/config file:
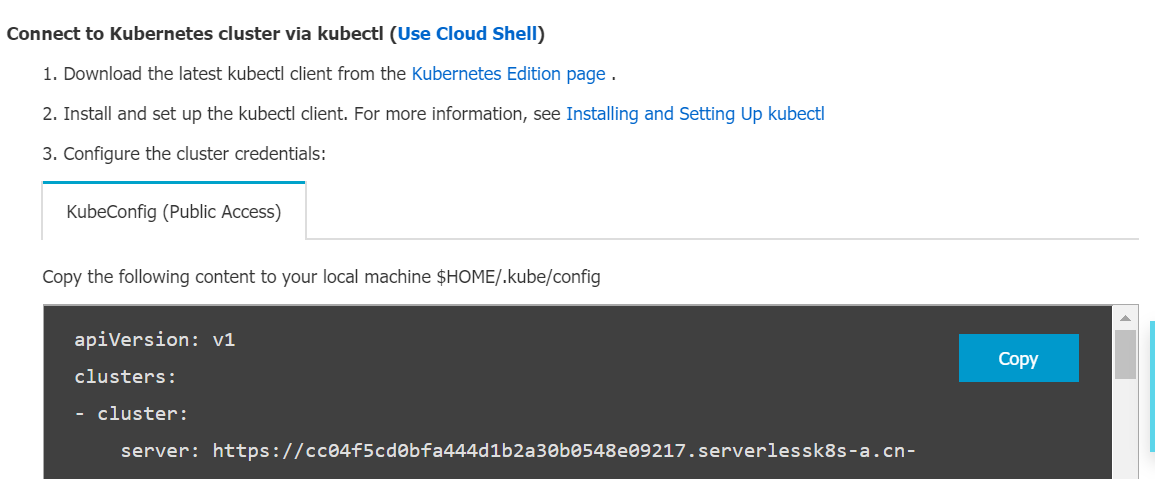
- Verify your Kubernetes cluster:
$ kubectl get nodes
As an alternative, see the Viewing the Kubernetes Dashboard instructions under the There's more... section to manage your cluster.
How it works…
This recipe showed you how to provision a managed Kubernetes cluster on Alibaba Cloud using a cluster template.
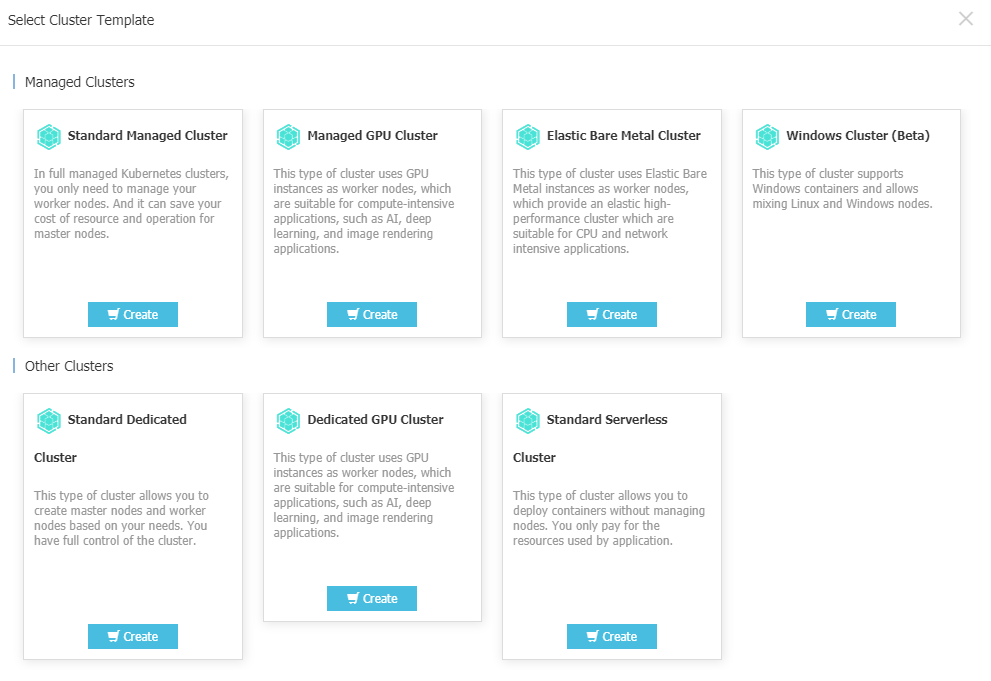
Under the Container Service menu, Alibaba Cloud provides a few Kubernetes cluster, where you are offered seven cluster templates. We used the Standard Managed Cluster here. This option lets you manage the worker nodes only and saves you the cost of resources and management for the master nodes:
By default, accounts support up to 20 clusters and 40 nodes in each cluster. You can request a quota increase by submitting a support ticket.
There's more…
As an alternative way of using the Alibaba Cloud console, you can use REST API calls through aliyuncli to create the ECS instances and your cluster. Follow these steps to do so:
- After you've configured your cluster options on your Alibaba Cloud console, click on Generate API request Parameters right under the Create button to generate POST request body content to be used with the aliyun CLI.
- Save the content in a file. In our case, this file is called cscreate.json.
- For an explanation of the additional parameters listed in this section, please refer to the Create a Kubernetes section at https://www.alibabacloud.com/help/doc-detail/87525.htm.
- Use the following command to create your cluster:
$ aliyun cs POST /clusters --header "Content-Type=application/json" \
--body "$(cat cscreate.json)"
The Alibaba Cloud Container Service provides two network plugin options for their Kubernetes clusters: Terway and Flannel.
Flannel is based on the community Flannel CNI plugin. Flannel is a very common and stable networking plugin that provides basic networking functionality. It is the recommended option for most use cases, except it does not support the Kubernetes NetworkPolicy. Terway is a network plugin developed by Alibaba Cloud CS. It is fully compatible with Flannel. Terway can define access policies between containers based on the Kubernetes NetworkPolicy. Terway also supports bandwidth limiting for containers.