
Understanding the best practices and optimizations for Veeam installation
The installation of Veeam Backup & Replication v10 is a straightforward process, and this section will go through the operation of the install as well as touch on best practices and optimizations for your environment. Setting up Veeam, if not done right, can lead to components not working correctly and poor performance, among other things. However, if you set up Veeam correctly, it will protect your data and environment with little configuration.
Installation of Veeam Backup & Replication v10
Before installing Veeam, we need to ensure that you have a server deployed, either Windows 2016 or 2019, with enough disk space for the installation. The disk layout should be similar to the following:
- OS drive: This is where your operating system resides and should be used only for this purpose.
- Application drive: This will be your application installation drive for Veeam and all its components.
- Catalog drive: Veeam uses a catalog that can generate around 10 GB of data per 100 VMs backed up with file indexes. If this were to be a significant storage requirement for your deployment, it may be advisable to allocate to a separate drive.
Once your server is ready, and you have downloaded the ISO file and mounted it, complete the following steps for installation:
- Run the
setup.exefile on the mounted ISO drive:
Figure 1.3 – Main installation screen
- Click either on the Install button under the Veeam Backup & Replication 10a section on the left or the Install link on the right side under Standalone components. At this point, you will see the License Agreement window, so you need to select the two checkboxes to place a checkmark and then click Next to continue.
- You will now need to provide a valid license file, be it a purchase or a trial. If you do not have it at this part of the installation, you can click Next to continue, and Veeam will operate in the Community (Free) Edition. When you obtain the license file, you can install that within the application:

Figure 1.4 – License dialogue window
- The next screen is where you choose which components you want to install and which directory. Veeam recommends that all of them are selected:
– Veeam Backup & Replication: The main application.
– Veeam Backup Catalog: Used when you turn on Guest OS Indexing within your jobs. This option takes all the Guest files and stores them in a catalog where you are then able to use advanced searching across all restore points and conduct 1-click file restores from the Enterprise Manager console.
– Veeam Backup & Replication Console: This is where you go to view, create, and edit jobs, and manage the environment.
- After clicking Next, the installer will then do a system check for any pre-requisites required, and if something is missing, you will be prompted and have the option to install the missing components:

Figure 1.5 – System Configuration Check – missing components
- Click the Install button to have the missing components installed.
- Once all the components have passed, you can click Next to move to the following screen. Unlike in previous versions of Veeam Backup & Replication, the next screen does not give you the option to input a user account to run the services. Instead, with version 10 of Veeam, you need to select the checkbox next to Let me specify different settings and then click Next.
- You will now have the opportunity to enter a user account for the Veeam services, better known as a Service Account. There are some recommended settings for this service account:
– You must have Local Administrator rights on the Veeam server.
– If you are using a separate SQL Server and not the Express edition that comes with the install, you require permissions to create the database.
– You will need full NTFS permissions to the folder containing the catalog.
For all the detailed permissions, please visit https://helpcenter.veeam.com/docs/backup/vsphere/required_permissions.html?ver=100:
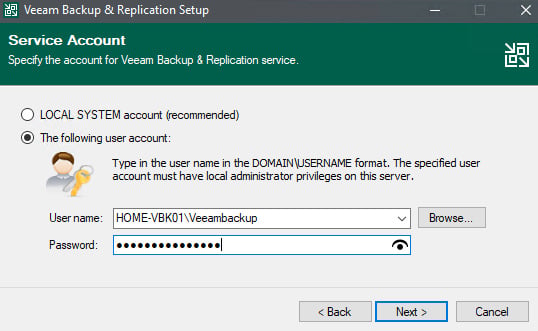
Figure 1.6 – User account for services
For this setup, I am using an account that I created on my lab server. In contrast, in a production scenario, you would already have a service account set up in Active Directory to enter at this step:
- The next screen lets you select the type of SQL install you will be using, and in a lab scenario, using SQL Express is good enough. If you are in an enterprise environment, the recommended best practice is to use an external SQL Server for best performance. Also, note that you can use Windows authentication or SQL Server authentication:

Figure 1.7 – SQL Server instance for Veeam
- After selecting the appropriate options, click Next once again.
- The next window is the TCP/IP port configuration. Should you want to use different ports, you can adjust them here, but the default ports should suffice. You then click Next to move to the Data Locations screen:

Figure 1.8 – Data Locations – directory selection
- Here, you indicate the application drive for the Instant recovery write cache, which mounts restore points during recovery and the dedicated drive for Catalog folder for guest OS indexing.
The installer is now ready to first complete installation of the local SQL Express instance and then the application. Veeam will also set your user account that you selected to initiate all the services:

Figure 1.9 –Ready to Install and check for updates
- After reviewing the setup, click Install to proceed with the installation and start setting up the components that work together with the backup server.
We will now proceed to configuring the required settings for Veeam to work with VMware:
- Repository Server: The server used to store the backup files.
- Proxy Servers: The servers that perform all the backup tasks.
- VMware vCenter Credentials: Used to connect and see your clusters, hosts, vApps, and Virtual Machines (VMs). vCenter Server is not required as standalone ESXi hosts are also supported if licensed in VMware:
- When you first launch the Veeam Backup & Replication console, you are taken directly to the Inventory tab, and Virtual Infrastructure will be highlighted:

Figure 1.10 – The initial console screen
- This screen is where we will begin adding the virtual center to enable the backup of your virtual machines. Click on the ADD SERVER option to start the process. You will then get prompted to select what kind of server to add. Choose VMware vSphere and then either vSphere or vCloud Director:

Figure 1.11 – vSphere or vCloud Director selection
You would typically select vSphere; however, if you have vCloud Director in your environment, you may also want to choose this option. When you choose vSphere, you will get prompted for two things to complete the connection:
– The DNS or IP address of your vCenter server.
– Credentials; these can either be a
vsphere.localuser or a domain account set up for access.Important note
You do have the option of selecting Microsoft Hyper-V and Nutanix AHV, but this book is focused mainly on VMware vSphere.
- Enter in the required credentials and then click Next, followed by Apply, to complete the VMware vSphere setup. You will now see your vCenter server listed under the Virtual Infrastructure section of the console and will be able to browse the hosts and virtual machines.
We now move on to the next piece required for the infrastructure, which is the proxy server. By default, the Veeam Backup & Replication server is to be your VMware Backup Proxy and File Backup Proxy. Due to the limitations of my lab, I am going to use this server as an example, but in the real world, you would add multiple proxy servers to your environment for better performance and according to best practice. Also, based on best practices, you would typically disable the Veeam Backup & Replication server from being a proxy server to allow the other proxy servers to handle the workload.
The next component you will require is a Repository Server, the location where Veeam Backup & Replication will store the backup files. By default, Veeam Backup & Replication creates a Default Backup Repository, typically on the most significant sized drive attached to your backup server. This location will be where the Configuration Backups usually get backed up. There are multiple options for adding a repository:
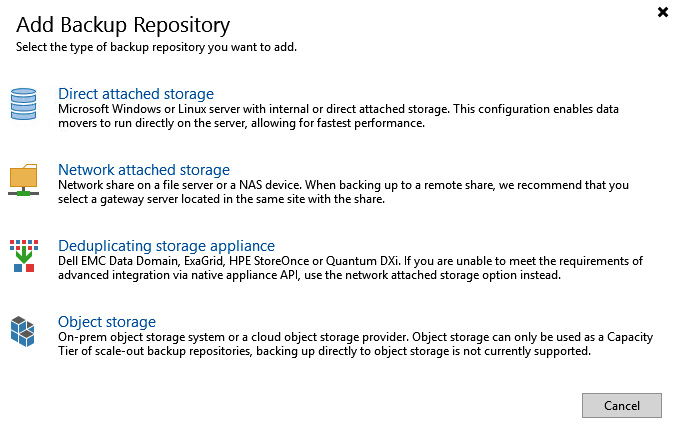
Figure 1.12 – Backup Repository selection
The first three selections would be for block storage, and the last one is object storage, which only works when creating a scale-out backup repository as the capacity tier for offloading data.
For further information on Veeam Backup & Replication best practices and the documentation, please visit the following websites:
- Veeam best practices website: https://bp.veeam.com/vbr/
- Veeam documentation website: https://helpcenter.veeam.com/docs/backup/vsphere/overview.html?ver=100
You have now completed the installation and basic configuration required for Veeam Backup & Replication. We will now look at how to optimize the proxy and repository servers in the next sections.