
Installing a role or feature
If you've got this far, you have a working Windows Server 2019 operating system. Great! Now what? Without adding roles and features to your server, it just makes for a great paperweight. We're going to take the next steps here together. Let's install a role and a feature into Windows so that we can start making this server work for us.
Getting ready
As long as you have Windows Server 2019 installed and running, you are ready to install roles and features onto that machine.
How to do it…
To install a role and a feature into Windows, perform the following steps:
- Open Server Manager. In the middle of the screen, you'll see a link that says Add roles and features. Click on that link:

Figure 1.17 – Server Manager showing the Add roles and features link
- Click Next on the first summary screen. You will come to a choice on the second page. For most roles and features, we want to leave it set at the top bullet, which is Role-based or feature-based installation. If we were configuring Remote Desktop Services, which we will discuss in Chapter 7, Remote Desktop Services then we would choose the second option:

Figure 1.18 – Selecting the installation type
- Now, we choose where we want to install a new role or feature. This is a neat page as we can choose from any server that we have added to our Server Manager, or we can even choose to install a role or feature into a virtual hard disk. I am running the Add Roles Wizard from DC01, but I want to install the IIS role onto WEB01. Rather than having to log into WEB01 to accomplish this task, I will do it right from here. In the following screenshot, you can see WEB01 listed as a server that I can install a role onto, even though I am opening this console on the DC01 server:

Figure 1.19 – Selecting a server
- Scroll down and choose the role that you want to install. For WEB01, I am choosing the Web Server (IIS) role. Then, click Next.
Tip
You can install more than one role or feature at a time. Some roles require additional components to be installed for them to work properly. For example, when I chose to install the IIS role and clicked Next, I was prompted to install some management tools. Simply click on the Add Features button to automatically add the items that it needs to operate correctly.
- Now, choose any features that you would like to install. For example, in order to do some network connectivity testing later, go ahead and select Telnet Client from the list.
- Read and click Next through the informational messages that are displayed. These messages will vary, depending on which roles and features you have installed.
- The final screen is your installation summary. If everything looks correct, go ahead and click on Install.
After your roles and features have finished installing, the server may or may not have to reboot. This depends on whether or not the role installation requires it. Following installation, or following the reboot, if your new role needs any additional configuration or setting up to be completed, you will be notified at the top of the Server Manager screen:
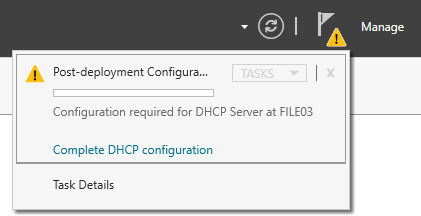
Figure 1.20 – The post-deployment configuration alert
As mentioned in the previous recipes, I'm going to show you how to do the exact same task via PowerShell. In this case, we're going to install IIS and the Telnet Client on the same web01 server, even though I am running this PowerShell from the DC01 server:
Install-WindowsFeature -Name Web-Server, Telnet-Client -ComputerName web01 -IncludeManagementTools
This command installs the IIS role and the Telnet Client onto the web01 server. If you wish to check if these roles are installed on a server, you could also run the following command:
Get-WindowsFeature -Name Web-*, Telnet-Client -ComputerName web01 | Where-Object Installed
As you can see, it's a lot less clicking, and you only need to memorize two very small, simple commands (Get-WindowsFeature and Install-WindowsFeature):
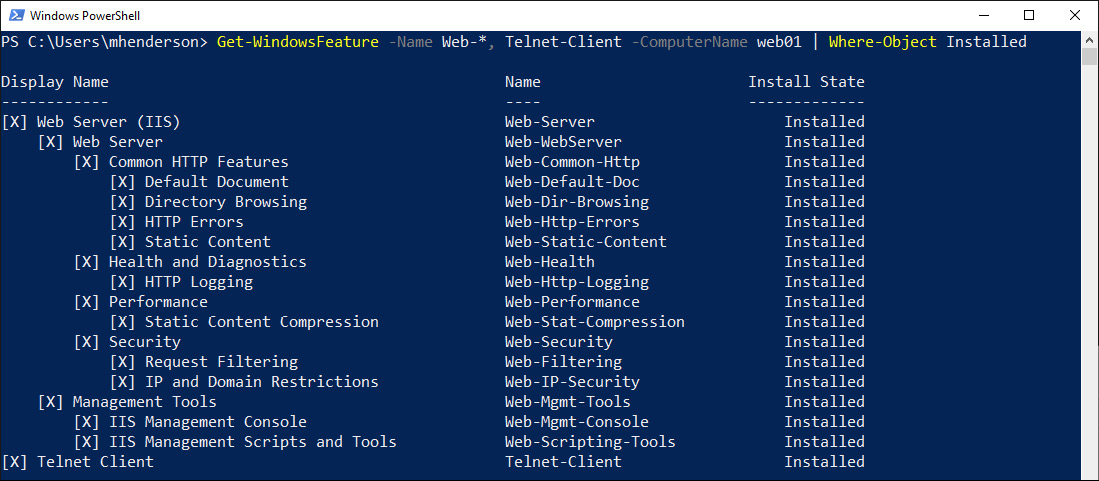
Figure 1.21 – Using Get-WindowsFeature in PowerShell
How it works…
Adding roles and features to a Windows Server is something that every administrator will have to do sooner or later. These items are necessary to turn on the functions in the server that will perform tasks that need to be performed in your environment. Adding roles is quite straightforward, whether you do it via the Server Manager or via PowerShell. However, it is interesting to see the options that are available to add more than one role or feature at a time. Moreover, the ability to remotely install these items for servers in your network that you are not logged into is incredibly useful.